I had finally carved out some time on Sunday afternoon (the Colts and Lions are out of the playoff picture). It was time to get back on finishing up the driver's side floor pan. There were some areas of the floor that weren't fitting as tightly to the frame rails, transmission crossmember and the front toe board as I would have liked. So I got out my box of self-drilling screws and installed them in the floor to draw the pan and the substructure closer together for a good weld.
Here you can see the screws in place and the nice tight fit at the plug weld sites.
One of the discoveries I made was that the new floor was not fitting as closely to the transmission tunnel as it should have. I had tack welded the floor to the transmission crossmember. So I used my 4" grinder to remove the welds and installed some screws to let me draw the floor pan tighter to the crossmember.
Here is the post-tack weld removal and the drill screws installed. Now I have the fit I wanted at the trans crossmember. The upshot though was that the gap grew at the floor pan to transmission tunnel joint.

Lot's of lessons learned here, the biggest is that I should have screwed this down during the initial fit-up process. Then when I trimmed the floor pan, I would have reduced the chances of dealing with the gaps I have. Oh well... Moving on....
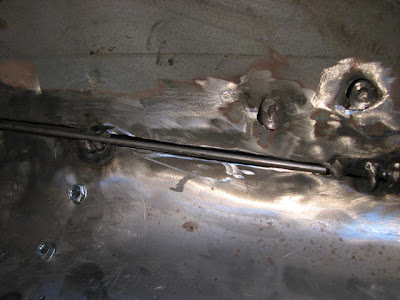
Now I was ready to start filling the gap with the "Glenn" method of round stock. I started putting the first piece in. I had to open up the gap some so that the wire would fit into the gap which worked out rather nicely.
Now it's on to getting this tacked in and start the welding process...or so I thought. I get everything set up to go. I open up the valve to my shielding gas and lo and behold, the gauge reads ZERO! I was sure I had some left after my last episode. The valve was in the "off" position too. Bugger. Thrifty Supply isn't open on Sunday so the planned project work came to an abrupt end.
So now it's Monday afternoon. I stop by Thrifty and get a new bottle of gas. I have about an hour and a half between getting home and leaving for another evening meeting. I get the gas connected and all is good in the welding world. Since it had been awhile since I worked on the car, I put a cone wire brush on my trusty DeWalt 2,500 RPM drill and cleaned up the metal around the remaining plug welds and along the floor-to-tunnel joint. Then the tacking began.
As I moved forward toward the firewall, the gap got wider. So I opened up the gap a little wider to be able to put another piece of smaller diameter wire next to the larger piece and tacked them both in.
Those of you who are intimately familiar with the welding process know the routine. Tack. Cool. Grind..... Tack. Cool. Grind.... And so on and so on. The progress is shown below...
I was making good progress, but ran out of time. The rear section looks much better and is ready for dressing the welds with my 2" air sander. I'm not going to spend a lot of time making the welds look "pretty" where the seat riser is going to go. The front section is getting there. I still have some places to fill in and probably have about another 45 minutes to an hour including the plug welds to finish and dress out. But at least there's progress. Now the question is, "When will I get another chunk of time to work on the fastback again?" Soon, I hope.


Good progress there Dennis. Yeah, sucking the sheet down against the frame members does a number on your panel alignment. Been there! :-)
ReplyDeleteNice work though. Hope to see you at it again soon.
Pretty good post. I just stumbled upon your blog and wanted to say that I have really enjoyed reading your blog posts. Any way I'll be subscribing to your feed and I hope you post again soon.
ReplyDeletewindow repairs wimbledon & Window Repairs Wimbledon