I had decided back during vacation day planning for 2012 that I would take my birthday off and put in a full, and hopefully, uninterrupted day on the fastback. That day was yesterday. It was a pretty full day of work. Uninterrupted? More on that later.
With the bottom of the car media blasted, it certainly made it easy to see where I needed to finish up the new floor on the driver's side. Because hanging sheet metal is not my "day job," the floor came out "OK" but not what I would consider Concours level. But a welder I worked with on a large refrigeration chiller prototype years ago at Trane Co. told me, "Welds don't have to be pretty. Just strong. I've seen pretty welds that snot would hold together better and welds that looked like snot that were unbreakable". I guess I can live with snotty, strong welds.
I wanted to get the rest of the pinholes filled and got that process going. Once again, the flood light shining on the inside of the floor illuminated them for me.

You can see the light shining through one of the spot weld drill holes I needed to plug. All the other pinhole welds are visible before grinding. I ground them down and then proceeded to install the emergency brake cable pivot mount.

After that, I plugged the spot weld drill hole....

With all the welds ground down to the point of not getting into the base metal too much, I called it "done" for right now. A skim coat of "Metal-to-Metal" filler will make it look seamless. But before I could begin that process, I needed to install the driver's side seat riser. That way, if there were any repairs or cleanup I needed to do on the bottom, I could fix those before adding the filler since filler + heat = mess.
I got out the driver's side seat riser. This was one of the first parts I bought along with the front floor pans and passenger seat riser from "The Paddock" if you remember that parts supplier. They were an hour's drive from my house which was nice since I didn't have to pay for shipping. They went belly-up in 2009 and the company went to auction in 2010. So that tells you how long these parts have been sitting around the garage waiting for installation. This is the underside of the new riser....

....and this is the underside of the old seat riser. Notice anything different? There's an extra support member that isn't included with the new part. Why it's missing is anyone's guess. It was probably a cost reduction item. But my gut tells me if it was there on the original, it should be there on the new part as well.
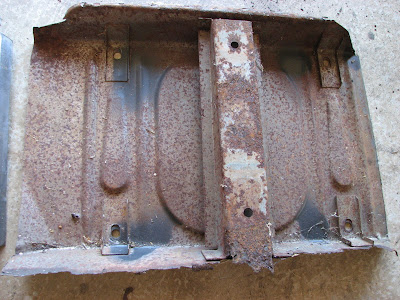
I went through this on the passenger seat riser and knew I would have to deal with it on this side. The only problem was the part of the brace that extended out underneath the front edge of the mounting flange was rusted away like the front of the riser flange was. I determined that it wasn't a big deal since the mounting points on the brace to riser were all in decent shape. I proceeded to drill out the spot welds and remove the brace.

I used my blasting cabinet with glass beads to clean it up. I cut off the offending rusty flange and test fit the piece into the new seat riser...

It fit with a little tweaking. But I also wanted to make sure the seat riser would be in the proper position before final welding. This was a hard lesson learned on the passenger side. Before cutting out the riser, I used a 48" long level and laid it across the top of the holes of the riser, noting where the point the level was located on the transmission tunnel and the top of the rocker panel. I measured the distance and marked it on each of the 4 holes so that I could get as close as possible to the original location with the new riser and marked the dimension at each hole.

It took quite a bit of bending, grinding, and manhandling to get it to fit properly. Such as it is with aftermarket parts and not original tooling parts. One big issue was the front flange didn't match the contour of the floor. Since I was going to have to modify the flange to match the contour, I also needed to know where the spot welds would go so I didn't end up with one in the middle of the transition bend. I went to my factory weld and sealant manual and saw where the welds were located...

I marked the bends for the change in floor contour and then placed the marks for where I would drill out the holes for the plug welds...
I bent the flange and began the trial-and-error process of trying to get this to fit. I also had to make sure I was as close as possible to the dimensions of the measurements from the old seat riser.

After much fussing and fitting I got this to fit as best I could. I was within a 1/16" to 1/8" on all my measurements from the old seat riser and figured the original factory parts probably weren't any closer. There weren't any dimensions for locating the seat riser in the factory manual. So it's always good to measure as close as possible the part position before removal.

With the fitting behind me, I proceeded to drill out all the holes on my drill press for the plug welds. There were a couple I had to do by hand since I couldn't get to them with the drill press. I ground down the drill burrs and got the inside of the brace primed and painted. There wasn't any paint on it from the factory obviously. I used Duplicolor etching primer followed by a top coat of black...
 I also did the inside of the seat riser where the brace would cover it...

I also primed and painted the floor where the seat riser would cover...


I did a final fit and tweak of the brace to the riser so that I didn't distort it when I welded the brace to the riser. I marked the plug weld holes on the seat riser and removed the paint so I'd have clean metal for welding.

After welding, I finished the painting of the brace and underside of the seat riser...

I didn't bother grinding down the plug welds on the brace. I mean, really! Who's gonna see it, right? I did a final fit of the seat riser assembly and it needed a little more tweaking. After a couple of fittings and modifying, I marked the plug welds on the floor and removed the paint at those locations. I did the same on all the flanges of the seat riser. I put the riser in position and used self-drilling screws to anchor it to the floor and snug up the flanges to the floor for plug welding. I did have to do some persuading with my body hammer to get the flanges tighter in places. One of the difficulties of doing these plug welds was that the thickness of the seat riser is greater than thickness of the floor. Even with a 5/16" hole, the weld arc at times wanted to arc to the side of the hole in the riser. I ended up putting the MIG gun at virtually point blank in the center of the hole and pulled the trigger. After 2 seconds I had a nice pool on the floor pan and pulled the gun away in a circular movement around the hole in the riser that got good penetration in both pieces of metal.
This is the finished product. The plug welds weren't pretty, but the penetration was good.

I did check the underside of the floor to verify the penetration was sufficient....
I was satisfied with the results. I then removed the screws and plugged the hole from the top side. Then came the fun part of grinding down all those plug welds. As is typical for me, I'll have to go back and do some welding touch up where I didn't get a complete weld at a few places around the edge of some of the plug welds. I'm sure they're strong enough, but it will give me peace of mind.
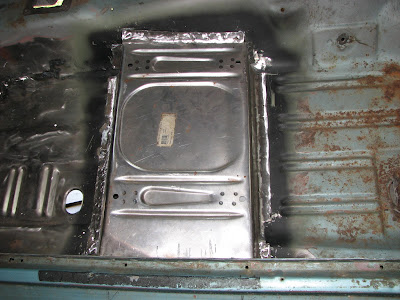
Here's a view of the floor from the rear of the car. I did notice from my measurements and this picture that the forward corner at the transmission tunnel of the passenger seat riser was about 1/4" lower than the driver's side. Bugger. When I installed it way back when, I had done a fit of the seat riser and then put the brace in and "assumed" it was OK. It wasn't. By the time I realized it, I already had a majority of the welds in place. I can compensate for it easily enough with a shim. I wasn't happy with myself for not doing the double-check, but hey, that's that and I'll deal with it later.
I didn't get a chance to finish up plugging the screw holes that are still visible from the bottom. I was interrupted by a phone call that one of my cousins had a massive heart attack and died. That was quite a shock to us all. He was a die-hard Blue Oval guy. He only owned one non-Ford vehicle and that was a 69 Firebird 400 coupe. He didn't keep it for long and sold it. He bought an old 80's LTD 2 door that he built and raced on circle tracks. He helped his sister on her '67 Mustang coupe by installing a "Grab-a-Track" suspension system that she runs in SCCA competition. So our family will miss him. Some way to celebrate a birthday. But as life often goes, you take the good with the bad.
With the bottom of the car media blasted, it certainly made it easy to see where I needed to finish up the new floor on the driver's side. Because hanging sheet metal is not my "day job," the floor came out "OK" but not what I would consider Concours level. But a welder I worked with on a large refrigeration chiller prototype years ago at Trane Co. told me, "Welds don't have to be pretty. Just strong. I've seen pretty welds that snot would hold together better and welds that looked like snot that were unbreakable". I guess I can live with snotty, strong welds.
I wanted to get the rest of the pinholes filled and got that process going. Once again, the flood light shining on the inside of the floor illuminated them for me.

You can see the light shining through one of the spot weld drill holes I needed to plug. All the other pinhole welds are visible before grinding. I ground them down and then proceeded to install the emergency brake cable pivot mount.

After that, I plugged the spot weld drill hole....

With all the welds ground down to the point of not getting into the base metal too much, I called it "done" for right now. A skim coat of "Metal-to-Metal" filler will make it look seamless. But before I could begin that process, I needed to install the driver's side seat riser. That way, if there were any repairs or cleanup I needed to do on the bottom, I could fix those before adding the filler since filler + heat = mess.
I got out the driver's side seat riser. This was one of the first parts I bought along with the front floor pans and passenger seat riser from "The Paddock" if you remember that parts supplier. They were an hour's drive from my house which was nice since I didn't have to pay for shipping. They went belly-up in 2009 and the company went to auction in 2010. So that tells you how long these parts have been sitting around the garage waiting for installation. This is the underside of the new riser....

....and this is the underside of the old seat riser. Notice anything different? There's an extra support member that isn't included with the new part. Why it's missing is anyone's guess. It was probably a cost reduction item. But my gut tells me if it was there on the original, it should be there on the new part as well.

I went through this on the passenger seat riser and knew I would have to deal with it on this side. The only problem was the part of the brace that extended out underneath the front edge of the mounting flange was rusted away like the front of the riser flange was. I determined that it wasn't a big deal since the mounting points on the brace to riser were all in decent shape. I proceeded to drill out the spot welds and remove the brace.

I used my blasting cabinet with glass beads to clean it up. I cut off the offending rusty flange and test fit the piece into the new seat riser...

It fit with a little tweaking. But I also wanted to make sure the seat riser would be in the proper position before final welding. This was a hard lesson learned on the passenger side. Before cutting out the riser, I used a 48" long level and laid it across the top of the holes of the riser, noting where the point the level was located on the transmission tunnel and the top of the rocker panel. I measured the distance and marked it on each of the 4 holes so that I could get as close as possible to the original location with the new riser and marked the dimension at each hole.

It took quite a bit of bending, grinding, and manhandling to get it to fit properly. Such as it is with aftermarket parts and not original tooling parts. One big issue was the front flange didn't match the contour of the floor. Since I was going to have to modify the flange to match the contour, I also needed to know where the spot welds would go so I didn't end up with one in the middle of the transition bend. I went to my factory weld and sealant manual and saw where the welds were located...

I marked the bends for the change in floor contour and then placed the marks for where I would drill out the holes for the plug welds...
 |
| The "scribbled" area was the location of the bends in the flange. |
I bent the flange and began the trial-and-error process of trying to get this to fit. I also had to make sure I was as close as possible to the dimensions of the measurements from the old seat riser.

After much fussing and fitting I got this to fit as best I could. I was within a 1/16" to 1/8" on all my measurements from the old seat riser and figured the original factory parts probably weren't any closer. There weren't any dimensions for locating the seat riser in the factory manual. So it's always good to measure as close as possible the part position before removal.

With the fitting behind me, I proceeded to drill out all the holes on my drill press for the plug welds. There were a couple I had to do by hand since I couldn't get to them with the drill press. I ground down the drill burrs and got the inside of the brace primed and painted. There wasn't any paint on it from the factory obviously. I used Duplicolor etching primer followed by a top coat of black...


I also primed and painted the floor where the seat riser would cover...


I did a final fit and tweak of the brace to the riser so that I didn't distort it when I welded the brace to the riser. I marked the plug weld holes on the seat riser and removed the paint so I'd have clean metal for welding.

After welding, I finished the painting of the brace and underside of the seat riser...

I didn't bother grinding down the plug welds on the brace. I mean, really! Who's gonna see it, right? I did a final fit of the seat riser assembly and it needed a little more tweaking. After a couple of fittings and modifying, I marked the plug welds on the floor and removed the paint at those locations. I did the same on all the flanges of the seat riser. I put the riser in position and used self-drilling screws to anchor it to the floor and snug up the flanges to the floor for plug welding. I did have to do some persuading with my body hammer to get the flanges tighter in places. One of the difficulties of doing these plug welds was that the thickness of the seat riser is greater than thickness of the floor. Even with a 5/16" hole, the weld arc at times wanted to arc to the side of the hole in the riser. I ended up putting the MIG gun at virtually point blank in the center of the hole and pulled the trigger. After 2 seconds I had a nice pool on the floor pan and pulled the gun away in a circular movement around the hole in the riser that got good penetration in both pieces of metal.
 |
| This is the front flange of the seat riser. |
 |
| This is the rear flange of the seat riser. |

I did check the underside of the floor to verify the penetration was sufficient....
 |
| Nice penetration with the heat ring and slight blistering in the center of the weld. |
 |
| Here's a "panoramic" view of the floor. All the welds had good penetration. :-) |
I was satisfied with the results. I then removed the screws and plugged the hole from the top side. Then came the fun part of grinding down all those plug welds. As is typical for me, I'll have to go back and do some welding touch up where I didn't get a complete weld at a few places around the edge of some of the plug welds. I'm sure they're strong enough, but it will give me peace of mind.
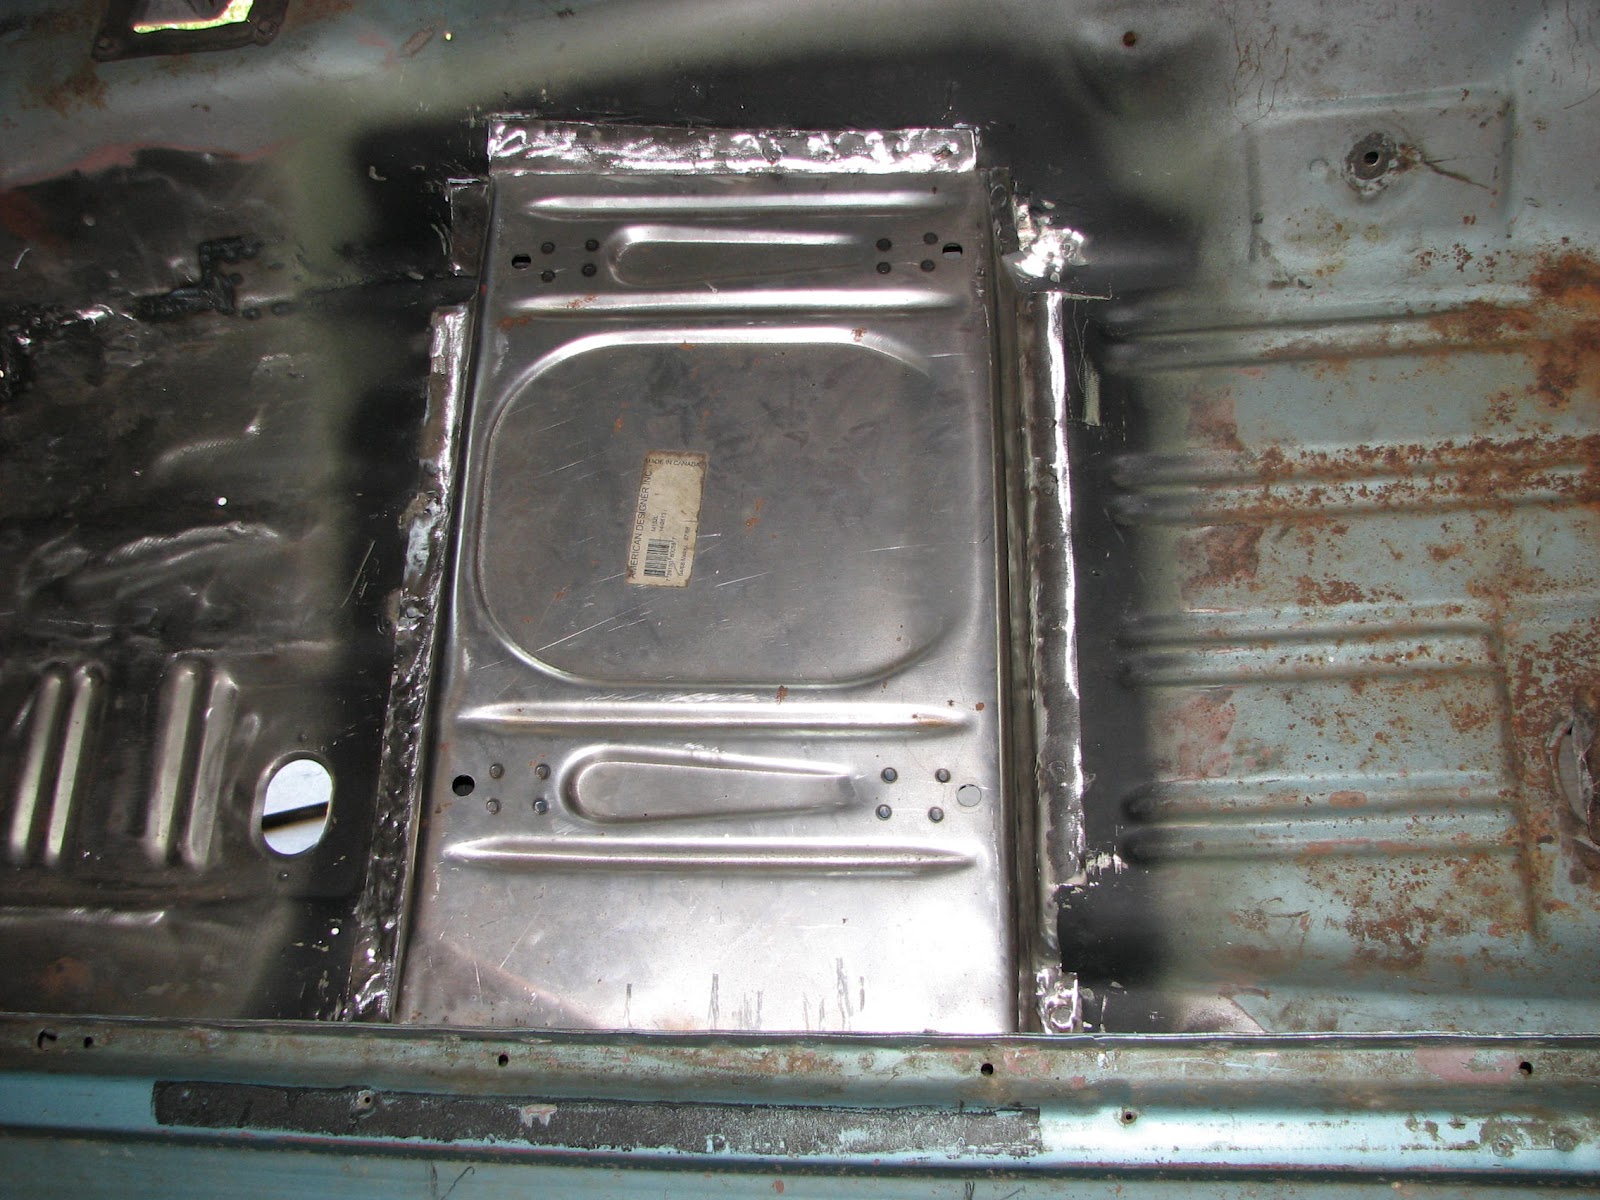
Here's a view of the floor from the rear of the car. I did notice from my measurements and this picture that the forward corner at the transmission tunnel of the passenger seat riser was about 1/4" lower than the driver's side. Bugger. When I installed it way back when, I had done a fit of the seat riser and then put the brace in and "assumed" it was OK. It wasn't. By the time I realized it, I already had a majority of the welds in place. I can compensate for it easily enough with a shim. I wasn't happy with myself for not doing the double-check, but hey, that's that and I'll deal with it later.
 |
| Left side freshly done. Right side...5 years old! |
I didn't get a chance to finish up plugging the screw holes that are still visible from the bottom. I was interrupted by a phone call that one of my cousins had a massive heart attack and died. That was quite a shock to us all. He was a die-hard Blue Oval guy. He only owned one non-Ford vehicle and that was a 69 Firebird 400 coupe. He didn't keep it for long and sold it. He bought an old 80's LTD 2 door that he built and raced on circle tracks. He helped his sister on her '67 Mustang coupe by installing a "Grab-a-Track" suspension system that she runs in SCCA competition. So our family will miss him. Some way to celebrate a birthday. But as life often goes, you take the good with the bad.


