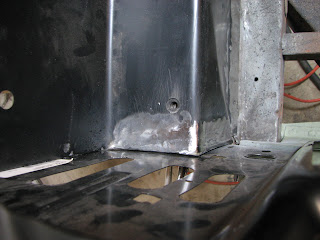
Today was a nice break from what was a challenging week on many levels. I don't know if it's a good idea to work on the car and get frustrated when you're looking for a diversion from life's frustrations. That's what reworking the right front splash apron involved this afternoon.
After fitting and installing the splash apron last weekend, I discovered that the front of the apron was not properly formed. The flange that connects it to the front radiator support was not flush but at about a 5 to 7 degree angle. Not good. So the fix was to make a cut to move the flange flush with the radiator support.
Then I had to pull the flange away until it was parallel and hence flush to the radiator support.
Next came fabricating a "pie" piece to fill in the gap.
After cleaning the EDP coating from the splash apron and getting the filler piece ground to fit, the spot welding began. But the problem was that even on the lowest heat setting and the thin width of the pie piece, I was "blowing through" and burning small holes in the filler piece especially at the "point", at the corner, and the joint between the pie piece and the vertical filler piece. Got that???
So I used this little home-made welding tool...
It a backup tool made from a piece of 3/4" copper tubing. I hammered the end flat and then put a bend in to to allow access behind the part. You might be wondering what this can possibly do to help in welding. That's the cool part. Molten metal won't stick to the copper. And it acts as a heat sync to pull the heat away from the weld so that it doesn't get too hot. Putting this behind the filler piece let me fill in the holes.
This work was VERY tedious work. I put about 4 to 6 spot welds in and then air cooled the welds with compressed air. Next, I ground down the welds flush to the part. Then I used a hammer and dolly to straighten the part from the minor warping from the heat. I repeated this process until there were no more visible seams between the filler piece and the splash apron, which is why it took so long.
After doing the "pie" piece, I moved on to the vertical piece using the same the process. When I was all done, it looked like this.....
But how would the radiator support fit? Here's what it looked like after fitting it in place...
It clamped up perfectly! I know this took about 3 hours from start to finish with all the patching and welding and grinding, and filling in holes, and grinding again, but the radiator support will be straight with no funky bend in it to force it into place. So the radiator support can now be installed...and that will be the next step. Be sure to come back and visit to see this step which will hopefully happen in next week.


No comments:
Post a Comment