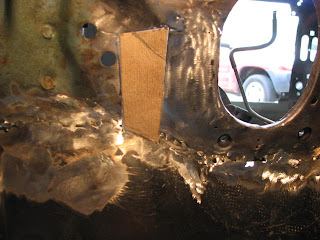
If you remember the last exciting episode, I got the firewall extension panel positioned and most of it welded in. But then I discovered that there was a sizable gap between the steering column patch I made and the extension panel. It was too big to try and fill with weld and too small to try and make a patch. So I ended up cutting out a piece so I could weld in rectangle shaped piece to fill that gap.
 | |
| Small filler piece added to the lower right side of the hole yet to be filled. |
Note the pencil line on the upper right. This was the first bend. The second bend was at the bottom where the firewall goes from vertical to the angle of the floor extension. The filler patch looked like this...
...and then I checked for fit which entailed using my 2" diameter 24 grit 90 degree air sander to shave the patch to fit...
I started the stitch welding process. I used my pick body hammer to align the edges as I alternated across the piece to keep the heat and distortion down along with a shot of compressed air to help keep the metal cool. All was going well until I got to the upper right corner. The gap along with the integrity of the old firewall metal worked against me and I ended up blowing a hole through it. Grrrrrrrr! I resorted to my home-made copper backup tool clamped on the engine compartment side and attempted to fill the hole / gap. However, the copper backup didn't exactly fit the firewall contour and I made things worse, if that is possible. So, I took a look from the engine compartment side and determined it might be better to try and fill it from that side. After about 20 minutes of add more filler weld, air cool, grind the welds down...add more filler weld, air cool, grind the welds down, I was starting to make progress.
Finally, I got almost all the gap filled. I ran short of the 2" sanding disc and decided to call it quits after almost 2 hours working on this one little troublesome patch. I have maybe 30 minutes of "finish" welding left to do...going back and filling some small joints and pinholes around the patches and floor extension.
I don't want to remove all of the weld buildup to maintain strength. So I'm going to take a page out of SW Pruett's play book and use some filler on the firewall and extension panel. I'm going to use the Everlast "Metal-to-Metal" filler since it will be in an area that is prone to moisture. But that will come after I get the fastback on the rotisserie. I know, I know. Some of you are saying to yourselves, "Why put all the body work into a part of the car that no one will see? I guess the answer is, "Because I know it's there." And people wonder why my lovely wife at times calls me "Adrian Monk". Yeah...slightly anal.
Next step after dressing the welds on this section is to move on to getting the front floor installed with the new seat riser. Hopefully, it won't take another 3 week hiatus to get more work done. But remember...."Life Happens."


Don't knock yourself too badly Dennis, that's a tough spot to work in and those compound curves complicate the patches. You're doing good, keep at it!
ReplyDeleteThanks for the encouragement. It is one bugger of a position to weld in. I can't wait to get it on the rotisserie so I can really get to some of these places more easily and make my baby nice.
ReplyDeleteKeep digging Dennis! Eat that elephant one bite at a time. And you are going to LOVE working on the car in a rotisserie. All the best!
ReplyDelete