The work on the car came about from a different kind of motivation--frustration. My Alma Mater, University of Louisville was 9-0 and ranked 9th in the BCS. Well, the defense decided to take a vacation and let Syracuse route them. I couldn't stand to watch the carnage and went to the garage halfway through the 3 quarter to work off my frustration. The quandary was what part of the car to work on. I still have some weld joints that need to be "touched up" but needed to do more than that.
I noticed I had the right side trunk drop off panel laying on the back half of the rotisserie. That would be the next project to attack. I rolled the car to 90 degrees on the rotisserie and locked it down. Then I needed to evaluate how much of the old drop off to remove. One of the complications was the ribbing stamped in the panel. I already dealt with that on the right firewall toe board ribbing and I didn't want to repeat that by trying to match up and weld a seam across the ribs. My concern was whether I would have enough access to cut out the old panel and weld in the new one. I did some experimenting with the 3" air cut off tool and had the clearance. The MIG gun would fit also. Now it was time to cut that piece out.
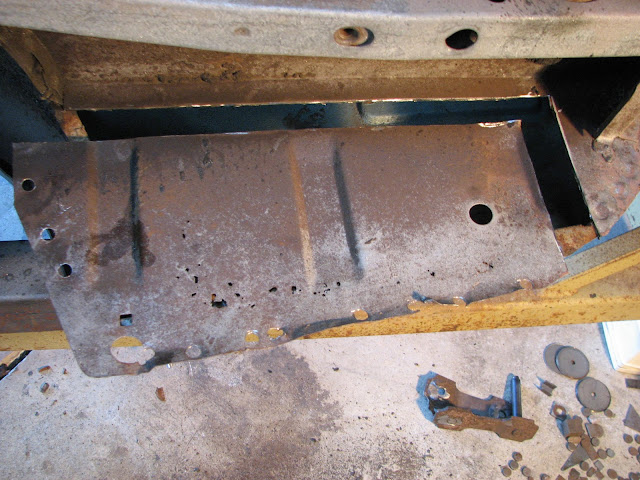
The part in question was in pretty good condition on the top half. The bottom part was where the rust pinholes were. Since this had already been media blasted it was pretty clean.

I measured out and drew the cut lines to remove the panel. Then I got out my Blair 3/8" spot weld drill and began the process of separating the drop off from the lower rear quarter panel.

The next step was to use the 3" wheel to cut the panel along the cut line. I did have to remove the rear spring shackle that was in the way. I had clear access after getting that removed with my 4" electric 90 degree grinder with a 1/8" pipe cutting wheel. You can see the remnant of the shackle on the floor. After cutting along the paint line, I was able to remove the old panel and not have to match up any stamped ribs...
When a panel is removed, you never know what you'll find behind it. Fortunately, there was no serious rust other than on the surface. The inside of the right rear quarter panel looks pretty good, all things considered...

With the original panel removed, it would become the template for the new panel...

I nested the original part stamped ribs into the new part. There was enough metal for the new panel...

However, as I have gotten used to the repro part not fitting or exactly reproducing the the part, like the punched holes that were either not included or misplaced such as the front lower corner....

...or on the bottom right side of the panel...

I included the punched holes in the marking of the new part when I outlined the original piece onto the new part.

What I had was two holes that were not punched, a square hole that wasn't punched, and a hole that was punched that I didn't need and wouldn't work because it would be in the flange that mounts the drop off to the lower rear quarter panel. Nice. So now I had to make a patch to fill in this unwanted hole...or would I?
When I was in my previous life as an engineer, I had the need to fill a boat load of holes in my Model A frame and firewall. Because the plant I worked in had a major stamping operation, I was able to get a bunch of scrap slugs from the NC punch presses. I hung on to this box of slugs figuring you never know when they may come in handy. Now was the time to dig them out and find out if I could find one that would work, or come close.
Here are some of the slugs I had...

Lo and behold, I found one that would fit fairly well...

Not so bad, eh? Now I have my filler material.

With the hole problem solution taken care of, it was time to start to cutting and trimming the new piece to fit where the old one came out. I used some rectangular tubing and C clamps to hold the part to my workmate so I could trim off the excess metal...

I left a 1/4" plus of extra material to be sure that I could continue the trimming process to get the new part to fit as closely as I could.

Using my 90 degree angle grinder with a 36 grit flap disc, I carefully removed excess material until I got a really tight fit...

I cleaned the side of the new panel that would be inside the trunk with lacquer thinner. I sprayed it first with etching primer and then followed up with black rust-oleum. I cleaned up the flanges on the quarter panel with the 2" air sander and sprayed them with 2 coats of Eastwood rust converter.
At this point, I needed to stop since my family was celebrating my wife's birthday Saturday evening and I needed to get my chef hat on and hang up my welding cap. I hope to get this on the car sometime in the next week, but I'll need to drill out the holds for the flange plug welds. I'll also need to fill the offending unwanted hole and drill out the new hole. The one that's mislocated is not that far off. So I'll leave that one alone as it's not worth the effort.
Hopefully, by the next update, this part of the body restoration will be behind me. Then it's on to the next rusty section. One of these days, there will be no more. But I'm not holding my breath.
I noticed I had the right side trunk drop off panel laying on the back half of the rotisserie. That would be the next project to attack. I rolled the car to 90 degrees on the rotisserie and locked it down. Then I needed to evaluate how much of the old drop off to remove. One of the complications was the ribbing stamped in the panel. I already dealt with that on the right firewall toe board ribbing and I didn't want to repeat that by trying to match up and weld a seam across the ribs. My concern was whether I would have enough access to cut out the old panel and weld in the new one. I did some experimenting with the 3" air cut off tool and had the clearance. The MIG gun would fit also. Now it was time to cut that piece out.
The part in question was in pretty good condition on the top half. The bottom part was where the rust pinholes were. Since this had already been media blasted it was pretty clean.

I measured out and drew the cut lines to remove the panel. Then I got out my Blair 3/8" spot weld drill and began the process of separating the drop off from the lower rear quarter panel.

The next step was to use the 3" wheel to cut the panel along the cut line. I did have to remove the rear spring shackle that was in the way. I had clear access after getting that removed with my 4" electric 90 degree grinder with a 1/8" pipe cutting wheel. You can see the remnant of the shackle on the floor. After cutting along the paint line, I was able to remove the old panel and not have to match up any stamped ribs...

When a panel is removed, you never know what you'll find behind it. Fortunately, there was no serious rust other than on the surface. The inside of the right rear quarter panel looks pretty good, all things considered...

With the original panel removed, it would become the template for the new panel...

I nested the original part stamped ribs into the new part. There was enough metal for the new panel...

However, as I have gotten used to the repro part not fitting or exactly reproducing the the part, like the punched holes that were either not included or misplaced such as the front lower corner....

...or on the bottom right side of the panel...

I included the punched holes in the marking of the new part when I outlined the original piece onto the new part.

What I had was two holes that were not punched, a square hole that wasn't punched, and a hole that was punched that I didn't need and wouldn't work because it would be in the flange that mounts the drop off to the lower rear quarter panel. Nice. So now I had to make a patch to fill in this unwanted hole...or would I?
When I was in my previous life as an engineer, I had the need to fill a boat load of holes in my Model A frame and firewall. Because the plant I worked in had a major stamping operation, I was able to get a bunch of scrap slugs from the NC punch presses. I hung on to this box of slugs figuring you never know when they may come in handy. Now was the time to dig them out and find out if I could find one that would work, or come close.
Here are some of the slugs I had...

Lo and behold, I found one that would fit fairly well...

Not so bad, eh? Now I have my filler material.

With the hole problem solution taken care of, it was time to start to cutting and trimming the new piece to fit where the old one came out. I used some rectangular tubing and C clamps to hold the part to my workmate so I could trim off the excess metal...

I left a 1/4" plus of extra material to be sure that I could continue the trimming process to get the new part to fit as closely as I could.

Using my 90 degree angle grinder with a 36 grit flap disc, I carefully removed excess material until I got a really tight fit...

I cleaned the side of the new panel that would be inside the trunk with lacquer thinner. I sprayed it first with etching primer and then followed up with black rust-oleum. I cleaned up the flanges on the quarter panel with the 2" air sander and sprayed them with 2 coats of Eastwood rust converter.
At this point, I needed to stop since my family was celebrating my wife's birthday Saturday evening and I needed to get my chef hat on and hang up my welding cap. I hope to get this on the car sometime in the next week, but I'll need to drill out the holds for the flange plug welds. I'll also need to fill the offending unwanted hole and drill out the new hole. The one that's mislocated is not that far off. So I'll leave that one alone as it's not worth the effort.
Hopefully, by the next update, this part of the body restoration will be behind me. Then it's on to the next rusty section. One of these days, there will be no more. But I'm not holding my breath.