As I have been looking at some of the blogs of my fellow Mustang brethren, I looked at the date of my last entry--August 27th of 2013. I'm not going to go into counting the days, or the weeks, maybe the months. Needless to say, my beloved fastback has been left unattended after finally finishing the extensive work on the right rear quarter panel. Was it burnout? Was it conflicting schedules? Was it life? The answer is...all of the above.
Not to get into a blow-by-blow account of the last 4 months, and 2 weeks--almost to the day--(Oops! I did count the days!) let's just day that life has presented "opportunities." For example...
Labor Day weekend was intended to be spent on a simple deck repair. Instead, it turned into basically a major deck rebuild. Removing 2 seats and replacing 8 deck boards led to more deck boards needing to be replaced...and then more...and then more. After 3 trips to Menards, the entire deck surface had been replaced, not to mention the surround. Oh...I forgot. The overhead pergola was taken down, boards replaces, and repainted.
Granted, the deck is 10 years old and needed some help. But when originally built by yours truly, I used deck screws. After that period of time, half the screws came out OK. The other half either sheared off or the heads stripped. That meant prying the boards off around the screws and using a vice grip to remove the screws. I'm not even going to do the math on how many of those came out that way. But you see how this simple project turned into a monster in both time and labor.
So that took up most of September. The last long weekend was used to travel to Council Bluffs, Iowa to visit my daughter, son-in-law, and grandson. And yes...we flew out in the club Cessna 172 SP....

Then came October with my annual fall trip to visit my mom in Michigan and do my usual chores of winterizing the boat, and doing house repairs. My wife had a conference in Branson, Missouri. She could have driven the 9 hours each way, but since she has a personal pilot at her disposal, and the trip could be underwritten by her school, I flew her there...7 hours, round trip in the club Cessna 182S.
What a way to travel. I holed up in the hotel to catch up on work and we never saw downtown Branson. The next weekend, we made a trip to Michigan to close the family cabin for the winter and that brought us to November.
I don't know what happened to November. So I'll leave it like that, except I did go deer hunting for the first time in my life. On the first day of gun season after 2 hours in the deer stand, I got my first deer in one shot. I dropped it in its tracks. So now I have a freezer with about 70+ pounds of venison.
December came and we all know what happens then. All the planning and executing of activities for Christmas. The day after Christmas, we flew up to Michigan on a day trip to visit my mom, sister, and her husband. It was an easy hour and 20 minute flight each way. Otherwise, it's an 8 hour drive round trip. Family arrived for our annual Christmas on the 28th. Everyone left on the 31st. I had plans on working on the Mustang, but then the weather went ballistic.
13" of snow drifting to 2 feet in the drive and temperatures in the minus teens made life interesting for a few days. Everything in central Indiana shut down for 3 days. Then this past Thursday, the temperature moderated and the snow melt started just in time for me to develop bronchitis and a sinus infection. A trip to the doctor yielded some super antibiotics to help knock it out.
That brings me to today, Saturday, January 11, 2014. (And you're saying to yourself, "Finally!")
The first order of business was to reclaim the garage. It was full of post-deck materials, post-Michigan trips tools, and post-Christmas boxes and decorations. Somewhere, there was a fastback in there...

But in my defense, it wasn't like she was totally out of mind. I did make a trip to the PPG distributor this fall and purchased a gallon of DP74 and 2 quarts of epoxy. Thankfully my lovely wife didn't flinch at the $$$ spent on paint since it wasn't cheap. Then I bought a gallon of Zero-Rust since so many of you have used it with much success. I'm going to use it on the interior of the body and fenders.
On Cyber Monday, I copped a complete gas tank kit from CJ Pony parts with everything needed to install it including sending unit, gaskets, screws, etc. for $99 with free shipping. But then the next day, I used my "RPM points" and another discount to purchase the fuel lines, brake lines, and all the mounting hardware.


I used these purchases as motivation to get back working on this beast. The goal for the next step was to repair the rust in the trunk lid. I got out my Eastwood body stand and surveyed the lay of the land. Here's the underside of the trunk lid that has what appears to have the majority of the rust...

The top right rear corner had some perforations that appeared to be repairable.

The opposite side has more rust that would prove more challenging to repair, particularly with the folded over lip of the outer skin.
I removed the trim in preparation for stripping the surface. However, after making a pass with the braided straight wire brush, the rust perforation was much worse than originally thought. The rust basically ran all the way to the center of the trunk lid.

And if that wasn't enough, the outside rear face had rust perforations in a third of the surface.

So at this point, I concluded that the trunk lid is not worth the effort to repair. I'll save it and use the outer surface for any other metal patch material I may need since it's similar thickness and metallurgy to the rest of the car. This was an unexpected hurdle. But this whole restoration process, as many of you know, is full of the unexpected. I'll keep my eye's peeled for a nice used trunk lid or spring for a Dynacorn unit if I can catch a sale.
With the trunk lid scratched off my list, the next step was to start on the front fenders. I grabbed the right front fender off the storage shelf and started evaluating this part hoping for a better outcome than the trunk lid. The fender is from a '68 convertible that I bought hood hinges off of on eBay. When I went to pick up the hinges, the owner said, "Oh, my the way, do you need any other parts?" To make a long story short, I left with the front doghouse, minus the hood, for $90! The fenders included everything...the headlight bezels, lights, side marker lights, trim, etc. So that was the deal of the century in my book.
Initially, it didn't look too bad.


The preliminary prognosis is that the fender is fairly solid. But I'll wait for final stripping to make that determination. I proceeded to remove the molding and trim pieces. Then I started on the inside of the fender with my bristle cone brush on a 9" grinder. It took the rust off, but the undercoating was not budging and is going to be tough to remove. I've decided that on the next dry day, I'll take it outside and use my media blaster to remove the goo on the inside.
I switched to the stripper pad on a 4-1/2" grinder that I used on the right rear quarter panel and doors and focused on the outside painted surface. It does a nice job, but is time consuming. After what seemed like a couple of hours...well...actually, it was, the entire outside of the fender was stripped to bare metal.


It looks pretty good. I did find a small 1/8" pin hole in the bottom of the fender. Unfortunately the inner fender support is behind it. So I'll have to cut that out and put a patch in it. I also found some bondo in the front of the fender.

I'm going to remove it eventually and do some more metal work to fix it along with a half-dozen other dimples and dents. The one thing I noticed as I was removing the outer surface of paint around the bondo was something interesting. Take a look and see if you can find it.

The bondo was applied OVER the original paint! Unbelievable. But I've seen worse...like bondo smeared over rust holes. I'll deal with that later.
It was too tempting not to put the fender on the body to sneak a peek of how it looks, not to mention I wanted to put my wife's Fusion in the garage so that I won't have to clean the frost off it tomorrow morning. I will say, it's another small step in the right direction and looks pretty good.


If tomorrow's weather lives up to the forecast, I may be able to media blast the inside of this fender and may go ahead and do the left side fender as well. Then I'll move on to stripping the left side fender. I may go to the storage unit and retrieve the doors and hang them to check how everything will line up. I'll then start on whatever rust repairs I need to make and begin the dent removal process.
Until the next episode...and hopefully it won't take 4 + months either.
Not to get into a blow-by-blow account of the last 4 months, and 2 weeks--almost to the day--(Oops! I did count the days!) let's just day that life has presented "opportunities." For example...
Labor Day weekend was intended to be spent on a simple deck repair. Instead, it turned into basically a major deck rebuild. Removing 2 seats and replacing 8 deck boards led to more deck boards needing to be replaced...and then more...and then more. After 3 trips to Menards, the entire deck surface had been replaced, not to mention the surround. Oh...I forgot. The overhead pergola was taken down, boards replaces, and repainted.
 |
| It started out so simply. Replace 8 boards...but then.... |
 |
| The pergola was in rough shape and needed paint and board replacement...but.... |
 |
| The more old, cracked, warped deck boards were replaced, the more it was apparent others needed replacement as well....but.... |
 |
| One board led to another until the entire surface was replaced. |
 |
| The pile of lumber grew to a pile taking on its own life. |
 |
| Finally, the project was completed...3 weeks after it started. |
So that took up most of September. The last long weekend was used to travel to Council Bluffs, Iowa to visit my daughter, son-in-law, and grandson. And yes...we flew out in the club Cessna 172 SP....
Then came October with my annual fall trip to visit my mom in Michigan and do my usual chores of winterizing the boat, and doing house repairs. My wife had a conference in Branson, Missouri. She could have driven the 9 hours each way, but since she has a personal pilot at her disposal, and the trip could be underwritten by her school, I flew her there...7 hours, round trip in the club Cessna 182S.
 |
| The Mighty Mississippi about 50 miles south of St. Louis. |
What a way to travel. I holed up in the hotel to catch up on work and we never saw downtown Branson. The next weekend, we made a trip to Michigan to close the family cabin for the winter and that brought us to November.
I don't know what happened to November. So I'll leave it like that, except I did go deer hunting for the first time in my life. On the first day of gun season after 2 hours in the deer stand, I got my first deer in one shot. I dropped it in its tracks. So now I have a freezer with about 70+ pounds of venison.
December came and we all know what happens then. All the planning and executing of activities for Christmas. The day after Christmas, we flew up to Michigan on a day trip to visit my mom, sister, and her husband. It was an easy hour and 20 minute flight each way. Otherwise, it's an 8 hour drive round trip. Family arrived for our annual Christmas on the 28th. Everyone left on the 31st. I had plans on working on the Mustang, but then the weather went ballistic.
13" of snow drifting to 2 feet in the drive and temperatures in the minus teens made life interesting for a few days. Everything in central Indiana shut down for 3 days. Then this past Thursday, the temperature moderated and the snow melt started just in time for me to develop bronchitis and a sinus infection. A trip to the doctor yielded some super antibiotics to help knock it out.
That brings me to today, Saturday, January 11, 2014. (And you're saying to yourself, "Finally!")
The first order of business was to reclaim the garage. It was full of post-deck materials, post-Michigan trips tools, and post-Christmas boxes and decorations. Somewhere, there was a fastback in there...
But in my defense, it wasn't like she was totally out of mind. I did make a trip to the PPG distributor this fall and purchased a gallon of DP74 and 2 quarts of epoxy. Thankfully my lovely wife didn't flinch at the $$$ spent on paint since it wasn't cheap. Then I bought a gallon of Zero-Rust since so many of you have used it with much success. I'm going to use it on the interior of the body and fenders.
 |
| This is what $450 worth of paint looks like. |
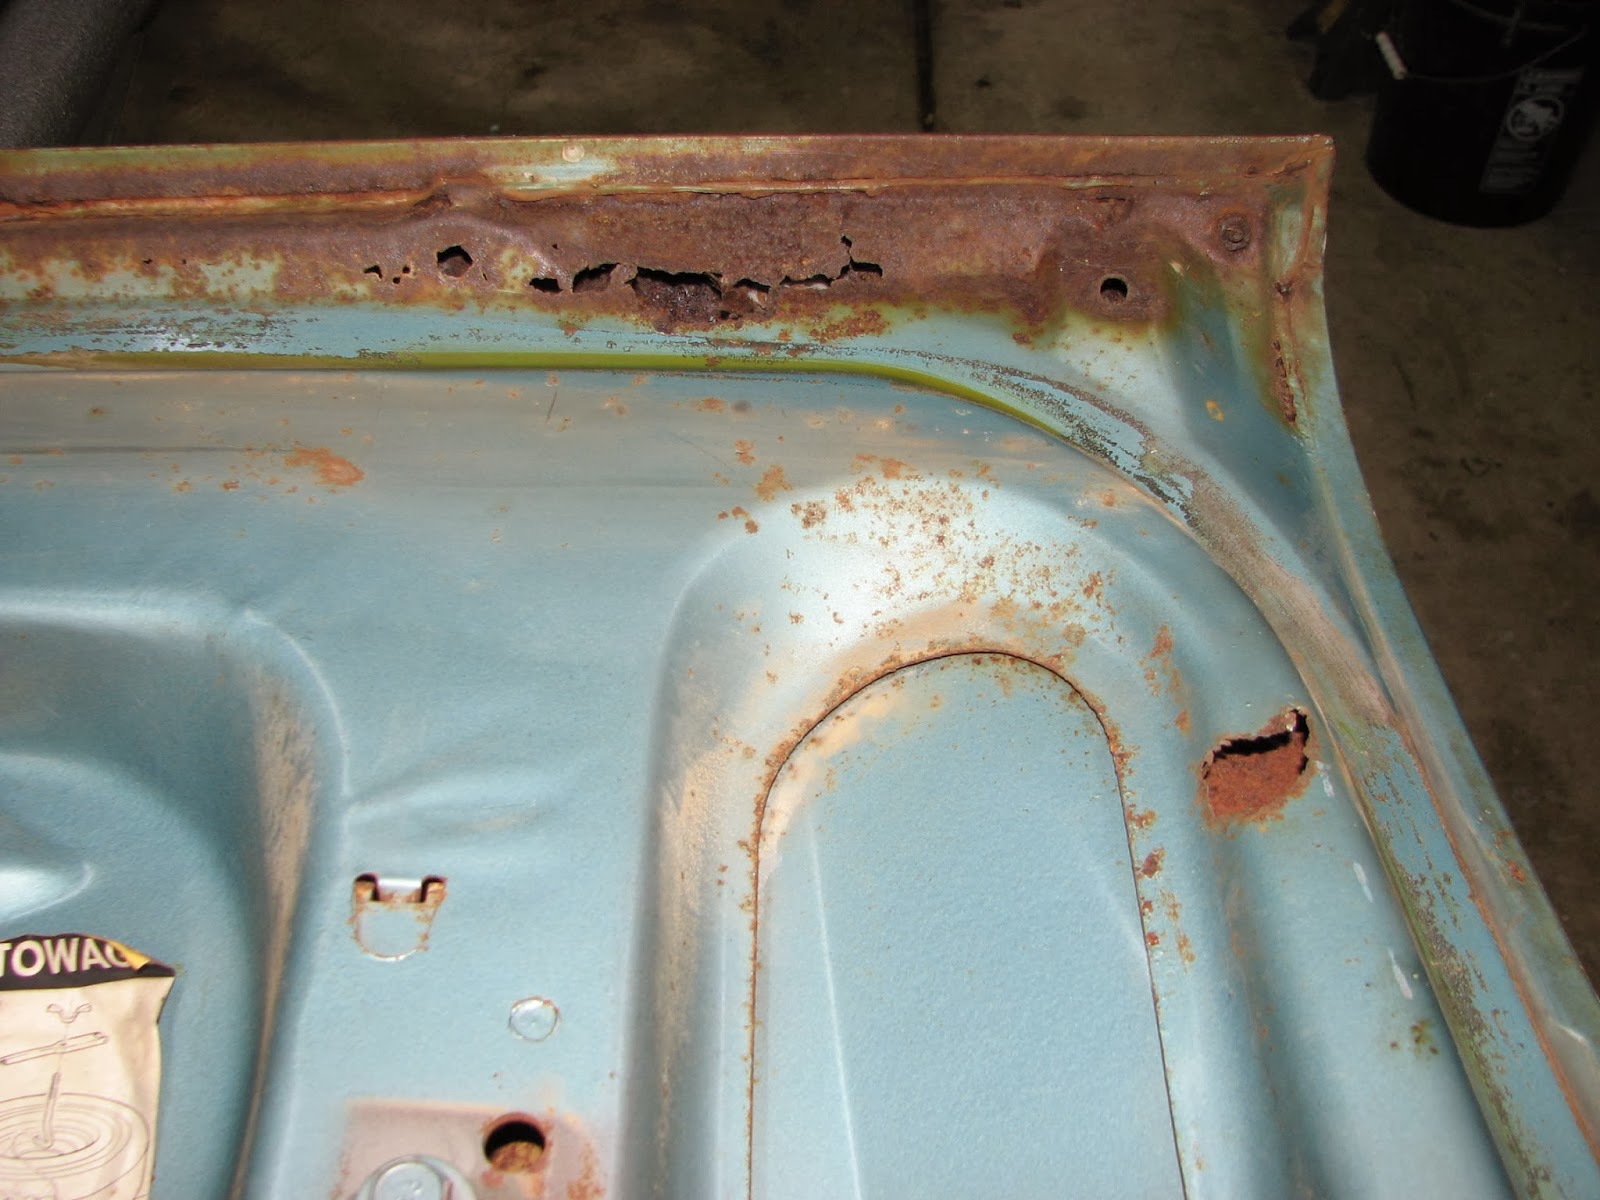
I used these purchases as motivation to get back working on this beast. The goal for the next step was to repair the rust in the trunk lid. I got out my Eastwood body stand and surveyed the lay of the land. Here's the underside of the trunk lid that has what appears to have the majority of the rust...
The top right rear corner had some perforations that appeared to be repairable.
The opposite side has more rust that would prove more challenging to repair, particularly with the folded over lip of the outer skin.
I removed the trim in preparation for stripping the surface. However, after making a pass with the braided straight wire brush, the rust perforation was much worse than originally thought. The rust basically ran all the way to the center of the trunk lid.
And if that wasn't enough, the outside rear face had rust perforations in a third of the surface.
So at this point, I concluded that the trunk lid is not worth the effort to repair. I'll save it and use the outer surface for any other metal patch material I may need since it's similar thickness and metallurgy to the rest of the car. This was an unexpected hurdle. But this whole restoration process, as many of you know, is full of the unexpected. I'll keep my eye's peeled for a nice used trunk lid or spring for a Dynacorn unit if I can catch a sale.
With the trunk lid scratched off my list, the next step was to start on the front fenders. I grabbed the right front fender off the storage shelf and started evaluating this part hoping for a better outcome than the trunk lid. The fender is from a '68 convertible that I bought hood hinges off of on eBay. When I went to pick up the hinges, the owner said, "Oh, my the way, do you need any other parts?" To make a long story short, I left with the front doghouse, minus the hood, for $90! The fenders included everything...the headlight bezels, lights, side marker lights, trim, etc. So that was the deal of the century in my book.
Initially, it didn't look too bad.
The preliminary prognosis is that the fender is fairly solid. But I'll wait for final stripping to make that determination. I proceeded to remove the molding and trim pieces. Then I started on the inside of the fender with my bristle cone brush on a 9" grinder. It took the rust off, but the undercoating was not budging and is going to be tough to remove. I've decided that on the next dry day, I'll take it outside and use my media blaster to remove the goo on the inside.
I switched to the stripper pad on a 4-1/2" grinder that I used on the right rear quarter panel and doors and focused on the outside painted surface. It does a nice job, but is time consuming. After what seemed like a couple of hours...well...actually, it was, the entire outside of the fender was stripped to bare metal.
It looks pretty good. I did find a small 1/8" pin hole in the bottom of the fender. Unfortunately the inner fender support is behind it. So I'll have to cut that out and put a patch in it. I also found some bondo in the front of the fender.
I'm going to remove it eventually and do some more metal work to fix it along with a half-dozen other dimples and dents. The one thing I noticed as I was removing the outer surface of paint around the bondo was something interesting. Take a look and see if you can find it.
The bondo was applied OVER the original paint! Unbelievable. But I've seen worse...like bondo smeared over rust holes. I'll deal with that later.
It was too tempting not to put the fender on the body to sneak a peek of how it looks, not to mention I wanted to put my wife's Fusion in the garage so that I won't have to clean the frost off it tomorrow morning. I will say, it's another small step in the right direction and looks pretty good.
If tomorrow's weather lives up to the forecast, I may be able to media blast the inside of this fender and may go ahead and do the left side fender as well. Then I'll move on to stripping the left side fender. I may go to the storage unit and retrieve the doors and hang them to check how everything will line up. I'll then start on whatever rust repairs I need to make and begin the dent removal process.
Until the next episode...and hopefully it won't take 4 + months either.