Monday, March 19, 2012

Preparing to strip...the car that is!

I'm in what I call an "in between" mode on the fastback.  I have just a few parts to remove from the body, such as the front stabilizer bar, remnant of fuel and brake lines, windshield wiper motor and linkage, rear vents,  yada, yada, yada.   Then I can start working on cleaning the bottom of the body....or I could do the floor seam metal work....or I could cut out and replace the upper right toe board...or...whatever.

I did determine it was time to swing by the storage unit and pick up my pressure blaster I bought...way back when...when I thought I would make more progress on the car...and when Harbor Freight gave me a big discount coupon and they marked it down.  I grabbed it for about 40% off.  I haven't seen it as cheap.  So it was a good deal.  That's what I'm saying and  I'm sticking to my story.

Also...way back when...I got a deal on the Eastwood conversion kit to change a pressure blaster to a soda blaster.  There is still "some assembly required" but it is in the garage and ready for said assembly.

 
This is the Harbor Freight media blaster.
 
This is the Eastwood conversion soda blaster kit.


The jury is still out obviously on whether this will work well, but I have to be realistic.  This isn't a professional sized unit, but my time is cheaper than the $1,200 the local media blasting company wants to strip the body.

The newest toy added to the arsenal of my tools is a blasting cabinet I just happened to come across on Craigslist the first hour of the listing.   It's a Harbor Freight unit and included a stainless steel cart that appears  to have come from a restaurant or similar business.


The whole shebang was $70!  I called and texted the owner and cut the deal.  I picked it up on the way home.  The "extra" was that it was already filled with glass bead media.   And the guy had put in extra lights.   And he threw in a large 2x4 foot piece of plexiglass to put a cover over the lights.   That's a deal in my book!

OK.   So you know what happens next, right?    I had to try it out as soon as I got home.  So I grabbed one of the shock tower mount and gave it a shot...or blast.   In 5 minutes, I ended up with a really nice, clean part.   Here's the comparison of "before" and "after."


So I would say it was a successful day.  I have high hopes that this little tool will help me immensely in the future restoration of good ol' Eleanor.

Monday, March 12, 2012

More Disassembly of the Body

I got a window on Sunday late afternoon to do some work on the car.  I was hoping that sometime over the weekend I could wheel that bad boy out into the drive way, "spin" it a few times with some blow down air and clean that puppy out some more. Then I was hoping to get on the bottom side with my big cone wire brush and get started on removing the surface crud.   Well, that didn't happen.

Saturday morning was taken up with my "breakfast club" guys Bible study (that's where I got my labor for the body lift) and then off to make a presentation at a "Health and Wellness" seminar.   Then it was almost Noon and I promised my mother-in-law I'd come by the hospital to visit for a bit.  She's getting better, but will be transferred to rehab today to get her strength back after her illness.  Then it was home to make food for a fundraiser dinner on Sunday to assist a group of 22 who are going to Jopin, Missouri to help with tornado relief. We're also raising money for the tornado victims here in southern Indiana too.

I made a pot of my Jambalaya  and a "Bacon Explosion"  which if you haven't heard of this before, it's a culinary feast of pork--4 pounds all together.  There is a pound of bacon that is prepared in a "basket weave" on a tray.  Then dry rub is sprinkled on it.  then 2 pounds of pork sausage is smeared on top of the bacon.  More dry rub.  Then on top of that is a pound of crispy crumbled bacon covered with...you got it...more dry rub.  Then you pour your favorite BBQ sauce all over that.   The pork layer is rolled up ala cinnamin role  style.  The "basket weave" is then rolled around the outside of the pork goodness.  This mass of meat is then put on a Weber grill set up for indirect heat for a couple of hours.  I throw some wet Mesquete wood on the hot coals for extra smoky flavor.   During the last half-hour, I brush BBQ sauce on the outside to give it a nice crust.   Here's what it looks like before going on the grill...


Needless to say, it's flat-out tasty, but very rich.  You can check it out here....


http://en.wikipedia.org/wiki/Bacon_Explosion


Anyway, I better get back onto the car since that's what this blog is supposed to be about, but hey...a guy has to eat, right.

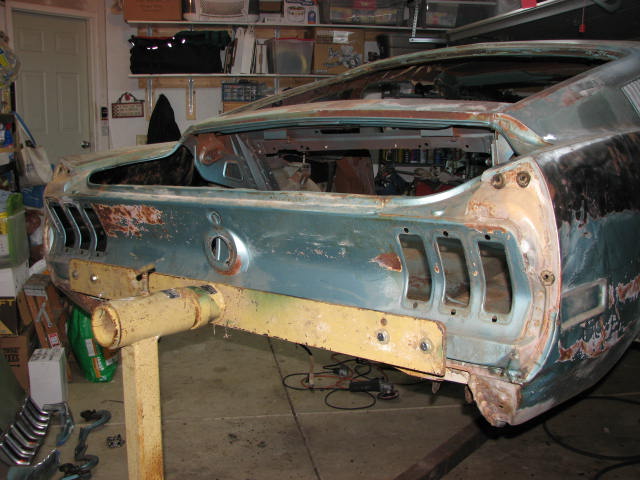
With my limited time and not being able to get the car outside, I started taking more parts off the body that will eventually need to come off.   The first order of business was to snake out the rear light wiring harness that runs down the driver's side of the car.   Next was the gas tank sending unit and interior light harness that runs down the passenger side of the car.  With the plugs marked and tagged, I boxed them up for later work.

Then I took out the tail lights followed by the trunk lid and then the hinges.   The rear fender extensions were the last parts to come off the car for the day.   Here's the "naked" rear end of the car...


Here's the pile of parts I took off the car.  The smaller pieces will be boxed and I.D.'d for later when I'll either restore or replace them...


Speaking of replace, with the trunk lid off the car, the rust in it may be a bit more than I want to try and fix.  The right side is the worst, especially along the lower seam.   Here's the rust close up...


The outside skin is OK.  It's this inside skin that will be interesting to try and fix.  It has a few compound curves and shapes that could be somewhat challenging to reproduce.   Then there's the evidence of mice nests inside the cavity between the inner and outer skins...


The amount of surface rust is heavy also.  I'd have to find a way to treat that by pouring some type of rust inhibitor in the trunk lid and then moving it around to try and cover the surface.   It might be worth springing for a good repro piece.  I hear Dynacorn's are decent.   But it will be awhile before I'm ready for a trunk lid anyway.

The Argon/CO2 tank is in the car ready for exchange later today.   Maybe.  It depends on when my mother-in-law get's released to go to rehab and how long it will take her to get settled.   And then there's a meeting at church tonight at 7 PM that got rescheduled yesterday.

Now it's Monday morning and I am already tired.  Was there a weekend...really?

There was a little joy in Mudville yesterday as Michigan State was able to not only win the Big Ten Championship here in Indy, but beat Ohio State in the process.  : D    Sorry...I'm not a Buckeye fan.  I lived in Michigan too many years.

My alma mater, University of Louisville, also won the Big East Title, which was a pleasant surprise considering the end of their regular season.   However, my wife's alma mater, University of Kentucky, caved at the SEC title game.  UK still got a 1 seed, so their SEC loss is really academic. 

Now it's on to next week and hopefully some good quality car time...and some good college hoops.

Thursday, March 8, 2012

A Mystery to Solve--Bottom of the Floorpan Paint - Part 2

I never cease to be amazed at the smallest details that seem to pop up during a restoration project.  A little light has been shed thanks to JR heading me over to the concoursmustang.com forum.  The black paint on the bottom of the car could be the "color of the day."  But the more interesting and overlooked point (probably because of the black floor pan) is this thing called "pinch weld painting."

Apparently, to hide the ugly flange of the rocker panel pinch weld lips, Ford painted that lip with black paint, with the exception of dark cars.  However, if the guy on the line zoned out while working, even a black car could have black paint sprayed on the pinch weld joint.  Here are some pictures of my car showing the pinch weld black paint...


The picture above is the rocker panel area forward of the passenger side door.   The picture below is the rocker panel between the rear of the passenger door and the rear wheel well.


 The next picture is the driver's side rocker panel between the door and the rear fender well.  You can see the front leaf spring mounting perch.


 The next shot is the rocker panel at the rear edge of the driver's side door.


The one interesting note of this paint is the way it's applied.  It obviously wasn't sprayed by a typical spray gun.  I'll have to do some more reading on this.  It's not like I have to have this sorted out now.  But at least I have the pictures to document it.  I'm probably going to go with tinted epoxy primer for the red oxide and match the interior tint which looks to have a brownish cast to it.    

If I can find some time this weekend between preparing to move my mother-in-law to a rehab facility and other commitments, I may get to actually cleaning up the bottom of the car.  I'll use the "whirly bird" wire brush on my angle grinder to knock off the surface crud.  Then I'll determine the next step in getting down to good metal.  I also have some photos to take of gas, brake, and exhaust mounts for more documentation.  I'll swing by Thrifty Supply to get a new and bigger Argon/CO2 tank.  Then I can start working on finishing out the underside of the floor pans.   All in a days work, right?   LOL!

Monday, March 5, 2012

A Mystery to Solve--Bottom of the Floorpan Paint

After getting the Mustang on the rotisserie, work on the car has come to a screaming halt.  My 88 year old mother-in-law who lives with us was hospitalized a week ago this past Friday.   She is getting better, but early last week, we were ready to plan for a funeral.  Her recovery will be a long one, especially at her age and finding out her heart function is decreased quite a bit.   It's a reminder we won't live forever in this world, but faith in Jesus will carry us into the next.  So until we get her health situation stabilized and planned, work on the Mustang will be tabled.

However, I have spent some time looking at the car and have definitely determined that the underside of the car was painted black with the same paint as the engine compartment.   Here is some photo documentation of the paint.    The picture below was taken from the rear of the car looking forward  on the driver's side.  It's the front leaf spring perch area.  There is definitely black paint here and on the rear frame rail.


This picture is of the same area but taken along the left rocker panel.  The original turquoise paint is visible along with the black.  But there appears to be a band about 1/2" long where it looks like red oxide primer is visible.  But there's still black painted along the rocker on both sides.


Here is a photo from the right side of the car.   Same deal as the left...


I've emailed Bob Perkins via Mustang Monthly to get his thoughts on this.  I have no idea why this car would have been painted black unless it had something to do with the rare color of Tahoe Turquoise of which only 629 Mustangs out of 317,000 were painted that color.

So I throw this out to the Mustang masses to see if anyone has a clue as to why this is black and not red oxide.  I certainly don't want to mess up the restoration with the incorrect color on the floor pan, even tho' most people probably don't look or don't care what color it is.  But being an x-anal engineer, it matters to me.