Saturday, October 22, 2011

Driver's side floor repair...getting the fit right

I set out today to make it as far as I could on getting this blinkity-blank driver's side floor in the car.  I didn't get started until around 10:30 AM which I will explain later.  Putting the floor in has had me in somewhat of a snit since in the Indianapolis area there are a number of specialized Mustang restore shops because it seems that each one has their own idea on how to put a floor in.  "The Mustang Ranch" is one of the oldest.  It's pretty much a one man show and the owner is not getting younger.  It's also hard to get in touch with him since he works his own hours and often when I swing by, he's not there.  Another shop is "Vail's Classic Autos" in Greenfield east of Indy.  They do Mustangs and other "high end" cars such as Hemi Mopars from the late 60's and early 70's.   They have a killer collection of Mustangs including a 69 Boss, a 68-1/2 Cobra Jet, a 66 GT convertible, and a 68 Shelby GT 500 KR....   You get the point.  I discussed the floor repair with one of their Mustang restorers, (who was working on a 70 Boss 429 buy the way).  He was a big fan of overlapping the floor pan by 1/2 in with the existing metal and welding both inside and outside.   So when I did the passenger side floor, I did it that way.  I thought, "Why not do it that way?  The shop turns out cars that make magazines and are show winners."   Then, about a year later, I came across Dave Scribling Restorations in Crawfordsville, Indiana.  If you don't know him, he did the famous 1968 Mustang fastback "Mustang in Black" that incorporated the engine, chassis, and electronics of  a 2003 Mustang Cobra into a relatively stock looking fastback. That was a major magazine car and a "mule" for his suspension kits he sells.  He was a proponent of butt welding the floor seams together.  So.....I decided to do that on the driver's side floor.  I don't know if one way is right or wrong. I'll end up with a larger seam to deal with on the passenger side, but figure I'll deal with the differences after I get the car on the rotisserie.  So onward....


I needed to make sure the floor was in contact with the frame rails.  I had a couple of cinder blocks that I used to weigh it down.   Then I took a look at the gaps and fit.   I laid underneath and marked the outline of the frame rails, transmission tunnel, and rear and front pan overlap.


I wasn't happy with the fit between the floor pan and the transmission tunnel crossmember not to mention the other gap along the transmission tunnel.


I decided to work on the transmission crossmember to floor pan fit first.  My plan was to make the radius of the floor pan match the crossmember.   Instead of using a rounded nose body hammer which would have left a ton of small dents, I made a buck from a 2"x4" and my multi-tool.


Then I used the buck and my 22 ounce hammer to "persuade" the radius into shape.


It did help, but not quite enough to get the contour right.   So I decided to go with a profile template to have a better idea of making the radius fit.


I used a piece of micro-corrugated and set the straight edge along the top of the flat section of the trans crossmember.  Then I traced the profile of the crossmember onto the cardboard.  I cut along the line and ended up with this template...

"F xc" marks this as the front transmission crossmember profile

I did the same thing for the rear edge of the crossmember....
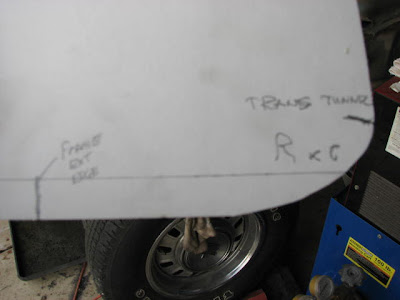
This is the profile for the rear transmission crossmember

I marked two datum points on the templates.  One was the edge of the transmission tunnel where the original floor was cut away.  The other was the line marking the inner edge of the frame rail.  I looked through my dollies in my body tool box and discovered one that almost fit the contour exactly. This was the front template fit....


...and this is the rear template fit...


The difficult part was that working one contour changed the other slightly.  So, after multiple attempts at working both sections of the floor, I was getting close to a good contour on both sections of the floor pan.


I still needed to work the edge to get it to fit the transmission crossmember profile, but I also needed to trim the floor pan to fit.  I wanted the contours to be as close as possible so that I didn't end up short with material later after I trimmed it.   There were multiple...and I do mean multiple times... that the floor went in...and then came out for some more massaging...and went back in, etc, etc, etc.

This is after the first attempt.  Notice that there's still a gap, but part of the reason the gap was there was the extra material that will eventually be cut off for the butt weld along the trans tunnel hadn't been removed yet.


The fit along the rocker panel and on the frame rails was nice and tight.


I finally got the floor pan formed to match the contour of the crossmember as good as possible.


I then proceeded to trim the floor pan on the rear side and the transmission tunnel.  It took 3 trim sessions and a bunch of grinding with my 24 grit 2" air sander to get the gaps consistent, but the time and effort were well worth it.


Now it was on to drilling out the holes for the rosette welds.  I marked the outline of the trans crossmember and the frame rails.  I also marked the overlap line for the firewall extension.


Here's the finished result with all the holes cleaned up of burrs from the drill.   Here's the view of the fit from the passenger compartment...


...and this is the view from the engine compartment.


So, after 6 hours of work, I decided to call it a day.  I didn't want to start welding at 4 in the afternoon when I was tired and hungry.

Speaking of hungry, for all the time I was working on the Mustang, I was also babysitting my smoker.  The meat went on at 10 AM and I hit the garage shortly thereafter.  I loaded it up with a beef brisket, a whole chicken, a pork shoulder, and a rack of beef ribs...


The chicken was already done around 2 PM.  So I pulled it off and put the ribs on.   All the meat was done by the time I got everything put away in the garage around 5 PM.   So I would say I made some progress on a number of fronts.  Hey...a guys gotta eat, and it might as well be good eats.   Besides, restoring a Mustang is hard work as many of you know.   The difference for us is that the smoker is at my house!  I hope to get the start on welding in the floor sometime later this coming week.  I don't have anything on my agenda which is really strange, but as my life has often been, I'll make no predictions.  There's always hope though....

Saturday, October 1, 2011

Driver's side floor repair...on to the actual floor

It's been a month of a week.  I'm sure some, if not many, of you know what I mean.   Lot's of stuff going on...some of it not pleasant, but it comes with the profession.  With a trip to Baldwin, Michigan to close up the family cabin, then heading southeast to Battle Creek for my niece's wedding, and sticking around to do my annual fall trip to help my mom with things around the house, I've had precious little time to prep for the trip.  Grass needed cutting, the yard trimmed, getting the dog kenneled, cars serviced and now packing, it's been non-stop.  I wore myself thin and took a nap to feel better. (Harvesting has started and the corn and soy bean dust is killing my sinuses.)  

I continued my packing getting all the tools and supplies I need to take north.  After moving the front floor pan out of the way to get to some other stuff, I thought, "Why not get started on that."  So I did.

First order of business was to clean up the cut on the floor itself.  I left the cut "rough" when I removed the old floor until I knew what I needed to get rid of.


I used a piece of steel for a straight edge and marked the line off.  Then I went at it with my air saw.  I love that  tool!   When I got done, I had this nice straight cut ready to be cleaned up for a good weld.


I lined up the floor with the inside of the rocker panel and used the existing spot weld marks as a guide to mark where I needed to drill my 5/16" holes.   This worked good since my weld and seam manual was rather sketchy on where the spot welds go. 


With the welds marked, I took the panel and center punched it for drilling....


Then came the fun task of drilling the holes.  I bought a really good DeWalt drill bit that is stepped with a build in pilot drill.  It is slick and saves a ton of time.   I used a piece of old deck board (remember that project?) as a backer and drilled out the holes.


Then I did a rough fit to see how it looks....


It's not too shabby, but I need to work on the transmission tunnel joint.  I was just glad to carve out a half hour to work on the car.   And the Eastwood fairy came by the house too with a quart of "Metal-to-Metal".   I'm already looking forward to the weekend of the 15th to do more extensive work.   The 15th?  Man that seems a long time away, but if it's like September, it will be here sooner than later.