Saturday, April 30, 2011

Sick and Wired - front radiator support and crossmember install part 1

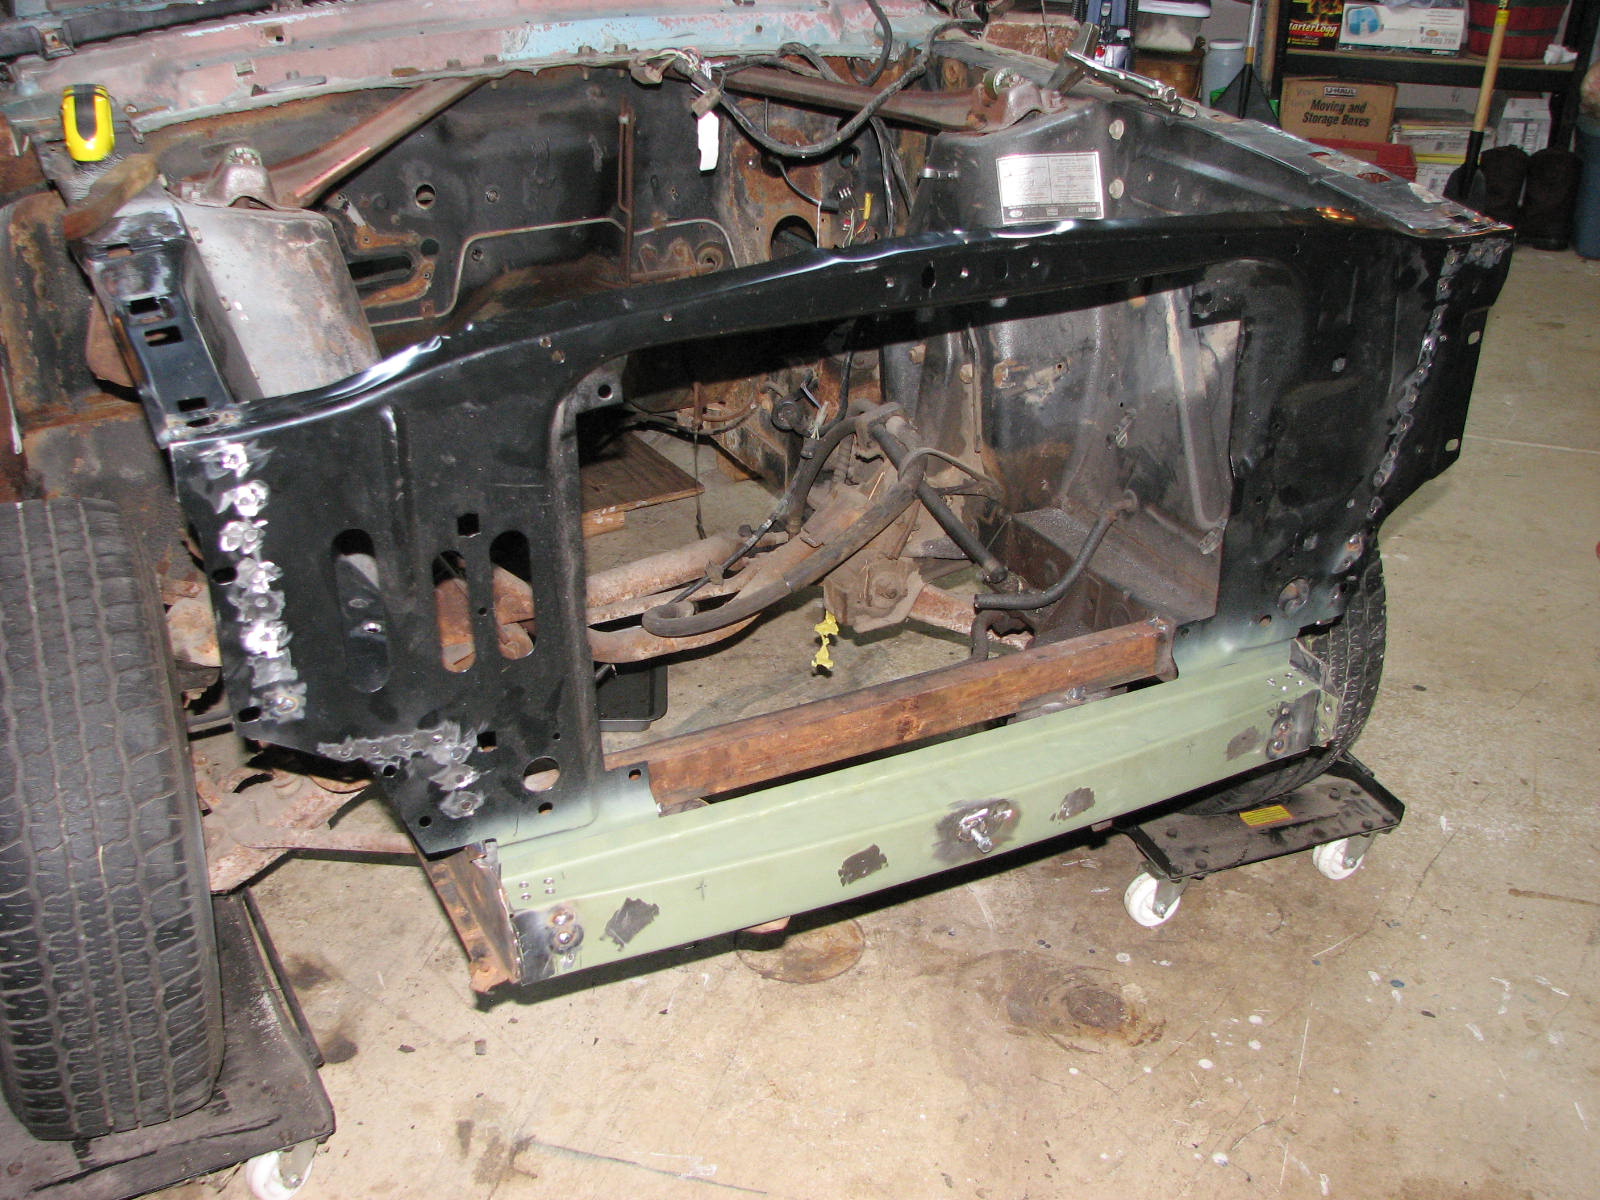
It looked like Thursday night would be the night to really hit it hard and get this front end metal work knocked out.  So I drilled out the 56 holes for the rosette welds using a combination of my drill press and body panel support fixture (courtesy of Eastwood) and my hand drill.   The subassembly was ready finally to get installed.   Here are a couple of pictures post-drill but pre-install...


I Got it measured and clamped into position.  Then I started the welding.   The welder however was acting up--erratic wire feed, spitting, etc.   I played with it and got it to cooperate somewhat.  But on the 4th weld, I pulled the trigger, got about 2 seconds of weld and then....nothing.   What's going on here?   I unscrewed the gas nozzle and used my nippers to grab the end of the wire, figuring it got fused in the tip.   I started to pull it loose and the wire kept coming out...and coming...and coming.    I opened up the welder and discovered my problem--out of wire!   Bugger!   So I only got this far...


I stopped by my local Thrifty Supply and picked up a spool of .023 MIG wire.  I figured I was ready to go.   But then I woke up in the middle of the night last night with serious chest congestion and raging sinuses.   It has wiped me out.   To top it off, I have a wedding today and the grass has grown from all the rain.   Then I have a conference next week from Monday through Wednesday with evening meetings when I get back.  I'm afraid work on the Stang will have to wait until next weekend.   Oh....I forgot...   The church yard sale is next Saturday.   

I can't help but quot a line from SNL's Gilda Radner as Rosanne Rosanna Danna...   "There's always something.  If it's not one thing it's another."

Tuesday, April 26, 2011

Paint and Rust Removal

Just a quick post today.   On yesterday's blog, I showed how I'm getting rid of the dents in the body.  The doors and hood are perfect.  The fenders are OK, but will need a little work.  The trunk lid has some rot in the passenger corner.   But to get to the bare metal to do the massaging of dents and rust repair, the paint and surface rust have to go.

I bought one of these "stripper" disc for a 4-1/2" electric angle grinder to see how well it would work.


The car has never been repainted.  And sitting outside for better than 10 years in the Texas rain and sun took its toll.   So to begin the "test" of this stripping method, I started on the trunk lid since it was a small area and would be a good test since it had a combination of paint and surface rust.   Here's the before picture...


After maybe 15 minutes with this little stripping disc, the trunk lid looked like this...


WOW!   I let the disc do the work with adding not much pressure to keep from gouging or removing metal.

Here's a "before" picture of the driver's side of the car.  This photo was taken when I first went to look at the car which happened to be in the storage building that the previous owner kept the car for 12-14 years...


Here is what the rear quarter panel looked like after about 40 minutes with the stripping disc...


...And what the door looked like after another 30 minutes of work...


These discs are not too expensive.  Lowes has them for around $9 each.   I used 1 disc to get all of this stripping done.  I bought 3 more (on sale at Eastwood) and hope I can finish the rest of the body with them.

So if you want to get rid of paint and surface rust, I highly recommend this method.  It's a little labor intensive, but it beats the tar out of the $900 the local "Redi-strip" wanted to soda blast the outside of the body.

I have two free evenings this week--tonight and Thursday.  Yay!  I'm hoping to use at least one of them to make a dent (no pun intended) in finishing the front end sub-structure.   Rain and storms are still in the forecast through the weekend.  If this keeps up, I may start a blog on "how to build an ark".    

Monday, April 25, 2011

Dent Removal

I hope everyone had a great Easter weekend.  It was certainly a great one for me, even though this past week seemed to fly by at Funny Car Nitro speed.

I didn't get much time to work on the Mustang as I really needed to improve the lighting in the garage which was so-so with the door down.  The weather here in the Indianapolis area has been windy, cloudy, rainy, and occasionally stormy.  So the garage door has had to stay closed.   I installed 4 double tube fluorescent light fixtures to replace the 2 anemic 100 watt halogen light bulbs.  What a difference!  So I expect to get Eleanor back on the jack stands and get this front substructure work done in the next week.

In the mean time, I thought I would show you some of the tools and process I have used to get some of the dents out of the car.   One thing I wanted to do is make sure the body work was good enough so that very little filler would be used on the car.  And so far, the work is going well.

For starters, I bought this "stud gun" on eBay...


It's a 110 Volt unit and in like new condition.  This uses copper studs that go into the tip of the gun....


Then you push the tip against the body where you want to "pull" the dent and push the trigger for about 2 seconds.   It welds the mushroomed tip to the body of the car.   You put as many of them on the car appropriate for the dent.

This is a small dent in the drivers rear quarter panel I wanted to get rid of...


When I was done with putting the studs in the dented area, it looked like this...


Then I slipped the special dent puller designed to grab the studs on each one and worked the dent out slowly alternating between all the studs to keep from "overpulling" the metal in one spot.


When I was done pulling the studs, I used my 3" air cutoff tool to remove the studs.  The dent then looked like this...


I did have to go back and add a couple of studs to pull some low spots, but the result was good.   I ground down the "pimple" left from the stud with my 2" 90 degree angle grinder with a 50 grit pad.   I sprayed on some etching primer and let it dry.  Then I block sanded it to see where the high and low spots were.  I then used my body hammer and dolly to work the edges of the dent.   It looked like this...


After another 5 minutes of  H & D work, the dent was pretty much eliminated.  Here's the final outcome...


At this point, a high build primer/surfacer with block sanding will give it a smooth finish.   Not too bad, eh?

The passenger side unfortunately won't be as easy because the dent is quite large, thanks to the cow that ran into the side of the car while in storage outside in Texas next to a barn ; (.     But then when I start that dent, I can show you the magic of a "shrinking disc".    That's down the road.  But first, I need to get this front metal work done so I can move onto the driver's side front floor and seat pan replacement.

Check back later in the week and I might have more news on the progress of this classic Mustang fastback.

Thursday, April 21, 2011

Other Things Important...

Work on the Mustang has been set aside this week for two reasons...one of them that is necessary and most important.

First, we had a wave of severe weather pass through that was promising 1"+ diameter hail.  The outlook seemed likely since the St. Louis area had been battered with it.  So, I didn't want to end up with pock marks in my wife's Fusion.  So I took the 'Stang off the jack stands and put it on my caster dollys.   I pushed the car to one side of the garage Then I shoved tools and equipment out of the way and managed to get the car in the garage.   The storm dissipated as it hit the Illinois-Indiana border.  We did get pea sized hail, but better safe than sorry.

The second reason for no work on the car this week is that's it's "Holy Week", the week before the passion of Jesus, his suffering and dying on the cross for all of humanity.   As pastor of a church, this week is one of much preparation and journey.   So part of my preparation was to break out the MIG welder and make "nail crosses" for Good Friday service.


This cross will be placed in the front of the church.  During the service, people will be invited to come forward and pull a "nail cross" out and take it home with them as a reminder of Jesus' sacrifice for them.  So my MIG welder has come in handy for a 'divine' purpose but will be pressed back into 'ordinary' service soon.

It's like all of us.  God has created us for a 'divine' purpose but each of us do it in often ordinary ways by caring for others, showing compassion, and letting people see Jesus in us.  After all, "For God so loved the world that he gave his one and only Son, that whoever believes in him shall not perish, but have eternal life.  For God did not send his son to condemn the world but to save the world through him"  (John 3:16-17)

Have a blessed Easter.

Tuesday, April 19, 2011

Documentation: Bag and Tag

One thing I'm glad I did was to document the car on disassembly not only with photos, but with what I call my "bag and tag kit".


Inside this container are things like heavy-duty Ziploc bags, Sharpie markers (fine tip), 1" masking tape, and 3" x 5" cards so that as parts come off the car I can put them in the bags with a description on a 3x5 card so that I will know where they came off the car.   I use the tape on larger parts that are too big to bag to identify them.  Those larger parts usually end up in a corrugated box or plastic tote labeled, for example, "dashboard" with all the components that came from that part of the car.   But there's another item in this box that has proved invaluable.


These marking tags are excellent for not just labeling parts, but labeling each component of the part.   I'll explain...


You take one of these and then put it on the end of, let's say, the plugs on your wiring harness like this....


....and like this....


So every plug has an identifying tag that tells me what to plug it into when it all goes back together.  It beats the tar out of trying to make sense of a shop manual electrical diagram, especially when dealing with my car that is heavily optioned and the dash is crammed full of connectors.   It also works great for all the vacuum hoses associated with cars equipped with A/C. You can find them at any office supply store.  

The nice part of this is that even though some of the tags have fluid on them due to hanging in the engine compartment during the engine pull, they are still legible (Thank you Sharpie!).

So when you get to the disassembly of your wiring harness, vacuum hoses, and even regular parts that are too big to "bag", give them a "tag" and all will be well when it comes to reassembly, especially if your restoration is taking as long as mine.  It's the only way I will be able to figure out which plug goes to what switch or light or whatever.  You won't regret it.

Sunday, April 17, 2011

Right Front Splash Apron "Adjustment"

Today was a nice break from what was a challenging week on many levels.   I don't know if it's a good idea to work on the car and get frustrated when you're looking for a diversion from life's frustrations.  That's what reworking the right front splash apron involved this afternoon.

After fitting and installing the splash apron last weekend, I discovered that the front of the apron was not properly formed.  The flange that connects it to the front radiator support was not flush but at about a 5 to 7 degree angle.  Not good.   So the fix was to make a cut to move the flange flush with the radiator support.


Then I had to pull the flange away until it was parallel and hence flush to the radiator support.  


 Next came fabricating a "pie" piece to fill in the gap.


After cleaning the EDP coating from the splash apron and getting the filler piece ground to fit, the spot welding began.  But the problem was that even on the lowest heat setting and the thin width of the pie piece, I was "blowing through" and burning small holes in the filler piece especially at the "point", at the corner, and the joint between the pie piece and the vertical filler piece.   Got that???


So I used this little home-made welding tool...


It a backup tool made from a piece of 3/4" copper tubing.   I hammered the end flat and then put a bend in to to allow access behind the part.  You might be wondering what this can possibly do to help in welding.   That's the cool part.  Molten metal won't stick to the copper.  And it acts as a heat sync to pull the heat away from the weld so that it doesn't get too hot.   Putting this behind the filler piece let me fill in the holes.


This work was VERY tedious work.   I put about 4 to 6 spot welds in and then air cooled the welds with compressed air.  Next, I ground down the welds flush to the part.  Then I used a hammer and dolly to straighten the part from the minor warping from the heat. I repeated this process until there were no more visible seams between the filler piece and the splash apron, which is why it took so long.


After doing the "pie" piece, I moved on to the vertical piece using the same the process.   When I was all done, it looked like this.....


But how would the radiator support fit?   Here's what it looked like after fitting it in place...


It clamped up perfectly!   I know this took about 3 hours from start to finish with all the patching and welding and grinding, and filling in holes, and grinding again, but the radiator support will be straight with no funky bend in it to force it into place.  So the radiator support can now be installed...and that will be the next step.   Be sure to come back and visit to see this step which will hopefully happen in next week.

Thursday, April 14, 2011

The Real Deal?

I'm taking a few minutes respite from a busy morning.  Sometimes my mind goes into brain "lock" and I have to divert to something else just to reset my feeble little head.

Whenever a "car person" starts to look over a classic like my Mustang, and particularly when buying one, you want to make sure that what the owner says is true.   Yes, you can check the VIN, and in the case of Fords, the "door tag" which is mounted on the driver's door, to make sure it is what it says...the exterior color, interior color, transmission type, rear axle ratio, engine type, etc.

When I first looked at the Mustang, I checked the VIN.  OK.  A "J code" 302 V8 (High Performance!!!!   Premium Fuel!!!).  That's good.  The door tag options seemed to match.  Good again.   But it was hard to check if the engine and transmission were ORIGINAL to the car due to the location of the engine block number.  You see, it was common during the muscle car years of the late 60's and early 70's to swap engines.   If you didn't have enough horsepower, put in a bigger engine, especially if you ran yours hard and basically blew it up.    So there could be a possibility that the original engine had been replaced a long time ago.   The only way to find out was to pull the engine...and depending upon the outcome, it could be "numbers matching" or it could be another engine from around that period which could affect the ultimate value of the car.

So, a year ago this past summer, (Wow! That's 2 years this summer!)  I pulled the engine and transmission together as a unit.  I bought an "engine balancer" which is attached between the engine and the hoist and allows you to change the center of gravity (balance point) to make getting it out of the car much easier.  All the accessories, such as the power steering pump, air conditioning compressor, carburetor, wiring, fuel lines, cooling fan, exhaust pipes, etc. were removed.  The transmission rear mount was removed (4 bolts) and the engine mounting bolts were removed (2 bolts).   Here's the start of it after everything "came loose".  The balancer is that red and black device if you're curious.  It's worth all $39.


Here's what it looked like afterwards....


Now came the moment of truth.  Was this the original engine???   Well....I scraped the crud off the back of the engine and here's what I found....


Let's see...."8.....R...1...4....3....2....9...1.   YES!   That's the sequential VIN number for the car.  IT'S A MATCH!   (Happy dance...happy dance...happy dance).   So now this discovery cemented the car going back to original.   Ford only made less than 13,000 of these engines.  They were the base engine in the Shelby Mustang GT 350's and were used in Ford's first year of Trans Am racing.  Called the "tunnel ram" 302, they were not the most reliable engine on the race track and many teams blew engines right and left that year.  So Ford decided to beef this engine up for 1969 and hence the next year saw the birth of the Boss 302.  And Ford dusted the competition with it for the next 2 years.   So this engine is special.

Here's some more post-pull pictures....

The original "C-4" automatic transmission

The car is on it's way to being totally gutted

And if you want to see the actual video of the end of the engine pull, you can check it out here....

 (Notice the "period correct" music playing in the background)

Next time, I'll update the continuing saga of replacing the front cross member and radiator support.

Wednesday, April 13, 2011

Baby Book

I have been to more car shows than I want to admit and probably more than my family wanted to attend.   Back in the day when I had my 29 Ford hot rod, I went to National Street Rod Association meets in Knoxville, TN, Columbus, OH, Louisville, KY, and Kalamazoo, MI.   The girls and their mom would head off to "Women's World" which was basically a huge bazaar and craft sale.  I would head out looking for other cars like mine to see how others hot rodded their car.

NSRA Nationals North, Kalamazoo, MI  September 1993 (with my girls)
                                               
One of the things I always looked for and then looked through was the "baby book" on the car.  It had all the documentation and history of the car, especially the restoration process.  Well, I too had a baby book for my 29 Ford, but it was all pictures and didn't amount to that many, just hitting the milestones and some of the more detailed and involved fabrication.

Well, I have started a "baby book" on the Mustang.... 


I have kept receipts on parts purchased on-line and through vendors.  I have all the paperwork when I purchased the car, but unfortunately, that's where the paperwork starts as there is no other paper trail on the car.   My girls talked me into getting a "vanity" plate for the Mustang...Eleanor, or in this case because it was already taken, "Eleanr".   I kept is until last year when I decided that she would not be an "official" Eleanor.   So thinking of the horsepower I'd like it to have, and my vocation as a pastor, the new plate was born: "REVVVV."   I also have my deluxe "Marti Report" too....


And I have a load of photos showing the work as it progresses, some of them I have shared here and others that will soon be posted. 


When the car is done, this book will accompany it, probably volume 2 or even 3.   Then others can look through the baby book and see how my Mustang has grown into the incredible machine she was when she rolled off the production line in February 20, 1968.

Tuesday, April 12, 2011

Jumping Ahead--Part 3 (really?!?!)

I can already hear the comments.  "Part 3?  How many parts are there to this deal?"  To give you my honest answer, "I don't know.  As long as it takes, I guess."    But isn't that part of the whole process?  Isn't life full of part 1, part 2, part etc., etc, etc.?   Well, enough philosophy.

At our last exciting episode, I was working to get the right front splash apron installed.  So after a removing the old rusty and bent parts, the fitting together began.  But here's what I had to do to modify the fender apron to get it to fit....


So I had to add 1/2" on the bottom rear section of the apron.  Notice that cool little clamp device on the right of the picture?  That's a gap clamp from Eastwood that clamps the body panel together and sets the gap for welding.  It is slick!  I used 3 of them on this part.   I slowly worked back and forth to fill in the gaps with the spot welds and keep the heat down.   Here's what it looked like when done....


I also had drilled all the 5/16" holes to reproduce the spot welds.  These holes are then "rosette" welded to attach it to the car.   So after clamping in place, checking my measurements....checking my measurements twice...then checking my measurements, I started the welding process.


So now it's in for good...and very solid.  (I added a few more welds than Ford originally had to give it some more strength.)   Then the final piece to do was to put the VIN back where it belonged.   I cut the VIN out of the old part and carefully put it in place on the new panel by using a scribe and drawing a line around it.  I cut out the metal of the new apron and fit the old piece with the VIN in place.  I did have to do a little grinding to get the gap and fit correct, but here's the finished product....


When it's all finished, it will look like it has always been there.   Pretty neat, eh?   I love it when something goes together so well.

Since I spent all this time on the car, some other things need to take a front seat for the next couple of days...like finishing my taxes!   But I do hope to get back on the car sometime this weekend between yard cleanup, grass cutting, etc...you know...all that fun stuff that keeps us from having fun.

And for the "pastor" part of my life, the next week through Easter Sunday are a bit busy.  But it's all worth it to be able to celebrate the resurrection of Jesus, for whom I am eternally grateful for his forgiveness and love...not to mention the abilities to get this Mustang on the road again.

Monday, April 11, 2011

Jumping Ahead--Part 2

If I had a nickle for every time I had to say, "Things didn't go according to plan"  I would be retired and be driving my Mustang around because I could afford to take it Dave Scribling Restoration in Crawfordsville, Indiana just up the road from me and have a full-blown restoration done.   Needless to say, the progress I was hoping to make on "Step 3" turned out to be more like "Step 2.4".

I have learned an important point; if you're going to purchase an aftermarket part, be sure it is made with original Ford tooling, or by a company that comes very close to making it like original.  The right front splash apron must have been a cheaper piece, even tho' I got it from a place that "Mustang Monthly" magazine recommended.  But I also have to say that cars built 40 years ago were not made to the exact tolerances the cars of today are built to.  So I should expect some "tweaking" and "massaging" of pieces parts, but not a major amount which is what happened.

So here's what I was able to accomplish on Friday evening and Saturday afternoon.  I was finally able to find the last couple of hidden spot welds and get them cut out.  This freed up the center part of the crossmember and out it came, still leaving the "ends" which were welded to the frame rails.  A total of 18 spot welds and 2 fillet welds had to be removed.   Reminder...the spot welds had to be drilled out of the offending part while still leaving the metal intact in the good part, i.e. tedious work, especially when doing it on your back!  (Face shield REQUIRED!!!)


Then I tackled the end pieces and got those removed.  Each side had 14 spot welds and 1 fillet weld to remove...


Then all of the surfaces were cleaned up with a grinder and sanding disc.  Then I started fitting the new parts together using my measurements I took before taking the car apart and used vice grips to hold them in place.  I measured from a bolt on the rear splash apron to the front of the radiator support on each side and then did a "cross" measurement that went from bolt to the opposite corner.  This guarantees squareness of the parts on installation...and that the front end won't look crooked when assembled.


Everything looked like to was going to fit without too much work...but then when I checked my measurements and squared everything up, the front splash apron (above) would be short about 1/2" on the bottom and 1/2" too long on the top with it attached to the front radiator support.   So the process of  removing and adding metal began...but  that I'll tackle on my next post.   So stay tuned...