Monday, January 30, 2012

Suspension Removal - Part 1

This weekend I was able to spend a couple of hours on the fastback in spite of complications such as my wife coming down with the stomach flu that's been going around and some extra meetings related to my occupation that consumed half of Saturday and Sunday afternoon. I have come to the place where I'm not picky and will take any time I can spend on "Mustang therapy".

After getting the driver's side floor installed, the garage looked like a war zone...black grinding dust everywhere...tools and consumables spread across the floor and in the car.  So with Saturday afternoon warming up into the 40's with bright sun and a hefty breeze out of the west, I aired up the tires, jacked the car up and removed the dollies, and rolled her out into the driveway.  It's the first time it's been out of the garage for probably a year. 

With my girl in the driveway, I proceeded to pick up and clean up and organize the garage as best I could with all the stuff I have in it.   But some of it will soon be moving to my new larger storage unit I'm upgrading to so I can put all the car suspension and tires in it along with the passenger door.   Now I at least have a clean space to put the Stang in.


I put an extension on my air hose so it would reach out to the Mustang.   Then I proceeded to blow out all the dust and debris so that I would have a fairly clean platform to work on.  With the sunlight, it also allowed me to evaluate the work done so far...and evaluate some of the work left to do.


If you want to see traffic slow down dramatically, just push your Mustang out into the driveway.


This is a shot through the back window at the floors.  They look pretty good under brighter light outside.


The recent floor replacement looks OK.  I suppose I could spend some more time to get a better metal finish, but I want to expend that energy under the car since that is the side that will be more visible, especially if I get stupid and decide to put display mirrors under the car.


I should get the passenger floor cleaned up like the driver's side.  It would look much better...at least until I get epoxy primer on it. Here's what I wanted to see better...the rust in the upper toe board and lower firewall.   You can see the rust perforation just above the dash shadow line in the middle of the floor.  


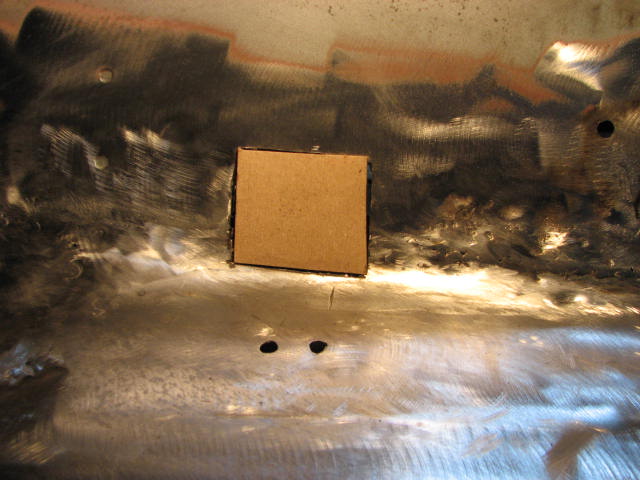
Here's the view of the rust perforation from the outside passenger side front wheel well area...


Here's the view of the rust perforation from the passenger side engine compartment area.


This will be an interesting repair since it involves the frame rail and rear fender splash apron joints.  I didn't see any other rust perforation.  It was just a layer of surface rust, which is a good thing.

After blowing the crud out of the car, I rolled it back into the now clean garage.  I used my trusty 6 ton floor jack to position the car so I can put the front and rear rotisserie pieces on it.   I put my jack-stands under it at their maximum height and pulled the tires.   So now I'm ready to start the suspension removal.


With a can of "PB Blaster" I sprayed all the nuts and bolt on the front suspension.  I called it quits since it was near dinner time and I wanted to catch a little bit of the Mecum Auction from Kissimmee, Florida.  Man, there was what I call "stupid money" paid for cars.  Amazing that some people have that kind of disposable income to drop $610K on a 1969 L-88 Corvette convertible.  Granted, all three previous owners were there and it was all original, and it had only 21K miles, and all the paperwork.  But still, that's a chunk of change.  Anyway...I went out a couple more times in the evening to spray the suspension down in preparation for removal.

Fast forward to late Sunday afternoon.  I fired up my heater, sprayed down the suspension again, and elected to start on the suspension by removing the left front springs.  The shock tower brace, shock, and cap came off without a hitch.   I started on the spring removal and ran into problems with the internal spring compressor I previously purchased.   The shaft was too long and would hit the spring perch before compressing the spring enough to remove it.  I had another set of outside spring compressors, but these wouldn't get enough of a "bite" on the spring coils...


I went back to the internal compressor and decided to cut the shaft down.  I measured the distance of the spring top to bottom.  Then I transferred that measurement to the spring compressor "hooks" in their extended position to determine how much of the shaft I had to cut off.   Here is what it looked like after the shaft cut.


I was able to get the spring compressed and out of the car.  I know some of you might be thinking, "Why not just torch it out?  It's fast and simple."   Problem is, my friend who has the torch is out of town on vacation.  So I had to resort to mechanical removal.   Here's the left front suspension with the spring out.


I started removing cotter pins, most of them that broke off from rust.  I did get the bolts loosened for the strut rod studs at the lower control arm and the lower control arm bolt and eccentric out.  I need to get some deep well air tool sockets to get some of the other bolts freed up.  I stopped by Lowes this morning on the way to work.  They have a complete set, but it's almost $60.  I only need a few of them.  So I'm going to purchase them individually. 

My next window of opportunity to work on suspension removal is tomorrow evening, but that is dependent upon my wife's crazy schedule, since she's been going to the capital to help get a piece of education legislation through before the end of the congressional session in March.  And then you have the possibility of a last-minute meeting since I'm pretty much on call 24/7.

I am just glad that I'm moving closer to getting the fastback on the rotisserie.  Then I can get the underside done and get the car back on all "fours" with new suspension.  I don't think I'm going to mess with trying to clean and rebuild what I have--at least that's how I leaning right now.  Besides, I want the newer style bushings and not original rubber.  I'll make the final decision after I get all the pieces parts out and evaluate them.

So here's to another week with progress on the Mustang.  That's all I could ask for.

Monday, January 23, 2012

Driver's Side Floor Repair - Done...for now.

Work on the fastback was rather segmented over the weekend.   I had a meeting scheduled late in the week on Saturday at Noon.  So, since Saturday is supposed to be my one "day off" each week, I decided to take off Friday afternoon, a flexibility I fortunately have, to work on the driver's floor...again.  I'm not even going to try and figure out how many hours I have in this repair because it's not about the time, but the investment in bringing a classic Mustang back to life...not to mention the "therapy" it provides for me.


At the last exciting episode, I had finished up for the most part the floor to transmission tunnel seam.  I had problems with blow / burn through around the emergency brake cable bracket.  I was chasing the hole as I attempted to stitch it shut.   I couldn't get my copper backup into position due to not having a good method to hold it there, short of asking my wife to lay under the car and hold it there (she was at work).  I made the decision to cut out the area of the floor with the blow / burn through.   But on the first try, I didn't make the patch big enough thinking that I could weld around the spot weld drill hole.  That didn't work at all. I decided to quit before I made things worse....


So I made a bigger cut to remove the entire e-bracket instead of trying to leave it in place.  You can see the failed patch attempt, the bigger new hole,  and the bracket below... 


I made a patch using a cardboard template and then transferring it to a piece of scrap floor pan metal I'd cut away previously while trimming up the floor pan....


After cutting out the patch and doing the trimming and forming to fit the hole, I welded a scrap to it so I could hold it into position...


This was working much better.  I started the tacking process and then removed the "helper" piece of metal...


I continued to do the typical spot--cool--grind routine until the repaired area looked like this...


It didn't look too bad.  But work came to a screeching halt because the air regulator in my compressed air line decided to go on the fritz and I couldn't control the pressure for my air tools.  Bugger.  Then the torpedo heater started to spit and sputter as it does just before it runs out of K-1.   I shut it down and when to add some more Kerosene, but there was only a gallon in the container.  Double bugger.   So that ended Friday's work, which took a couple of hours by the time I got set up with heat and everything ready to start work... and then the work itself... and then the clean-up, especially since I promised to take my wife out to dinner after a challenging week at work for both of us.

Saturday morning brought a nice coating of about 1" of sleet with another 1" to 2" of snow on top of that.  I roll out of the drive at 6:30 AM and head to Starbucks and then the church to pick up where I left off at Noon on Friday.   After my meeting was over I stopped and filled up my 5 gallon kerosene container.  Then I headed back home to deal with the air regulator.   I took it off the air line and headed to Lowes (it was a Kobalt brand regulator) where I bought it.  They didn't have one in stock, but the store 20 minutes away had 3 in stock.  So off to the other Lowes I went.  With a new regulator in hand (they exchanged it even with no receipt!) I headed home.  But by this time, it was 5:30 PM and I was hungry and tired.  So I called it a day.

Now it's Sunday afternoon.  After a couple of visits to families after church, I got home around 3 PM.  The heater was running and I was ready to go to work.  But then I get a call from one of the church members who now lives in Atlanta, but his daughter still lives in the area.  She went to a national parts store (which shall remain nameless) to get a headlight replaced in her Kia Rondo.  They couldn't do it.  So he asked me if I could help.  She came over and, thanks to a really dumb design, it took about 20 minutes to troubleshoot what said parts store had messed up and find out what bulb she needed.  She went and got the correct bulb, and then another 20 minutes to get it installed.  With all headlights now working, I sent her on her way.   So I got back to work on the fastback around 4 PM.
 
The work left on the floor amounted to finishing up some unfinished tacks along the transmission tunnel and the seam at the rear of the floor pan.   Here is the finished result...


I know it's not the prettiest metal finishing job, but the seat riser flange is going to cover it up.   Then I cleaned up the surface of the floor with a stripping pad on my 4" grinder, did some more metal filling and grinding, and got to the point where I've done about all I can on the floor from the inside of the car.   So here is what it looks like now...


I'm going to wait to put the seat riser in until I finish up the floors on the underside.   So now I'm ready to move to the next big step...getting it ready for the rotisserie.   I have to put it on jack stands and pull the tires.  Then take the front and rear suspension off along with the passenger-side door.   It's been a long, long time coming to get to this point.   Hopefully, once I get it on the rotisserie, I can make some good progress and get the underside metal work done once and for all.   I better stop and pick up a case of "PB Rust Blaster" and start soaking all of those suspension nuts and bolts for the next week or so.   Maybe that will help disassembly go easier, but as history has proven, I'm not counting on it.

Monday, January 16, 2012

Driver's Side Floor Repair - Almost There

Finally.  An afternoon with nothing on the schedule after dinner.   After getting home from my Sunday "pastor" duties, and making a nice chicken artichoke spinach pasta dish,  I took my freshly filled container of K-1 Kerosene (at $ 4.49 a gallon!) and filled up my trusty torpedo heater.  This is a 30,000 BTU Craftsman brand I bought on eBay a number of years ago for $36!   It does a nice job of heating my 3 bay garage.  I plugged it in after topping off the tank, made sure that there was no danger of fire, and left it running to heat the space up.  After about 30 minutes, it was nice and comfortable at 64F degrees, which is good enough with a sweatshirt and jeans on to work.

The first thing I did was to mark where the seat riser will go with a white paint pen.  I'm not planning on making the welds look fully dressed since once that riser goes in, no one will ever see the welds unless someone else decides to cut this apart again.  But I don't see that happening...ever,...after this beast is done. 


I'm not going to bore you with a whole slew of pictures on finishing up the floor.  It's a ton more of weld and grind....weld and grind...weld and grind.   I got the hand full of remaining plug welds done on the flat section of the floor and rocker panel.   Then it was hop around on the transmission tunnel and floor seam to get all the welding done.  It took more time than I would have liked since after grinding down the weld, there would be pits and holes left to go back and weld up and grind.   You see the pattern here.   I used the white paint pen to circle the areas that needed repair.   I had to do that since my auto darkening welding helmet didn't like the work light I was using and would go dark on me as soon as I leaned over to weld.  But at least I could see the paint marks.


This process went on for what seemed like hours.  Wait a minute...  It WAS hours.   The joys of working with almost 44 year old metal.   I removed all the drill sheet metal screws and plugged those welds up from the top.  I'll do the bottoms when the car makes it onto the rotisserie.

One of the places that gave me fits was where the emergency brake pivot bracket was spot welded to the floor and transmission tunnel.  I started to drill out the welds back when I cut the original floor out.   I thought I could work around it.  Well that didn't work out so well.  I had all kinds of trouble with blow through.  I tried my copper backup and it didn't work.  So I decided to cut out a larger piece and make a bigger patch with tighter gaps.


I thought I wouldn't worry about the upper right-hand corner since that's were a spot weld was drilled out.  I used a piece of scrap floor pan metal to tack it to the patch and then hold it in place.  The concept was a good idea, but the execution was not.  The right side blew through again and I couldn't get it to stitch up.   So I stopped and decided I'll do what I should have done and take that bracket all the way off.  Then I can make a proper patch and do it right.  I can repair the underside later on the rotisserie and put the bracket back on then.

In the mean time, the rest of the welding is pretty much done.  I did crawl under the car and will have some work to do on the back side of the seam.  But I'm calling the tunnel seam done at this point.   All I have left is that aforementioned patch and the rear seam of the floor pan to the rear floor.  That will also be a weld that's hidden by the seat riser.   So the results at this point are OK--not perfect--but OK.  


Besides, if I go with Dynamat or something similar for sound proofing--or even if I don't and go factory--all of the pretty welding will be covered up anyway.  I don't know too many people who would ask to have the carpet and sound deadener lifted up so they could see the welds.   The important thing is that the welds are strong and no moisture can get through.

It's another full week of evening meetings Monday through Thursday.   So I have to wait and see how next weekend plays out for time to work on the ol' gal again.  At least there seems to be light and the end of the floor pan replacement tunnel.

Thursday, January 12, 2012

Passenger Side Firewall Extension - The Evaluation

After James bought the doors for his Mustang on CJ Pony Parts and posted that they had a sheet metal sale, I thought I better check and see if there are any other pieces parts I needed.  I started poking around and most everything looked OK.  I saw some surface rust on the passenger's right side of the top of the toe board, or bottom of the firewall where it bends to form the extension.  I got out my 4" cone braided wire brush and had at it to see how much surface rust was there.   Here's what I found...


Aw crap!  If you think this looks like fun, here's what it looked like when I put the trouble light on the engine side of the firewall....


More Swiss cheese...and it's not in the most accessible area.  That's the bad news.  The good news is that the rust looks like it's localized in the one area.  I thought about making my own patch panel, but the part I have to cut out looks like it will get into the top of the ribbing in the toe board.   I also figured if I got into it and needed more metal I could put myself in a real bind.   So I got on CJ's web site tonight and the sale was still on.  So for $27 and change with free shipping, I ordered the new right side toe board and will cut out what I need.  

It's supposed to be biting cold the next couple of days.  Welding in a garage with the temp at 18 F degrees isn't my idea of fun.   I need to get some more K-1 kerosene for my torpedo heater if I'm going to get back on finishing up the driver's side floor this weekend.  Hopefully there will be no surprises in my schedule, but as life tends to go, you never know....

Tuesday, January 10, 2012

Driver's Side Floor Repair - Closing the gap

I think "Eleanor" thought I had left her abandoned in the garage.  An insanely busy December with all my duties at church and then with my kids coming from 3 different states to visit with their children and dog in tow over the Christmas-New Year holiday made for an interesting end of the month.   I'm sure many of you can relate.  Now it's onward into 2012 and onward on the fastback.

I had finally carved out some time on Sunday afternoon (the Colts and Lions are out of the playoff picture).  It was time  to get back on finishing up the driver's side floor pan.  There were some areas of the floor that weren't fitting as tightly to the frame rails, transmission crossmember and the front toe board as I would have liked.  So I got out my box of self-drilling screws and installed them in the floor to draw the pan and the substructure closer together for a good weld.


Here you can see the screws in place and the nice tight fit at the plug weld sites.


One of the discoveries I made was that the new floor was not fitting as closely to the transmission tunnel as it should have.  I had tack welded the floor to the transmission crossmember.  So I used my 4" grinder to remove the welds and installed some screws to let me draw the floor pan tighter to the crossmember.


Here is the post-tack weld removal and the drill screws installed.  Now I have the fit I wanted at the trans crossmember.   The upshot though was that the gap grew at the floor pan to transmission tunnel joint.  


Lot's of lessons learned here, the biggest is that I should have screwed this down during the initial  fit-up process.  Then when I trimmed the floor pan, I would have reduced the chances of dealing with the gaps I have.   Oh well...  Moving on....

Now I was ready to start filling the gap with the "Glenn" method of round stock.   I started putting the first piece in.  I had to open up the gap some so that the wire would fit into the gap which worked out rather nicely. 


Now it's on to getting this tacked in and start the welding process...or so I thought.   I get everything set up to go.  I open up the valve to my shielding gas and lo and behold, the gauge reads ZERO!   I was sure I had some left after my last episode.  The valve was in the "off" position too.    Bugger.   Thrifty Supply isn't open on Sunday so the planned project work came to an abrupt end.   

So now it's Monday afternoon.  I stop by Thrifty and get a new bottle of gas.  I have about an hour and a half between getting home and leaving for another evening meeting.   I get the gas connected and all is good in the welding world.   Since it had been awhile since I worked on the car, I put a cone wire brush on my trusty DeWalt 2,500 RPM drill and cleaned up the metal around the remaining plug welds and along the floor-to-tunnel joint.   Then the tacking began.


As I moved forward toward the firewall, the gap got wider.  So I opened up the gap a little wider to be able to put another piece of smaller diameter wire next to the larger piece and tacked them both in.


Those of you who are intimately familiar with the welding process know the routine.  Tack.  Cool.  Grind.....   Tack.  Cool.   Grind....   And so on and so on.   The progress is shown below...


I was making good progress, but ran out of time.  The rear section looks much better and is ready for dressing the welds with my 2" air sander.  I'm not going to spend a lot of time making the welds look "pretty" where the seat riser is going to go.  The front section is getting there.  I still have some places to fill in and probably have about another 45 minutes to an hour including the plug welds to finish and dress out.   But at least there's progress.  Now the question is, "When will I get another chunk of time to work on the fastback again?"   Soon, I hope.