Merry Christmas and Happy New Year (almost)
2017, like so many other years in the past, has really gone by at warp speed... or maybe I should say "light speed" with all the Star Wars hype these days. It's hard to imagine that I've only posted twice this year. That's not a stellar performance when it comes to moving a restoration along. But, it is what it is.
On this installment, I began work on the roof. If you recall from my last post, I had completely stripped the roof and started stripping the dash and cowl area. I had also discovered a number of ripples and dents in the roof that weren't apparent until after the bare metal was exposed. I'm not a fan of slathering on body filler to fix metal imperfections like I see in so many of the TV shows on the Velocity Channel. My goal is no more than 1/16"as the absolute thickness limit. Any more than that and I didn't do a good enough job on the metal work. Preferably, a high build primer should be enough. Speaking of enough, let's move on to the roof.
The work described has taken place over a few afternoons and evening sessions. So it represents probably 8 hours of work. It's not a lot of time, but the progress is reasonable. The PickleX-20 does a remarkable job of keeping the bare metal rust-free especially since the roof was stripped and treated 6 months ago. It's worth the price of admission especially if you're restoration drags on like mine has. So I didn't have to do anything except get out the body working tools and have at it.

I got out a part of my arsenal of body tools including a collection of spoons, hammers, dollies, shrinking disc, along with my 24" long Dura-block for sanding and a can of guide coat.


First order of business was to spray on the guide coat and then put on some 80 grit adhesive backed paper and sand in an "X" pattern across the roof on the driver's side to see how bad it was.
Well..needless to say, there was more damage than initially thought. The only explanation I have as to how this could have happened is that the roof was used for storage with little thought to what throwing things on it might do to the surface. I didn't relish the thought of the possibility of just replacing the entire roof section. But after seeing what Sven Pruitt went through on his Boss, (take a look here) I decided to go ahead and try metal working the ripples and dents out, remembering my filler thickness limit.
The metal forming began with the dinging/slapping spoon and a convex dolly using the "off dolly" process. That places the dolly under the low spot and pushing up while gently but firmly hitting the high spots. The advantage is it spreads out the force evenly and hopefully not leaving any deformation dents as a hammer might do.
The fun began on the front driver's side corner working toward the back and center since that is how the dents got there. It's sort of like moving against a wave of metal deforming and attempting to move it back in the direction from which it came.

The shrinking disk was not that effective, or if it was, it was so minute, I couldn't detect any metal shrinking. Continuing on that route would have been time consuming and wouldn't yield any sizable results. So I stuck with the spoon, dolly and off-hammer process. I did discover that on some of the more stubborn wrinkles
It's getting better after a couple of hours with the off-dolly and slapping spoon. I also have a large 1-1/2" head Fairmount body hammer; one end with a shrinking head and the other that has a flat head. I used the flat end with glancing blows that worked well. I hold the hammer just below the head and come down at a 30-40 degree angle lightly hitting the metal and then once contact is made I slide the hammer a couple of inches across the dent. It's a combination of "hit and slide" that spreads out the force a little more especially on the smaller ripples.
Then there was a more pronounced dent above the windshield near the center of the roof. I can't get behind it with a dolly due to the windshield flange and inner structure. So my only viable option was the stud gun.


The first attempted was OK but still not what I would have liked to see. So I put another row of studs in between the first studs. It turned into a 2 man job with one person pulling the stud and the other with the body hammer tapping the area behind the studs. (More on the 2nd person later)

It's better, but still not there. I'm thinking about how I want to proceed. There wouldn't be more than 1/32" of filler, but I would like it to be almost a translucent skim coat.

...and this is after a couple of hours of work.

At one point, I had to get creative because I couldn't reach in far enough to push up on the bottom side of the roof and yet still use the slapping spoon on the top. I used the spreader bar that I normally have in the back of my pickup truck to hold loads toward the rear of the bed. I blocked it up and then expanded it so that it was doing the pushing up while I slapped the snot out of the top. It actually worked pretty good as the above picture attested.

I decided that to get some motivation on the project, I'd enlist other guys who might be interested in helping. One of them is a senior in one of the local high schools and a member of the church I used to pastor. He is an honest-to-goodness motorhead and jumped at the chance to help. He even has his own Youtube channel called Supercars of Indianapolis. So I put Joey on the rear panel to strip the paint off. He was my second set of hands on the roof dent pulling the stud while I hammered away. There's nothing like teaching the next generation about auto restoration, especially when they have a passion for cars.

He did a pretty good job considering the rotisserie mount prevented him from getting into all the tight places. I may have to do something to either redesign the rotisserie to mount the rear off the leaf spring shackle mount, or take it off the rotisserie and finish what I can't get to now after it's on a body card. I've not decided if that's what I'll do yet.
I'm hoping to make more progress in the coming weeks, but I've been down for over a week with a raging case of bronchitis and then family will be arriving in a few days for Christmas. January will be a busy month as I have two trips planned to head north to Canada for First Nation community visits and a PR weekend for the missionary organization I'm with. I'm going to try and set up one night a week as a "work night" I'm sure Joey will come when he can. I might even get another guy or two to come. I just want to try and keep things from stalling for too long.
Speaking of projects stalling, I have noticed that I'm not the only one whose project has been slow coming along. A number of other Mustang restorers I keep track of are in the same boat as me. So I guess I shouldn't feel too badly about my progress.
Well...that's about it for this installment. Until the next time...
2017, like so many other years in the past, has really gone by at warp speed... or maybe I should say "light speed" with all the Star Wars hype these days. It's hard to imagine that I've only posted twice this year. That's not a stellar performance when it comes to moving a restoration along. But, it is what it is.
On this installment, I began work on the roof. If you recall from my last post, I had completely stripped the roof and started stripping the dash and cowl area. I had also discovered a number of ripples and dents in the roof that weren't apparent until after the bare metal was exposed. I'm not a fan of slathering on body filler to fix metal imperfections like I see in so many of the TV shows on the Velocity Channel. My goal is no more than 1/16"as the absolute thickness limit. Any more than that and I didn't do a good enough job on the metal work. Preferably, a high build primer should be enough. Speaking of enough, let's move on to the roof.
The work described has taken place over a few afternoons and evening sessions. So it represents probably 8 hours of work. It's not a lot of time, but the progress is reasonable. The PickleX-20 does a remarkable job of keeping the bare metal rust-free especially since the roof was stripped and treated 6 months ago. It's worth the price of admission especially if you're restoration drags on like mine has. So I didn't have to do anything except get out the body working tools and have at it.

I got out a part of my arsenal of body tools including a collection of spoons, hammers, dollies, shrinking disc, along with my 24" long Dura-block for sanding and a can of guide coat.


First order of business was to spray on the guide coat and then put on some 80 grit adhesive backed paper and sand in an "X" pattern across the roof on the driver's side to see how bad it was.
 |
| The first application of guide coat |
 |
| The results after sanding off the guide coat. |
The metal forming began with the dinging/slapping spoon and a convex dolly using the "off dolly" process. That places the dolly under the low spot and pushing up while gently but firmly hitting the high spots. The advantage is it spreads out the force evenly and hopefully not leaving any deformation dents as a hammer might do.
 |
| This is the dinging/slapping spoon that is used to hit the high spots. |
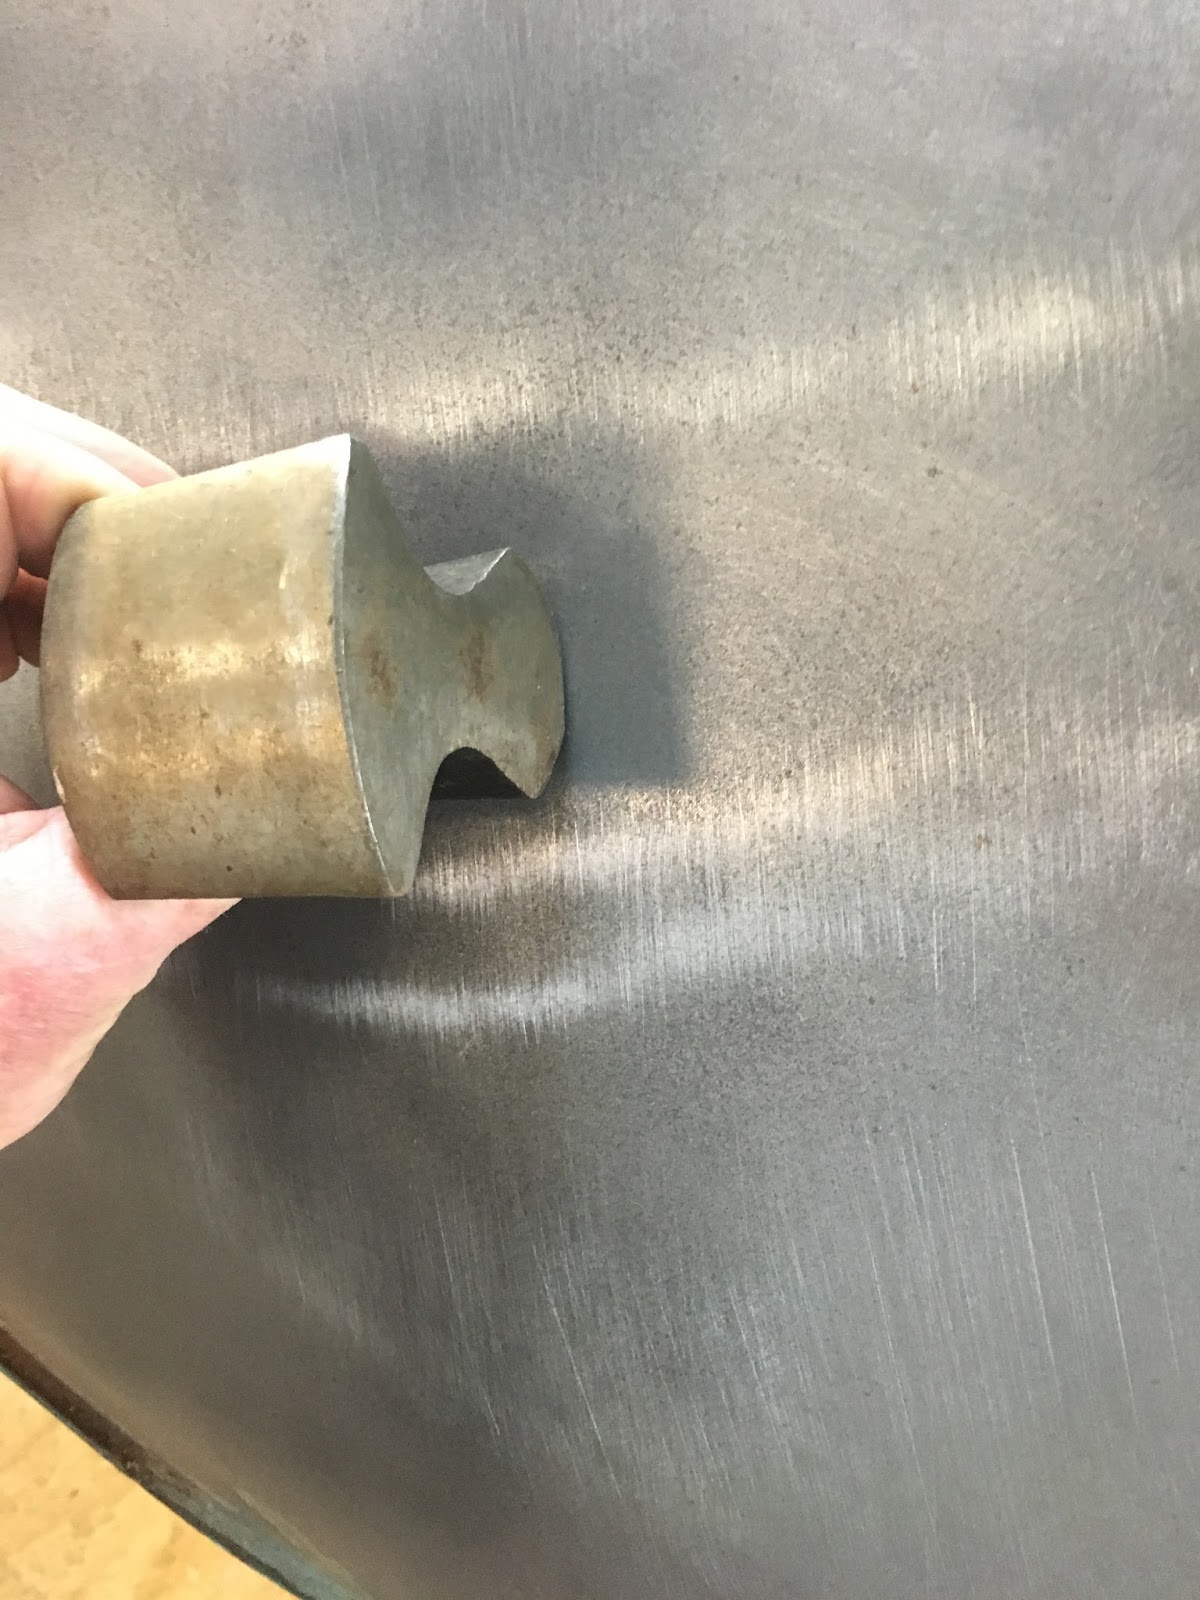 |
| Imagine this dolly on the opposite side of the two high shiny ridges pushing up while the slapping spoon strikes those high spots. |

The shrinking disk was not that effective, or if it was, it was so minute, I couldn't detect any metal shrinking. Continuing on that route would have been time consuming and wouldn't yield any sizable results. So I stuck with the spoon, dolly and off-hammer process. I did discover that on some of the more stubborn wrinkles
 |
| Progress is being made although it's slow going. |
Then there was a more pronounced dent above the windshield near the center of the roof. I can't get behind it with a dolly due to the windshield flange and inner structure. So my only viable option was the stud gun.


The first attempted was OK but still not what I would have liked to see. So I put another row of studs in between the first studs. It turned into a 2 man job with one person pulling the stud and the other with the body hammer tapping the area behind the studs. (More on the 2nd person later)

It's better, but still not there. I'm thinking about how I want to proceed. There wouldn't be more than 1/32" of filler, but I would like it to be almost a translucent skim coat.
 |
| The dent after the 2nd set of weld studs. |
I moved from the front area following the "wave" of ripples toward the rear. This is what I started with...

...and this is after a couple of hours of work.

At one point, I had to get creative because I couldn't reach in far enough to push up on the bottom side of the roof and yet still use the slapping spoon on the top. I used the spreader bar that I normally have in the back of my pickup truck to hold loads toward the rear of the bed. I blocked it up and then expanded it so that it was doing the pushing up while I slapped the snot out of the top. It actually worked pretty good as the above picture attested.

I decided that to get some motivation on the project, I'd enlist other guys who might be interested in helping. One of them is a senior in one of the local high schools and a member of the church I used to pastor. He is an honest-to-goodness motorhead and jumped at the chance to help. He even has his own Youtube channel called Supercars of Indianapolis. So I put Joey on the rear panel to strip the paint off. He was my second set of hands on the roof dent pulling the stud while I hammered away. There's nothing like teaching the next generation about auto restoration, especially when they have a passion for cars.
 |
| Joey doing a very meticulous job of removing the paint with a stripping pad. |

He did a pretty good job considering the rotisserie mount prevented him from getting into all the tight places. I may have to do something to either redesign the rotisserie to mount the rear off the leaf spring shackle mount, or take it off the rotisserie and finish what I can't get to now after it's on a body card. I've not decided if that's what I'll do yet.
I'm hoping to make more progress in the coming weeks, but I've been down for over a week with a raging case of bronchitis and then family will be arriving in a few days for Christmas. January will be a busy month as I have two trips planned to head north to Canada for First Nation community visits and a PR weekend for the missionary organization I'm with. I'm going to try and set up one night a week as a "work night" I'm sure Joey will come when he can. I might even get another guy or two to come. I just want to try and keep things from stalling for too long.
Speaking of projects stalling, I have noticed that I'm not the only one whose project has been slow coming along. A number of other Mustang restorers I keep track of are in the same boat as me. So I guess I shouldn't feel too badly about my progress.
Well...that's about it for this installment. Until the next time...


