For the first of December here in central Indiana, it feels more like the first of April. The temperatures are in the low 60's with a breeze out of the southwest. My wife hit the yard to do her final gardening work and I hit the garage once I got home from my Saturday obligations. I needed to make a trip by Lowes on the way home, which I'll explain later. But how can you not stop at a place (i.e. Lowes) you drive by almost daily on your way to or from Starbucks for caffeine that has so many things that can come in handy in the garage? See...I knew you'd agree. Tools and caffeine. What a great combination!
This is the first weekend where I had some time to get back on the trunk drop off. If you remember the last exciting episode, I had the replacement part trimmed to fit. The next step was to get it installed. One task I didn't mention before was the treatment of the "inside" of the part, that is the side facing the inside of the outer quarter panel. After the trim job, I gave it a couple of coats of etching primer after a wipe down with acetone. Then I gave it a couple of coats of satin black Rustoleum. I also cleaned the outer quarter flange and gave it a shot of Eastwood's Rust encapsilator. Then I sprayed the flange with the black Rustoleum.

So that brings me up to today's fun activities. The trip to Lowes netted a 7/8" hole saw to put the drain hole in the original location since this piece of .... sorry... this repo part didn't have one hole in the right place. I chucked it in the drill press and in a matter of seconds, the new hole was done.

While I was at it, I measured the dimensions of the square hole that's used to hold a wiring harness clip. I put the appropriate size drill in the press and knocked that out too. FYI, it's a 5/16 bit if you run into the problem on your 'Stang. I used a triangular rat-tailed file to "square" the hole up. I spent some more time after the picture below to make it look actually "square."

While I had the drill press set up with the bit for the plug welds, I marked the location of the welds. The factory wasn't especially careful on spacing. But the anal engineer in me and the welding manual suggested otherwise.

After making holes in the part, it was time to fill up the one extra hole. I took my punch plug from my collection of slugs and ground off the zinc coating that doesn't tend to weld very nicely. I clamped the part to my work mate using a piece of 1/4" steel and my copper backup sandwiched between the part and the heavy metal backup. I started with the back side of the part that would be out of view.

After lots-o-tacking and grinding the slug was in. I flipped it over and did a little more metal finishing.

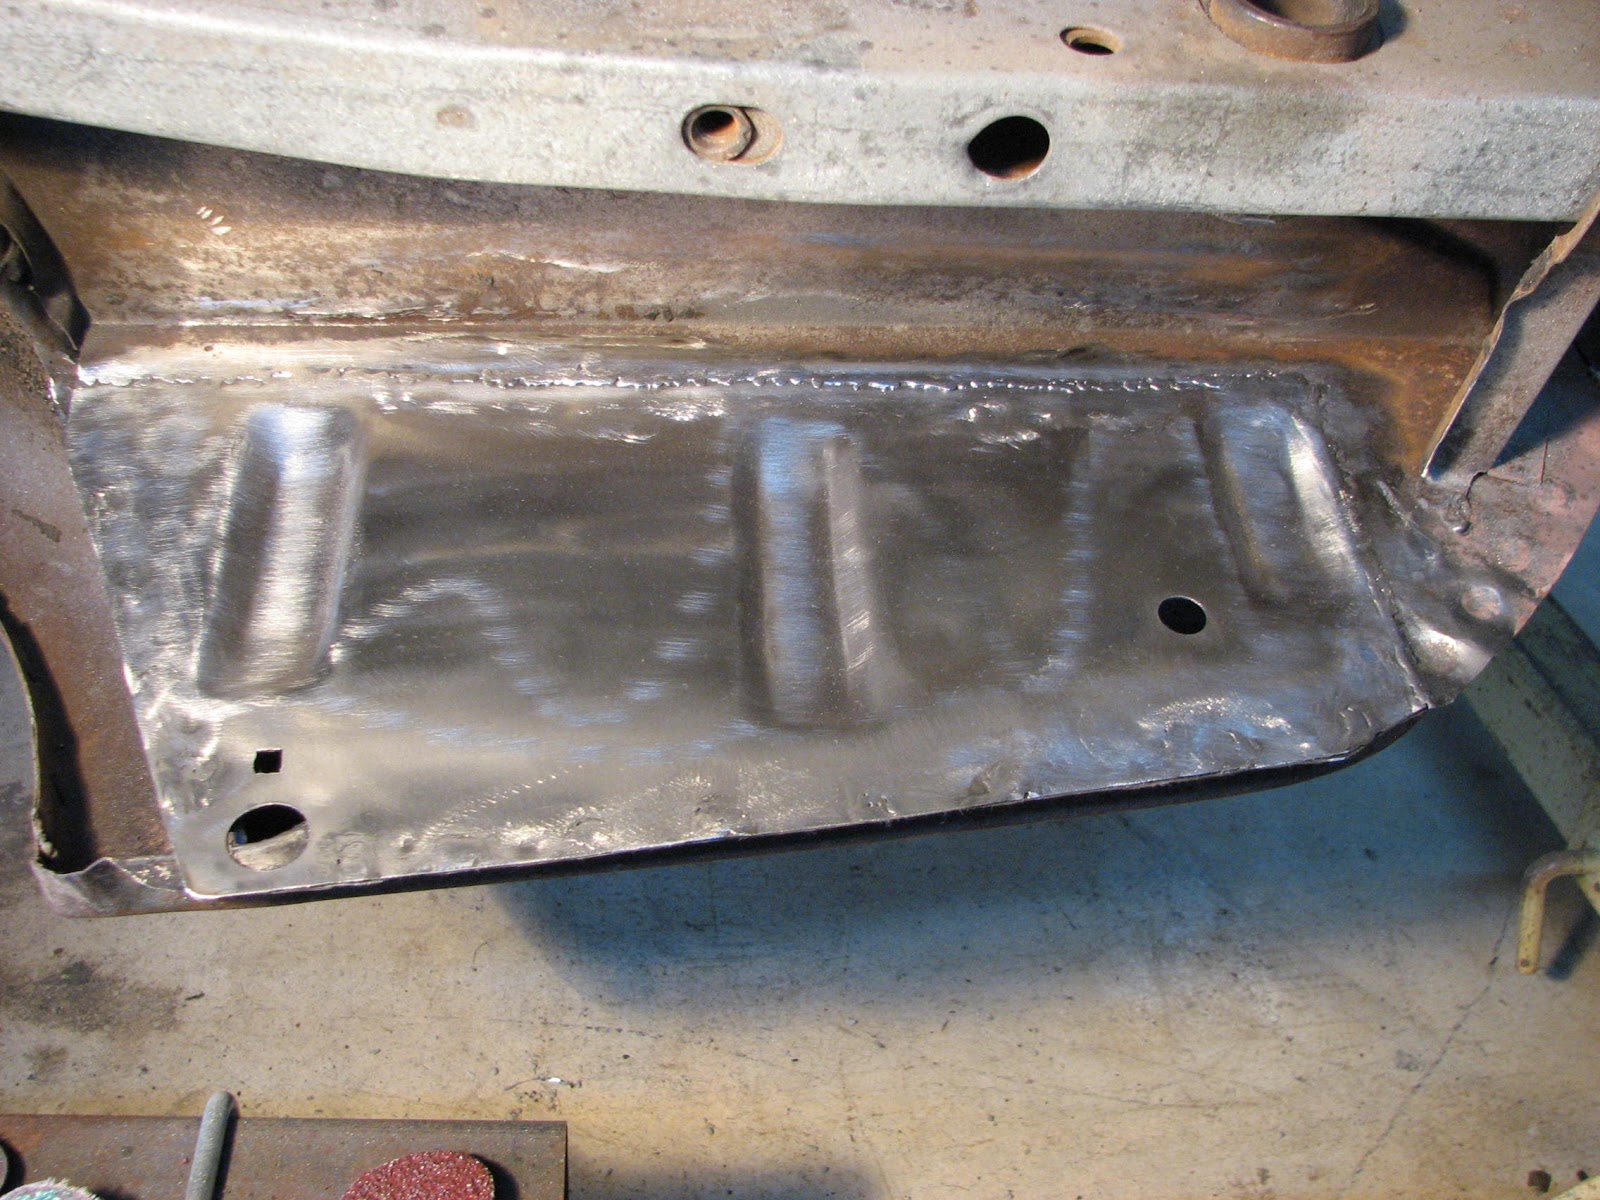
Before I clamped the part in place, I put a cone braided wire brush on my angle grinder and cleaned up the inside of the outer quarter panel so that I could spray the rust encapilator in later. Then after I clamped the part in place, I used my paint pen to mark the plug weld locations on the outer quarter panel flange. Then I took it off and used my 2" sander to clean those spots to bare metal in preparation for the plug welds...

Then the tedious process began of filling the plug welds and tacking the butt joint. I won't bore you with the process since many of you are familiar with the process. Tack...tack...tack...grind...grind...grind. See what I mean?

After an hour and a half or so, the welding was close to being done. I will say it was rather challenging to get to that top joint with my grinding tools. I figure that if I'm not happy with it, I'll put a skim coat of Metal-to-Metal on it. I really do wonder how many people are going to look under it and say, "Hey, that weld joint doesn't look properly finished. I'm not building this to go across the block at Barrett-Jackson or Mecum auction. So too bad.

I rolled the car over to make sure I had good penetration in the lower outer quarter flange...

...and the same on the inner wheel well flange....

I have a repair on one of the spot welds I drilled out in removing the drop off. I got a little ambitious and drilled through the outer wheel well flange. I'll go back and fill that later. It should be a 15 minute job including dressing the weld.
I got done today and felt pretty good about the progress. I decided to roll the car into position so I could spray the back side, or inside, of the trunk drop off since I did grind the paint off some of it and the weld burned some of the paint off. As I'm rolling it into position, I'm looking through trunk into the cavity that the outer quarter and the truck drop off form and...."What is that? You've got to be kidding me?" Yup, a pin hole of rust in the outer quarter panel. Seems like it's two steps forward and one step back.
I'll hit that area with my braided cone wire brush on my 4.5" grinder. That seems to do a pretty good job of revealing the crustie rusties as I did in the passenger toe board area. I also noticed I'm getting to the end of the spool of .023 wire and my Argon/CO2 tank is also getting near the end.
So ends another exciting day of working on the fastback. The next big step (not counting the pin holes in the quarter panel) will be tackling the rust in the right top corner of the trunk opening on the body. No repro parts available. But from what I've experienced so far, it won't be a problem making the new replacement pieces parts myself.
My wife will be going to Lexington, KY to help my daughter who is 36 weeks in her pregnancy with her first son and the second grandson for me. I'm hoping to spend time on the fastback while I "bach" it for the weekend. I'll have to make sure he has some Mustang swag to go home in from the hospital. After all, you got to start bringing them up right from a young age. :- )
This is the first weekend where I had some time to get back on the trunk drop off. If you remember the last exciting episode, I had the replacement part trimmed to fit. The next step was to get it installed. One task I didn't mention before was the treatment of the "inside" of the part, that is the side facing the inside of the outer quarter panel. After the trim job, I gave it a couple of coats of etching primer after a wipe down with acetone. Then I gave it a couple of coats of satin black Rustoleum. I also cleaned the outer quarter flange and gave it a shot of Eastwood's Rust encapsilator. Then I sprayed the flange with the black Rustoleum.

So that brings me up to today's fun activities. The trip to Lowes netted a 7/8" hole saw to put the drain hole in the original location since this piece of .... sorry... this repo part didn't have one hole in the right place. I chucked it in the drill press and in a matter of seconds, the new hole was done.

While I was at it, I measured the dimensions of the square hole that's used to hold a wiring harness clip. I put the appropriate size drill in the press and knocked that out too. FYI, it's a 5/16 bit if you run into the problem on your 'Stang. I used a triangular rat-tailed file to "square" the hole up. I spent some more time after the picture below to make it look actually "square."

While I had the drill press set up with the bit for the plug welds, I marked the location of the welds. The factory wasn't especially careful on spacing. But the anal engineer in me and the welding manual suggested otherwise.

After making holes in the part, it was time to fill up the one extra hole. I took my punch plug from my collection of slugs and ground off the zinc coating that doesn't tend to weld very nicely. I clamped the part to my work mate using a piece of 1/4" steel and my copper backup sandwiched between the part and the heavy metal backup. I started with the back side of the part that would be out of view.

After lots-o-tacking and grinding the slug was in. I flipped it over and did a little more metal finishing.

Before I clamped the part in place, I put a cone braided wire brush on my angle grinder and cleaned up the inside of the outer quarter panel so that I could spray the rust encapilator in later. Then after I clamped the part in place, I used my paint pen to mark the plug weld locations on the outer quarter panel flange. Then I took it off and used my 2" sander to clean those spots to bare metal in preparation for the plug welds...

Then the tedious process began of filling the plug welds and tacking the butt joint. I won't bore you with the process since many of you are familiar with the process. Tack...tack...tack...grind...grind...grind. See what I mean?

After an hour and a half or so, the welding was close to being done. I will say it was rather challenging to get to that top joint with my grinding tools. I figure that if I'm not happy with it, I'll put a skim coat of Metal-to-Metal on it. I really do wonder how many people are going to look under it and say, "Hey, that weld joint doesn't look properly finished. I'm not building this to go across the block at Barrett-Jackson or Mecum auction. So too bad.
I rolled the car over to make sure I had good penetration in the lower outer quarter flange...

...and the same on the inner wheel well flange....

I have a repair on one of the spot welds I drilled out in removing the drop off. I got a little ambitious and drilled through the outer wheel well flange. I'll go back and fill that later. It should be a 15 minute job including dressing the weld.
I got done today and felt pretty good about the progress. I decided to roll the car into position so I could spray the back side, or inside, of the trunk drop off since I did grind the paint off some of it and the weld burned some of the paint off. As I'm rolling it into position, I'm looking through trunk into the cavity that the outer quarter and the truck drop off form and...."What is that? You've got to be kidding me?" Yup, a pin hole of rust in the outer quarter panel. Seems like it's two steps forward and one step back.
I'll hit that area with my braided cone wire brush on my 4.5" grinder. That seems to do a pretty good job of revealing the crustie rusties as I did in the passenger toe board area. I also noticed I'm getting to the end of the spool of .023 wire and my Argon/CO2 tank is also getting near the end.
So ends another exciting day of working on the fastback. The next big step (not counting the pin holes in the quarter panel) will be tackling the rust in the right top corner of the trunk opening on the body. No repro parts available. But from what I've experienced so far, it won't be a problem making the new replacement pieces parts myself.
My wife will be going to Lexington, KY to help my daughter who is 36 weeks in her pregnancy with her first son and the second grandson for me. I'm hoping to spend time on the fastback while I "bach" it for the weekend. I'll have to make sure he has some Mustang swag to go home in from the hospital. After all, you got to start bringing them up right from a young age. :- )
Look at you, butt-welding like an old pro! Nice job Dennis!
ReplyDeleteThanks Alex. Practice makes perfect and I've had loads of practice on butt welds. This car came out of Texas. I can't imagine what I'd be looking at if it was a "rust belt" car. On second thought, I do. Sven's Boss! :- )
ReplyDeleteBravo and OUCH! Nice job on that trunk drop and I was especially impressed with all of the extra "corrective actions" you accomplished to get it in shape. Rust? What rust? Never heard of the stuff.......
DeleteSven, you crack me up, Mr. Master-of-rust-repair! I have a feeling this will not be the only hidden rust I'll find as you have discovered. But a little rust isn't going to stop me now. I'm too close to the end...maybe.
DeleteOne more piece done, one step further to the finish. Keep it coming.
ReplyDeleteI'll be looking forward when thee is no long "one more piece" to be done. The rust gremlins are vexing indeed.
DeleteCompletely agree with the need to stop at Lowes...you never know what you'll find for the Man Cave!! Great work on the Fastback!!!
ReplyDeleteThanks Patrick. I mean, how can I not stop. The truck just turns in the parking lot every time I go by if I go home that way...and that is quite often!
ReplyDelete