It's not that I haven't been doing anything on the fastback. Sometimes there is a break for "introspection" on how to proceed. You see, as a "retired" manufacturing engineer I end up weighing the pro's and con's to ridiculous levels at times. One of the production foreman at a plant I worked in had a framed sign in his office that read, "There comes a time in every project when you shoot the engineer and get on with production." OK. Guilty...but not totally.
If you remember at our last exciting episode, I had laid out grid lines on both left and right quarter panels so that the left side would become the template for the right side. I got that slick profile gauge. I got some scrap micro-corrugated cardboard for the templates.

Then I used the profile gauge to get the contour at each station on the left quarter panel. I then transferred it to the cardboard and cut them out.

The next step in the process was to compare the template to each of the 6 stations on the panel. The template matched the left panel rather nicely after some minor trimming...

The right side...not so much....

After getting them all done and doing the comparison between the left and the right panel, I decided to just forget about trying to re-form the panel to match the left, especially since after about 30 minutes of trying to get two side-by-side profiles to match. It was like chasing a herd of cats. I'd get one section close and the other would become distorted and vise-versa. I was making progress, but it was painfully slow. Was all this work really worth it? I was bumping up against the limit of my metal forming skills.
Time for some introspection. What were my options? 1. I could continue down the path I was on and resign myself to the many hours ahead with the result still ending up with more body filler than I wanted. 2. I could forget using the templates and make the right side look respectable even if it didn't match the left. Who's going to see both sides anyway? 3. I could go ahead and replace the lower quarter panel and deal with an aftermarket piece and do my best to make that fit. 4. I could pull the trigger on the 2013 Boss 302 Laguna Seca at the Ford dealer near my nephew's house in Atlanta and ditch the fastback. What's a guy to do?
Option 3 became the logical and realistic choice. Now it was time to figure out what vendor to get the part from. I have decided that buying repro parts is like one of those dating websites. A picture and a paragraph are all you have to go on. You don't know what you're really going to get until that face-to-face encounter. Most of the time, it's going to be disappointing. That's what one of my daughters experienced when she tried one of the websites (that will remain nameless). I ended up getting one from Kentucky Mustang. I've bought parts from them over the years and got good service and fast shipping.
The box arrived and I was not disappointed. I got exactly what I expected...a repro part that was going to take a crapload of work to make it fit as received.

The first thing I noticed was the form lines are not as sharp and crisp as the original. This is the fender lip of the original right rear quarter panel. Notice how sharp the 90 degree form is.

...and this is the contour of the panel on the replacement part. It is probably 3 times the radius of the original!!!

Not very sharp. I would have to hammer and dolly that aggressively to come close to the original. Well, I would have to deal with this later as I had a rather important appointment to keep. So if you would indulge me for a few moments....
My grandson turned 1 on May 30.. The trip to to celebrate the little guy's birthday was on the agenda. The $64K question was how were we going to go out there to the Omaha, Nebraska/ Council Bluffs, Iowa area? Now that my wife and I have an aircraft available and the cost to fly commercially was actually more than the estimated flight time in one of the club airplanes, we decided to take the club airplane. We fly on our schedule, no TSA, no paid airport parking, etc. However, the weather was dicey, especially since the system that dropped those two killer tornadoes in Oklahoma was hanging around the midwest. I had the plane scheduled but watched the weather closely. I would do one last check of the weather with flight service at 5 AM make the go-no go decision the morning of the 30th. If the weather looked bad along our intended route, we'd cancel the airplane and drive. If not, it would be load up and head to the airport.
At 5:30 AM I woke my wife up and said, "Hey hon, how'd you like to fly out and see your grandson?" She got up right away and got ready. I filed the Flight plans with the FAA, loaded up the truck, and off to the airport we went. Within 20 minutes of arrival we were loaded, preflight inspection complete, and we were ready to launch at 7:30 AM. We made a stop in Burlington, IA to get a weather update from flight service, empty our bladders and fill up the airplane. The weather didn't look great, but there were no convective sigmits (i.e. Thunderstorms). Just clouds and rain. We launched for the second leg. The flooding in southeast Iowa was pretty bad as seen here just outside Otumwa at 4,000 feet...

Another 30 minutes and we climbed up to 6,000 feet to get above the cloud deck. But 15 minutes later we were in the soup flying through moderate rain until we landed at Council Bluffs an hour away. Total flight time including the stop: 4.6 hours. Driving time: 10.5 hours. Airplane wins.

We had a great time there for the next 5 days. We went to Judah's favorite restaurant for his birthday dinner...
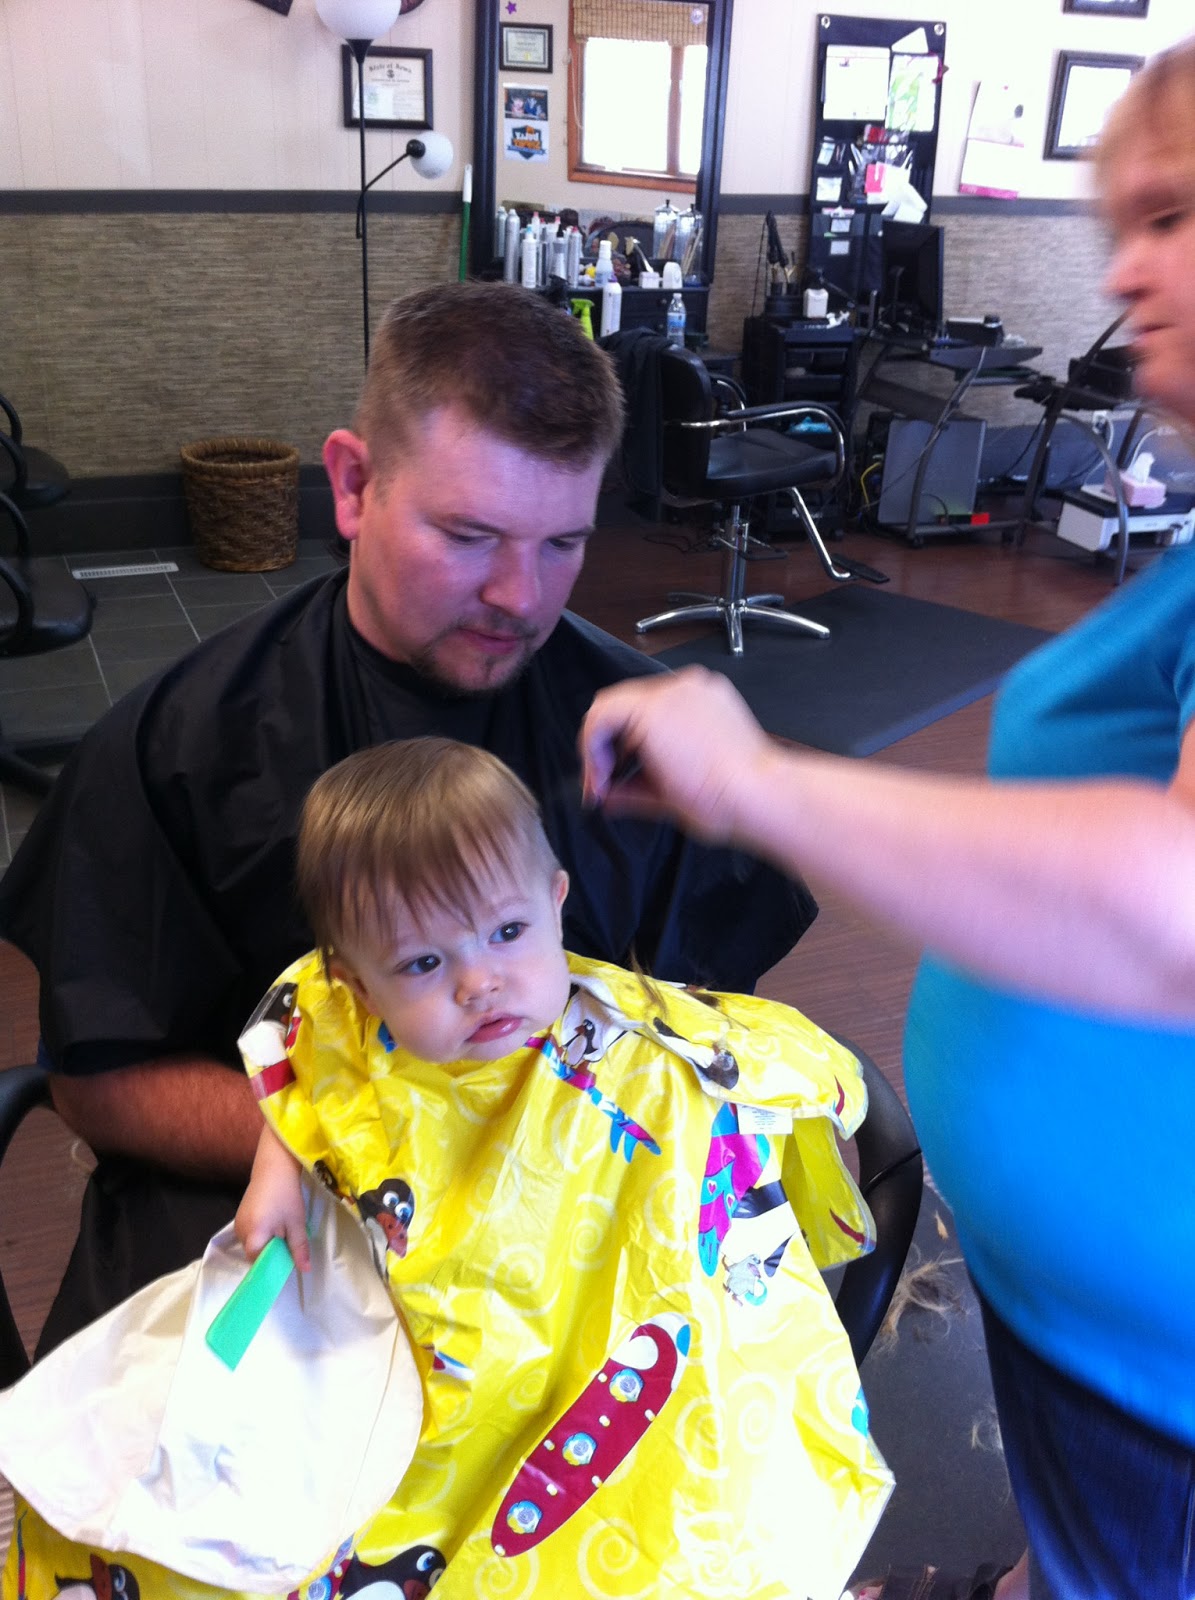
The next morning, he got his first haircut...
Then we went to the Omaha zoo...


...and a bunch of bass too....

Judah's big family party was the next day. He had a fire truck cake and liked the Oreo tires the best.

We had a day to relax before flying back home on Monday. The flight home was uneventful. We did end up in some clouds until Chicago Center cleared us for a higher altitude. Here's a short video of that part of the flight...
Thanks for letting me take this little side excursion.
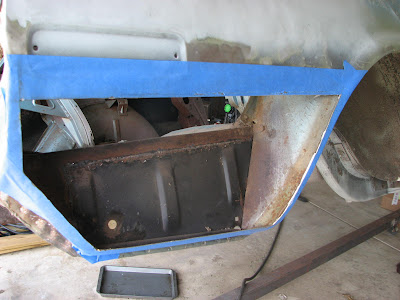
So after getting back home and catching up from being on vacation, I did some more work on this patch panel. I started by clamping it in place to get an idea of how much reword would be required. Once again, I am not disappointed by the piss-poor fit. This is as bad as I've seen...well, maybe the passenger toe board was pretty bad. If you don't remember that, check it out here
Here is a view looking at the right trunk drop off piece. Remember, the original is still there. Glad I didn't remove it first. Again, the fit is beyond poor.

This is the right rear corner section of the quarter panel. Notice it doesn't have the flange that's supposed to wrap around and attach to the rear light panel.

So I elected to try and get the flanges straightened out and more defined. I used my trusty bench vice and body hammer to get the flange that attaches to the trunk drop off area straight...
I got the lower flange to fit better and it tightened up the rest of the fit but there was still a long way to go.

This is the fit on the lower rear area of the outer wheel well. There's still a gap in the middle of the corner that would require shrinking it via cutting a pie piece out and welding it together...

After monkeying around with it for a half hour and then evaluating the fit along the bottom of the trunk drop off flange, I decided I would not use the flanges and cut them off. I needed to measure the proper cut to remove enough of the old material yet leaving enough to butt weld the new piece in.

A combination of my 3" cutoff wheel and air saw made quick work out of removing the old section of the quarter panel....
This is the outside of the removed piece. The rust holes are quite obvious...

...and here is the back side. I did get all the rust out of the quarter panel.

The inside of the wheel tub looks pretty good. I'll clean this up and get some rust treatment and paint on it before welding in the new piece. I'm also able to see some pinholes that will need attention in the seam from the trunk drop off I installed last fall. Wow. That never happens does it?!?

Now it's on to cutting the new piece. The first thing I needed to do was establish the datum points for both the old and the new. Using the rear upper corner of the old panel, and overlaying the new panel and tracing its outline on the old panel, I could see where I needed to transfer the measurement onto the new panel.

I did the same for the upper right side of the panel at the fender well lip.

After transferring the measurements onto the new panel, I used the old piece and laid it on top as the template to trace. The 2" datum line I established along with the corner points made the aligning much easier and hopefully I'll have an accurate part to weld in.

Here's a view after tracing the old part on top of the new. Everything outside the line will be tossed.

Here is the part with the flanges removed. I still have the top piece to remove, but left it in place because that datum line running across the top will help me keep the panel aligned while adjusting the fit of the other three sides. When that is done, I'll cut it off, do the final finish grinding and sanding for welding and start that tedious process.
 There is one thing I discovered that could be problematic. As I made the top cut in the old panel, there was apparently a fair amount of stress still in the panel. All of a sudden, it "popped" and oil canned badly.
I'm trying to decide whether I should try and shrink it now, or take my
chances that welding in the new panel will help alleviate the problem.
The heat from welding could make it worse if I'm not careful. So
there's some more "introspection" that will be needed before the next
step.
Until then.
If you remember at our last exciting episode, I had laid out grid lines on both left and right quarter panels so that the left side would become the template for the right side. I got that slick profile gauge. I got some scrap micro-corrugated cardboard for the templates.

Then I used the profile gauge to get the contour at each station on the left quarter panel. I then transferred it to the cardboard and cut them out.

The next step in the process was to compare the template to each of the 6 stations on the panel. The template matched the left panel rather nicely after some minor trimming...

The right side...not so much....

After getting them all done and doing the comparison between the left and the right panel, I decided to just forget about trying to re-form the panel to match the left, especially since after about 30 minutes of trying to get two side-by-side profiles to match. It was like chasing a herd of cats. I'd get one section close and the other would become distorted and vise-versa. I was making progress, but it was painfully slow. Was all this work really worth it? I was bumping up against the limit of my metal forming skills.
Time for some introspection. What were my options? 1. I could continue down the path I was on and resign myself to the many hours ahead with the result still ending up with more body filler than I wanted. 2. I could forget using the templates and make the right side look respectable even if it didn't match the left. Who's going to see both sides anyway? 3. I could go ahead and replace the lower quarter panel and deal with an aftermarket piece and do my best to make that fit. 4. I could pull the trigger on the 2013 Boss 302 Laguna Seca at the Ford dealer near my nephew's house in Atlanta and ditch the fastback. What's a guy to do?
Option 3 became the logical and realistic choice. Now it was time to figure out what vendor to get the part from. I have decided that buying repro parts is like one of those dating websites. A picture and a paragraph are all you have to go on. You don't know what you're really going to get until that face-to-face encounter. Most of the time, it's going to be disappointing. That's what one of my daughters experienced when she tried one of the websites (that will remain nameless). I ended up getting one from Kentucky Mustang. I've bought parts from them over the years and got good service and fast shipping.
The box arrived and I was not disappointed. I got exactly what I expected...a repro part that was going to take a crapload of work to make it fit as received.

The first thing I noticed was the form lines are not as sharp and crisp as the original. This is the fender lip of the original right rear quarter panel. Notice how sharp the 90 degree form is.

...and this is the contour of the panel on the replacement part. It is probably 3 times the radius of the original!!!

Not very sharp. I would have to hammer and dolly that aggressively to come close to the original. Well, I would have to deal with this later as I had a rather important appointment to keep. So if you would indulge me for a few moments....
My grandson turned 1 on May 30.. The trip to to celebrate the little guy's birthday was on the agenda. The $64K question was how were we going to go out there to the Omaha, Nebraska/ Council Bluffs, Iowa area? Now that my wife and I have an aircraft available and the cost to fly commercially was actually more than the estimated flight time in one of the club airplanes, we decided to take the club airplane. We fly on our schedule, no TSA, no paid airport parking, etc. However, the weather was dicey, especially since the system that dropped those two killer tornadoes in Oklahoma was hanging around the midwest. I had the plane scheduled but watched the weather closely. I would do one last check of the weather with flight service at 5 AM make the go-no go decision the morning of the 30th. If the weather looked bad along our intended route, we'd cancel the airplane and drive. If not, it would be load up and head to the airport.
At 5:30 AM I woke my wife up and said, "Hey hon, how'd you like to fly out and see your grandson?" She got up right away and got ready. I filed the Flight plans with the FAA, loaded up the truck, and off to the airport we went. Within 20 minutes of arrival we were loaded, preflight inspection complete, and we were ready to launch at 7:30 AM. We made a stop in Burlington, IA to get a weather update from flight service, empty our bladders and fill up the airplane. The weather didn't look great, but there were no convective sigmits (i.e. Thunderstorms). Just clouds and rain. We launched for the second leg. The flooding in southeast Iowa was pretty bad as seen here just outside Otumwa at 4,000 feet...
 |
| US 34 is the highway running through the flooded fields |

Another 30 minutes and we climbed up to 6,000 feet to get above the cloud deck. But 15 minutes later we were in the soup flying through moderate rain until we landed at Council Bluffs an hour away. Total flight time including the stop: 4.6 hours. Driving time: 10.5 hours. Airplane wins.

We had a great time there for the next 5 days. We went to Judah's favorite restaurant for his birthday dinner...
 | |
| Judah kept a close eye on that cow the whole time! |
 |
| I was a good boy sitting on daddy's lap |

Then my son-in-law took me to one of his favorite fishing spots. We were killing it that evening and caught more fish than I ever had before, including this nice blue gill...

...and a bunch of bass too....

Judah's big family party was the next day. He had a fire truck cake and liked the Oreo tires the best.

We had a day to relax before flying back home on Monday. The flight home was uneventful. We did end up in some clouds until Chicago Center cleared us for a higher altitude. Here's a short video of that part of the flight...
Thanks for letting me take this little side excursion.
So after getting back home and catching up from being on vacation, I did some more work on this patch panel. I started by clamping it in place to get an idea of how much reword would be required. Once again, I am not disappointed by the piss-poor fit. This is as bad as I've seen...well, maybe the passenger toe board was pretty bad. If you don't remember that, check it out here
 | |
| This is a view from the lower right rear quarter panel. The flange forming is pathetic |


So I elected to try and get the flanges straightened out and more defined. I used my trusty bench vice and body hammer to get the flange that attaches to the trunk drop off area straight...
 |
| The vice is at the bottom of the picture. All flanges were clamped to straighten them out |
I got the lower flange to fit better and it tightened up the rest of the fit but there was still a long way to go.

This is the fit on the lower rear area of the outer wheel well. There's still a gap in the middle of the corner that would require shrinking it via cutting a pie piece out and welding it together...

After monkeying around with it for a half hour and then evaluating the fit along the bottom of the trunk drop off flange, I decided I would not use the flanges and cut them off. I needed to measure the proper cut to remove enough of the old material yet leaving enough to butt weld the new piece in.
 | ||
| There is a line drawn 2" down from the "datum" line running through the side marker light indentation |
After I drew my lines with a sharp drafting pencil, I taped off the lines.

A combination of my 3" cutoff wheel and air saw made quick work out of removing the old section of the quarter panel....

This is the outside of the removed piece. The rust holes are quite obvious...

...and here is the back side. I did get all the rust out of the quarter panel.

The inside of the wheel tub looks pretty good. I'll clean this up and get some rust treatment and paint on it before welding in the new piece. I'm also able to see some pinholes that will need attention in the seam from the trunk drop off I installed last fall. Wow. That never happens does it?!?

Now it's on to cutting the new piece. The first thing I needed to do was establish the datum points for both the old and the new. Using the rear upper corner of the old panel, and overlaying the new panel and tracing its outline on the old panel, I could see where I needed to transfer the measurement onto the new panel.

I did the same for the upper right side of the panel at the fender well lip.

After transferring the measurements onto the new panel, I used the old piece and laid it on top as the template to trace. The 2" datum line I established along with the corner points made the aligning much easier and hopefully I'll have an accurate part to weld in.

Here's a view after tracing the old part on top of the new. Everything outside the line will be tossed.

Here is the part with the flanges removed. I still have the top piece to remove, but left it in place because that datum line running across the top will help me keep the panel aligned while adjusting the fit of the other three sides. When that is done, I'll cut it off, do the final finish grinding and sanding for welding and start that tedious process.

 |
| There is a definite "indentation in the top cut line between the side marker and wheel well lip. |
Until then.
Lovely story Dennis. You and your wife really live your life to the fullest! and Judah is a looker!
ReplyDeleteI would have never thought about the possibility of deformation in a structure that is basically at rest. I hope is not a lot. Maybe you can change the points where the car rest on here and there? That would have really caused be some headaches and sleepless nights!
The problem is that the rear quarter got hit pretty hard and the deformation wasn't just one big dent but a number of them that formed creases as well. They all put the stress in the panel. Trying to guess how it was deformed and then working it in reverse apparently didn't take all the stress out of it. I'm going to clamp a piece of square tubing to the bottom edge and then use the shrinking disc to take the excess material out of it. Then I'll attach the new panel. At least I don't have to worry about the stress building up from top to bottom any more!!! And thanks for your kind comments. I am truly blessed with my family.
DeleteArgh! It's never simple is it? The only thing that comes to mind is to use your profile gauge to form a longitudinal profile "rib" of the good side a couple of inches wide and as long as the distance between tail panel and the wheel well at the height of the passenger-side cut line that oil-canned on you.
ReplyDeleteTack that profile (on edge) just above cut line on the bad side to hold the quarter skin in position so you can tack in the patch. Then cut out the profile rib.
Never done this before, never have seen it done, but it just feels like it might work if you can't come up with a better idea?
Thanks for sharing some of your family trip. Looks like it was great fun! I'm glad Judah got to spend some time with his grandpa.
Good idea on the longitudinal template. It will be a challenge since the profile gauge is only 10" long. But where there's a will, there's a way.
DeleteSnap a line on the inside wall of the good quarter and tick off every 10" and transfer the result every 10" on a 2" x ??" strip of sheet?
DeleteI dunno... just spit-balling here. :-)
I'll post what I end up doing after some "introspection". All ideas are welcome.
DeleteLove the pics from the trip Dennis. As for the panel, it is the best that is out there as far as I can tell. Meaning, you don't have much choice on those type of patch panels. I do believe that you made the right choice in not using the flanges. Sometimes it's hard to remember that you only replace as much as you need to.
ReplyDeleteYeah, I learned the "only use what you need" lesson on the passenger side floor. Oh we'll.
DeleteMan it just never ends sometimes does it !?! But then the tough fights are the only ones worth fighting. I've often wondered why the dies for forming these panels aren't better. It seems that there's little cost difference from making a good die versus a bad one. Were there really that much variations in factory sheet metal that whatever original piece they used for the template was not compatible with other factory pieces? Wish I knew the entire history of how these aftermarket panels are designed and built. But then I would need to speak and read Chinese :/
ReplyDeleteOn a positive note, I actually got some work done on SusieQ this weekend. First time in nearly 2 years. Got the seat tracks bolted on the passenger side seat. So one less thing!
rj
Hey RJ, let's see some pictures of SusieQ! One less thing is, well...one less thing. I also wonder about the dies. The machining takes the same amount of work, unless they're using a wood buck, that I wouldn't discount the Chinese using. Cheap, cheap, cheap.
DeleteI'm waiting to hear from Yearone on whether their quarter skin has the rear flanges. I hate to spend the money, but it could save me in the long run on metal work.
In the mean time, I'm going to try and take some stress out of the upper part of the panel with the shrinking tools I have and see where that leads. If I can get the bottom cut edge straight and not oil canning I'll weld in what I have and go from there.
I also have a new source in Dallas who has access to a boatload of old mustangs. He's going to check and see if he can get an original quarter for me. We'll see how that goes.
I was thinking that too Dennis with regards to trying to find an original quarter panel - or at least the section you need. When I lived in Texas, the junk yards were full of old Mustangs. But the salty winters of PA have virtually erased them from the landscape here. Too bad. As Sven said, keep noodling it - there's a solution in there somewhere!
Deleterj
Great post of the work and travel Dennis. Hard to believe your gradson is already a year old! Fine, fine looking young fella he is!
ReplyDeleteI can certainly feel your pain on these patches. As crazy as this sounds, I have found full replacement quarters are much better candidates for good sheet metal patch panels than the small, targeted patches like the one you have. Obviously, a full fender skin purchase is quite costly in order to get a decent patch panel that is less than half the size, but it has now worked for me a number of times.
Keep noodling the problem and I am confident you will arrive at the best solution for the task at hand. Excellent work!
I thought about s replacement quarter panel skin. Unfortunately I can only find the full quarter with the vent and the patches either forward of the wheel well or the one I have. I've check CJ's, NDP, Yearone, and a couple others to no avail. The dent removal was going well. I figure I'll put some time in it to see if I can get the upper straight enough, now that the progress on the lower section is actually looking pretty good. If worse comes to worse, I'll spring for the full quarter and do a replacement of the whole thing. The next couple of hours will be the deciding factor. Thanks for the input that, as always, is quite helpful!
DeleteI wanted to thank you for this great read!! I definitely enjoying every little bit of it I have you bookmarked to check out new stuff you post.
ReplyDeleteVehicle Scratch Removal
I really loved reading your blog. It was very well authored and easy to understand. Unlike additional blogs I have read which are really not that good. I also found your posts very interesting. In fact after reading, I had to go show it to my friend and he enjoyed it as well!
ReplyDeleteVehicle Scratch Repair