This process of restoring the inside of the body shell to some semblance of originality, or maybe a little better, has been a long, tedious, dirty, tiring, frustrating, and painful (both figuratively and literally) step in this restoration. But there is a little light at the end of the tunnel on this part of the resurrection of my fastback.
Thanks to the factory welding and sealant manual, not to mention a recent article in Mustang Monthly
here, I was able to determine not just where the sealer goes, but what materials to use. I mentioned those products in my previous post. What I've posted here was over the course of a few days. I'll let the pictures tell the story...
 |
| Seat riser spray sealer applied |
 |
| Floor to firewall and kick panel spray sealer applied. |
 |
| Rear seat and rear wheel tub spray sealer applied. |
 |
| Trunk floor and wheel tub spray sealer applied |
 |
| Sound deadener applied (same 3M product as sealer) |
 |
| Rear valance to trunk floor spray sealer applied. |
 |
| High build gap filling sealer (3M "fast n' firm) applied |
 |
| More gap sealer applied. |
 |
| Gap sealer at firewall to torque box applied. |
 |
| Gap Sealer applied under spray sealer |
 |
| Sealing complete in front of passenger compartment. Dash sprayed with rust converter for now. |
 |
| Sealing complete in rear of passenger compartment |
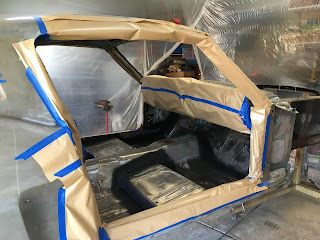
So after painstakingly stripping, scuffing, and wiping down the surfaces inside the body, I masked off the areas I didn't want the overspray of Zero Rust to go. That included the dash which I sprayed with Eastwood rust converter, which turns black on clean metal and will preserve it. I'll detail the dash later. I decided after masking the trunk area that I will wait to primer it later as that will need to be prepped more carefully since it will be exposed and sprayed with body color.
I approached this project as I would the room of a house. I "cut in" all the seams and hard to reach places, like the cowl vents, by using a brush to guarantee coverage that spraying might miss.
 |
| Cowl vent and pinch seam areas brush painted with Zero-Rust. |
 |
| Body on its side. Painting the hidden areas around the perimeter of the roof |
 |
| More roof painting with a brush |
After all the brush work was done, I set up my primer HVLP gun. I reduced the Zero-Rust 20% to get a good flow. I was using a 1.8mm tip in my gun. That gave a fairly nice pattern and coverage. The rotisserie came in handy especially for getting behind the dash and doing the inside of the roof.
 |
| The finished produce... |
There are a couple of areas, particularly under the dash that are a little light on coverage, but at this point, I'm not worrying about it. Sort of "out of sight, out of mind". It's not going to be exposed after everything gets installed in the dash and interior and it's certainly not going to rust anymore.
With just 11 days before I head north for a couple of weeks, this major hurdle in the restoration process is now behind me! It almost seems surreal. Now I can focus on the actual bodywork. The big question is do I leave it on the rotisserie, or take it off. I'm leaning toward the latter for a couple of reasons. The 1st reason is in spite of the versatility of rotating the body on the rotisserie, it's still fairly high off the floor. The 2nd reason is I can't put the front or rear valances on the body with it on the rotisserie. So if I build my body cart, I can take it off the rotisserie, gain some garage space, and hang all the body panels on the car. Then I can sell the rotisserie and get that out of my garage where I'm already pinched for space. (If you know someone interested in the rotisserie, let me know.)
I would say I ate a few more bites of this elephant. And it's tasting pretty good! But there is a lot more to eat. Hopefully I won't get sick of it by the time the elephant is fully digested.
Until the next time....


Nice work Dennis! That is a pile of work in the rear view mirror!!!
ReplyDeleterj
Thanks RJ. It must be OK cuz my wife got back from her trip and looked at it and said, "Wow! That's amazing!" I'm glad it's done. I feel like I've turned a huge corner in a good way. Now it's onward to put something else in the rear view mirror.
ReplyDeleteWow! That has got to be satisfying seeing all that effort on such a miserable, messy job in a nice new coat of red-ox primer! It looks fantastic! Bravo Dennis!
ReplyDeleteThanks Sven. It's no one-off supercool bumper like your crafty hands are making, but it's a job that's done, done, done. Now it's on to fun stuff like body work and panel fitting.
Delete