Monday, June 27, 2011

Indianapolis Mustang and All Ford Show

This weekend was the Mustang Club of Indianapolis car show which was open to anything Ford.   I've been to the one in Summer of 2009.   I will say that this year was a disappointment, especially from the vendor and swap meet side of the show.  Only ONE parts vendor, no swap meet, and a mediocre showing in number of cars.   But there were some nice Mustangs and other Ford models there.


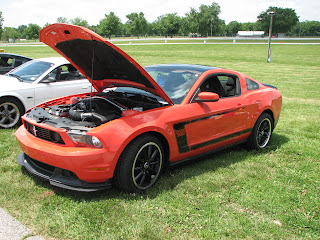
There were three   2012 Boss 302 Mustangs there...all the same color...the same everything....


This 64-1/2 Indy pace car Mustang was pretty cool...


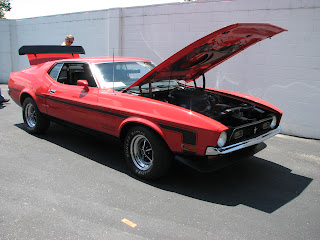
There was a special "corral" for display of some very nice Mustangs.  This is my favorite from the 71-73 model years, a Boss 351...


Then there was a spectacularly restored  '70 Boss 429 Mustang....


The surprise of the show for me was the largest collection of  '74-'78 Mustangs I've ever seen at a show in decades.  There were 8 of them all together and nicely kept or restored...all of them V8 cars too.


There were only three '67-'68 Mustangs there which was a surprise and a disappointment.  Normally there are a half-dozen to a dozen of them.   There was a "driver quality" 68 Shelby GT500 convertible,  a '67  GT Fastback with a 390 V8, and a '68 Bullitt recreation.   None of them had the hood open to check out the engine compartment.

The real star of the show for me was a "barn find" all original 65 Shelby GT350 Mustang right near the entrance to the show.   It had rust in the lower fenders and rear quarters and hadn't been repainted.  The paint was worn off to the primer on the top of the front fenders.  The interior was fairly well preserved.  You can only imagine what the engine compartment looked like...a mixture of crud and rust.  No shiny stuff there at all.   The only thing that the owner did was put a new exhaust system on it so it could be driven.   Unfortunately, the car had left before I got a chance to come back and take some pictures of it.  Oh well. 

It was a nice break to take on a beautiful Saturday with no rain which seems to be a rarity this summer.  Going to the show was the only car stuff I did all weekend because of other things I needed to do...like cut grass, trim, and move and stack a trailer load of firewood for the smoker and fireplace.   I hope to get back on the car this week or at least one evening before the weekend.   Then it's off to Michigan for some R&R the week of the 4th of July and my high school class reunion.   I had hoped I would have the Mustang done and drive it to my reunion.  But alas, that isn't going to happen this time.   Maybe it will be done by the next one.   Only time will tell.

Friday, June 24, 2011

It's complicated--driver's side floor repair

It's been a couple of busy weeks.  Last week was Vacation Bible School at church and I did all the music with the kids...103  from preschool through 5th grade.  Then it's been catch-up for the things that got shelved during VBS.   It's all part of the juggling act as a pastor.    Anyway....

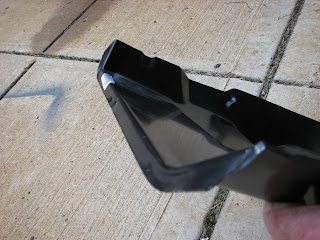
I got the new firewall extension part in from Kentucky Mustang.  I found this vendor at last year's Mustang and All-Ford show at the now named Lucas Oil Raceway Park  (AKA  Indy Raceway Park, or IRP).   They had it in stock for $4 cheaper than the "big box" parts suppliers and shipping was quick.  I took this part out of the box and as I looked at it I thought, "does every aftermarket part have the stupid flange formed in the wrong direction?"  The flange was bent down instead of up.   So here we go again.....

Looks OK from this view....
What's the deal with this flange bent down instead of up?
So I clamped the part to my workmate, got out the air saw, and cut that bugger off figuring that I would then put it on the top where I thought it belonged...


I decided to test fit the part even though I haven't cut out the offending rusted area of the floor/firewall.  It was then I noticed that the flange didn't go down to the bottom end of the firewall extension.  Hmmm.

This view is in the bottom left corner where the firewall/floor meets the vertical side of the cowl

Upon closer inspection, I realized that there is NO FLANGE on that section of the firewall. I noticed small spot welds and the very slightest evidence of a joint.  Something is not right here...or as I thought it should have been.


OK.  So now I decided to get out my latest purchase on eBay I got last week which was a factory assembly manual that Ford used as MOP's (Manufacturing Operating Procedures) for assembly line workers on how to fit and weld the body structure together....


This was worth its weight in gold.  The detail is amazing and I HIGHLY recommend getting the set if you're doing a full-blown restoration.   There are also manuals for body assembly (like putting the guts of your doors back together), interior, electrical, and chassis.  

Finding the right page was somewhat of a hunt.  Remember, we're talking 1968--not 2011.  No computer database.  No 3-D computer model of the body.   Just hand drawn paper and pencil illustrations by a draftsman.   The diagrams for this section of the car were on 4 different pages.   Here are 2 pages that showed the detail I needed....


Then the "light" went on.  There isn't supposed to be a flange on the part because the flange I can see is part of the cowl and torque box!   (Cross-section detail at the bottom of the page)    I'm glad I didn't start drilling out the spot welds on that!  What a mess that could have been!   I'll chalk this up to a dose of "divine intervention."   

I decided to do some more poking around the car to get more of the relationship of the car to the assembly manual.   Here's the view laying underneath the driver's side looking up at the bottom section of the  firewall (underneath the gas and brake pedal for those who are spatially challenged)...


I can see where the frame rail is attached to the lower firewall.  This shouldn't be a problem to remove now that I know what is attached where and how the pieces fit together.  The next picture is looking toward the rear of the car showing the lower part of this picture (the firewall and floor crossmember) and the floor that has been removed...


It is here I noticed something rather curious.   There was still a good amount of paint up in the transmission and drive shaft tunnel.   BLACK paint!   I was under the impression that the underside of all Mustangs of this vintage was painted in red oxide primer and that only the engine compartment, including the firewall, was painted black.   Was this a mid-year change?   Was this for San Jose built cars?   I need to check this out. 

But let's face it.  At the rate I'm going, I don't have to worry about what part is painted a particular color.   It's more about having good rust-free parts to paint.   So let the measuring and cutting commence...carefully, of course...for the new firewall extension to go in.  Hopefully, it will be exactly like the factory did it.

Monday, June 13, 2011

Worse than it looks--driver's side floor repair

I've been anxious to get back on the floor repair so I can button up the serious metal work and get this gal on the rotisserie.   Saturday presented me with a small window that I could remove the rest of the driver's side floor and start the fitting of the new floor piece and get it ready to install.   I started out with my pile of tools--both air and electric...


Not seen is the air saw and a few "persuaders" inside the car like my hammer and chisel and drill with the spot weld cutter.   After about 45 minutes of work, I had this pile of parts on the floor next to the car...


I'm one of these guys who saves all the pieces I've cut out until I know for sure I won't need them for a reference.  I've had the bad experience of tossing the trashed parts only then to find out I needed a reference dimension to install a bracket or drill a hole for a fitting.   The thing is, the parts pile is getting pretty big.  But that's what a shed is for right?...except the shed is already full of lawn and garden equipment and is basically my wife's "garage" since I've pretty much taken over 2 bays of our regular garage.   Anyway...

I cut the floor out in pieces so that I could preserve as much of the base material in the frame rails, rocker panel, and remaining floor intact.   With the exception of some trimming along the drive shaft tunnel, the hole was pretty much done.


I knew I would get back to that after doing some more cleaning up of the metal.  I took my 4" grinder with a heavy-duty wire brush and started cleaning up all the surface rust...or what I thought was surface rust.  I was amazed how I went from having a piece of the car that looked like it would only require a small patch here or there to an entire panel that looks like a slice of Swiss Lorraine cheese.

Some of the holes are visible with the flash...
...but with no flash, the light shining through the rust holes is major


The frame rail extension is in good shape.  A little cleanup and some POR-15 and that will be that.   Same for the transmission tunnel support (except for the cut I accidentally made while cutting out the flloor.)   Oh well....

I ordered the offending panel this afternoon.  Thankfully I can do the other patching without a major firewall replacement.   So in the mean time, I'll do my cleanup and paint of the frame rail and get the floor piece pre-drilled for the rosette welds.  Then I can finish up the main metal work.   I hope this will be it, but something tells me in the back of my mind that I better not get my hopes too high.

Monday, June 6, 2011

Hot Topic--Driver's side Floor Work

I've been trying to carve out some time to work on my Eleanor, but it seems my schedule was against me...until Saturday.  Of course, it had to be the hottest day of the year so far in central Indiana at 94F degrees.  But at least I was in the shade and had my box fan circulating air.

The first step for the day was to finally get the heater and AC fan housing out of the dash.  I did find the last screw that was holding the fan housing in and got that out of the dash...


Then with that out of the way, I finished labeling the interior wiring harness and got that out of the way...


...and that allowed me to get the engine compartment wiring harness out of the way....


The only wiring left is the rear harness that I'll remove when I take the tail lights out later.   But for now, I was trying to make some progress on the driver's side floor.   The first order of business was to remove the driver's side door for better access.   I should have done it on the passenger side, but didn't.  Since I'm moving toward getting the body stripped down to put on the rotisserie, I might as well start now with the door removal, which was fairly easy since I'd already gutted it.


The one tool I bought that is worth it's weight in gold is this Eastwood body panel stand.  It's really nice to hold and work on body "pieces parts" and supports up to 500 pounds...


The door is in really good condition.  The car obviously didn't spend any time on the road in the dreaded "rust belt" of the Midwest.    With the door out of the way, I took some measurements to make sure the new seat riser would go back in place as close as possible to the original.   So the drilling of the spot welds began...


Some of the welds were too hard to access.  So I broke out the air saw and cut the rest of it out...


Obviously some mice had made this area their home at one point.  A dust pan and shop vac cleaned this mess up.   Here's the seat riser from the top with my dimensions for later use on installing the new one...

 
One thing that's different between the factory riser and the aftermarket one is the absence of the center support.   I really don't know why this piece isn't added to the new part.  I figure I would rather be safe than sorry.   So I'll be cutting this out of the original, clean it up, and install it in the new seat riser as I did on the passenger side.


The replacement front floor piece and seat riser are made in North America and not a China part.


However, the lip that is spot welded to the inside of the rocker panel had the flange bent the opposite direction (for a convertible).   They don't make the 1/2 pans any other way.  So,  I had the straighten it out and then bend it to the proper position for the fastback.   Here it is after I fixed the flange.


I laid the floor in place to take more measurements so that the access holes for the seat mounting hardware would line up with the original floor.   After the measurements, I scribed my lines and started cutting out the floor.  here's as far as I got...


Looking at the inside of the rocker panel
I started drilling out the spot welds for what was left of the seat riser, but the heat was getting to me and my wife and I had a high school graduation part to attend.   So that's where I stopped for the day.   I'm hoping to get the rest of the floor cut out, the frame rail cleaned up, and the floor pan trimmed to fit.   Then it's drill out the holes for the spot welds and start the installation next weekend.   So progress continues to be made on the "other woman" as my family (i.e. wife) refers to my Mustang.