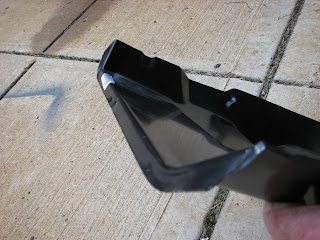
I got the new firewall extension part in from Kentucky Mustang. I found this vendor at last year's Mustang and All-Ford show at the now named Lucas Oil Raceway Park (AKA Indy Raceway Park, or IRP). They had it in stock for $4 cheaper than the "big box" parts suppliers and shipping was quick. I took this part out of the box and as I looked at it I thought, "does every aftermarket part have the stupid flange formed in the wrong direction?" The flange was bent down instead of up. So here we go again.....
 | |
| Looks OK from this view.... |
 | |
| What's the deal with this flange bent down instead of up? |
I decided to test fit the part even though I haven't cut out the offending rusted area of the floor/firewall. It was then I noticed that the flange didn't go down to the bottom end of the firewall extension. Hmmm.
 | |
| This view is in the bottom left corner where the firewall/floor meets the vertical side of the cowl |
Upon closer inspection, I realized that there is NO FLANGE on that section of the firewall. I noticed small spot welds and the very slightest evidence of a joint. Something is not right here...or as I thought it should have been.
OK. So now I decided to get out my latest purchase on eBay I got last week which was a factory assembly manual that Ford used as MOP's (Manufacturing Operating Procedures) for assembly line workers on how to fit and weld the body structure together....
This was worth its weight in gold. The detail is amazing and I HIGHLY recommend getting the set if you're doing a full-blown restoration. There are also manuals for body assembly (like putting the guts of your doors back together), interior, electrical, and chassis.
Finding the right page was somewhat of a hunt. Remember, we're talking 1968--not 2011. No computer database. No 3-D computer model of the body. Just hand drawn paper and pencil illustrations by a draftsman. The diagrams for this section of the car were on 4 different pages. Here are 2 pages that showed the detail I needed....
Then the "light" went on. There isn't supposed to be a flange on the part because the flange I can see is part of the cowl and torque box! (Cross-section detail at the bottom of the page) I'm glad I didn't start drilling out the spot welds on that! What a mess that could have been! I'll chalk this up to a dose of "divine intervention."
I decided to do some more poking around the car to get more of the relationship of the car to the assembly manual. Here's the view laying underneath the driver's side looking up at the bottom section of the firewall (underneath the gas and brake pedal for those who are spatially challenged)...
I can see where the frame rail is attached to the lower firewall. This shouldn't be a problem to remove now that I know what is attached where and how the pieces fit together. The next picture is looking toward the rear of the car showing the lower part of this picture (the firewall and floor crossmember) and the floor that has been removed...
It is here I noticed something rather curious. There was still a good amount of paint up in the transmission and drive shaft tunnel. BLACK paint! I was under the impression that the underside of all Mustangs of this vintage was painted in red oxide primer and that only the engine compartment, including the firewall, was painted black. Was this a mid-year change? Was this for San Jose built cars? I need to check this out.
But let's face it. At the rate I'm going, I don't have to worry about what part is painted a particular color. It's more about having good rust-free parts to paint. So let the measuring and cutting commence...carefully, of course...for the new firewall extension to go in. Hopefully, it will be exactly like the factory did it.


Dennis,
ReplyDeleteDeja Vu! The "mystery flange" is on every single toe board repair panel I have ever seen and it has no purpose on any Mustang I have ever seen! The one recommendation I would make is only patch what needs to be and leave as much good original metal as possible. I have discovered that these repair panels get less "accurate" the farther up the firewall they extend. Keep up the good work!
SW, thanks for the comment and recommendation. At least I know I'm not the only one who's run into this situation. ; )
ReplyDelete