At our last exciting episode, I was in the process of welding in the lower rear quarter patch panel...more specifically repairing the all the "P" words. Pinholes. They are the bane of my welding existence. But the show must go on.
After I got my wife and mother-in-law on the road to Michigan Saturday morning for my M-I-L's 90th birthday party with her friends in Battle Creek, that left me home alone. I left off where I did last time. You know the drill. The only saving grace is that there were actually fewer and fewer pinholes after each round...

The reason I was dreading this was I knew that when I was done, I would open up more...you guessed it...pinholes. It did finish out fairly well, especially considering that I will have the factory sound deadener sprayed inside that will pretty much cover the joint. But knowing it would be there would bug me to death. Then again, it's in a place that hardly anyone will really inspect closely. So I decided to declare the inside done.

You can probably guess what happens next. After setting up the backlight again, the "P" word reared it's ugly head. Yup. I almost had as many as I started the day with. So out came the rediscovered paint pen and they got marked...


When I got to the upper right hand corner of the patch panel, the welds were not laying down good at all. And then the blowout occurred. This hole was not going to be fixed easily.

Between the thinned metal from all the welding and grinding, and discovering that the welder problem was I had come to the end of a spool of wire, I figured I had no choice but to make a patch to fill the buggered up area. I cut a small area out making sure I had enough solid metal to weld to...

Then I made the patch and gave it a little tap and bend to match the contour of the fender lip. I used the stud gun to put a pin in the piece so I had something to hold it into position while tacking it in place...

After exercising much patience, the patch was in...

I got to the point where I called the war on pinholes done. I don't think it was a total victory since I'm sure there are a few small ones in there that the back light didn't show.
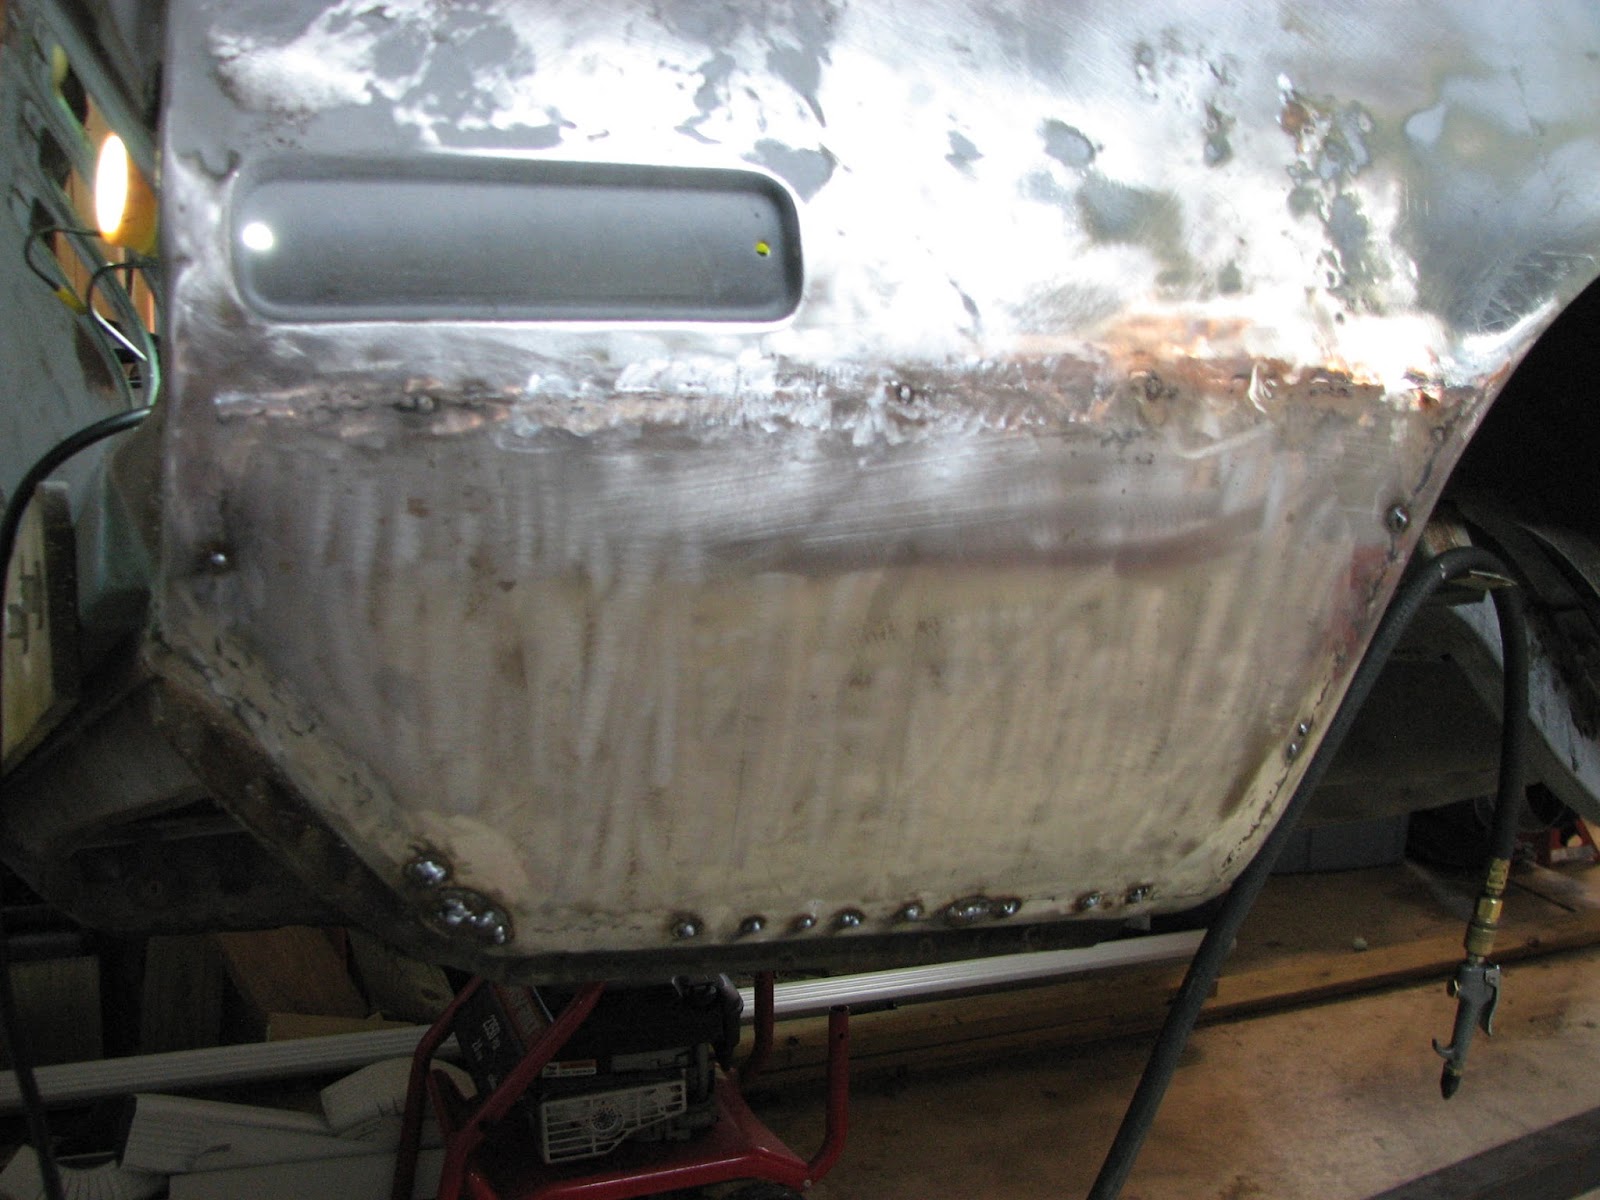
To blow off some frustration over the pinhole situation, I decided to dive in and strip the paint off the quarter panel since the next step will be to start the filler work. After about 45 minutes, I was left with a fairly clean quarter panel.

Even the patch panel looked pretty good...


Now I have a nice clean quarter panel. I also was able with a smooth surface to identify a couple of areas that will need some work removing smaller creases. But with the temp climbing toward 90 degrees and after 6 hours I was tired, my back was screaming at me, and I was filthy dirty from all the grinding and paint removal. I closed up shop for the day and decided I would tackle more the next afternoon. Beside, the Colts were playing the Browns and the night race at Bristol were on. I will kiss the person on the lips who developed picture-in-picture TV.
Sunday however brought some unexpected schedule changes. The brother of one of the members of church had emergency surgery and another was transferred to a specialized rehab hospital. Both hospitals were located only 2 miles apart, but they were a 40 minute drive away in Greenwood. I also discovered that Apple's standard map app with the latest operating system iSO 6 stinks. The location of the rehab hospital was wrong. After going inside to the receptionist and asking about the hospital, she said, "They moved to their new facility about 4 years ago." Really? Four years? Someone needs to have a chat with the GPS database people.
Anyway...by the time I got home, it was closing on 9 PM and my wife and M-I-L had returned from Michigan. I got them unloaded and decided to call it a night. Maybe, just maybe, I would be able to work on the fastback Monday night.
Monday arrived without much fanfare or emergencies. After getting home from work and making dinner (I do about 90% of the cooking at our house) and having opened a late anniversary present from my wife (Woodford Reserve) I was trying to muster enough motivation to get to the garage. With the promise of a refill after I was done working on the car, I headed out to the inner sanctum, that, buy the way, was a nice cool 74 degrees since I had turned the garage AC on when I got home. :- )
I had marked the offending areas of the panel with a circle denoting the beginning of the deformation and a line down the middle of the crease. I had two areas like this to repair.
The stud gun came into play once again. The trick is to pull the dent from the outside in. Since the wheel well was behind these two areas, there was no way to get a dolly behind it. The first round of studs were placed halfway between the valley and the edge of the deformation...

After gingerly pulling on the pins in an alternating pattern, the dent was coming around...

There was still a low spot that felt confined to the valley of the dent. So another couple of studs were placed and pulled...

Almost there. I needed one more to get the one remaining low spot...

After that pull, the dent was almost history. A skim coat of filler will level it out, especially the "dimples" left from the stud gun.


Onto dent #2. Same drill. The first round was placed again halfway between the valley and the edge of the deformed metal...


After the first pull and cleaning up the area, another round was needed in the valley of the dent...

There were still a couple of low spots. So a third set of only 2 studs were placed and carefully pulled...

There was this one low spot that was barely perceivable, but I couldn't leave it. So with one more stud and a few taps with the slide hammer, it was level...

The finished product was OK for me. I just have to put my anal retentive part of me on a shelf sometime.

The reflection of the light and the dimples from the stud pins makes it look uneven, but the almighty feel with the palm of my hand says "smooth."

There was one more area back by the side marker light. There's no need to explain the process.
Step #1....

Step #2...

Step #3...

And so folks, I'm officially calling the heavy metal work on this rear quarter panel DONE!

It's come a long way. And in spite of my "pickiness" I have to remember what I started with...

...and this ugly lower rear quarter section...

And now? Well, I'll leave it to you to decide.

It's hard to believe that this journey started back in February. Yes. It's been 6 long month and I'm not even going to count the hours and $$$ of tools. However, I will say, it's a whole lot better than when I first began.
Now it's on to cleaning the metal inside and seeing what other serpent is hiding in there waiting to bite me.
Until next time....
Wow! What a transformation! You do some very nice work Dennis. Much to be proud of.
ReplyDeleteThanks Alex. I will say I did hone some metal working skills. As an aside, you used PPG DP40 epoxy primer on your 'vert. How did you handle the 7 day working life of the surface when it came to filler and paint? I'm trying to decide which route to go on paint--whether PPG, Dupont, or Martin-Senour. Thanks again for your kind comments.
ReplyDeleteYou just need to scuff it to paint over it if used after the 7 days.
DeleteDennis that panel looks fantastic! I don't think you even need filler, just primer it and a little sanding. How much bodywork is left on the old girl now that the quarter it done?
ReplyDeleteWell Grant, as much as I'd like to think that high build primer will cover the "multitude of sins" I don't think it will. I have some areas I can't get some of the dimples out and I don't want to risk deforming the panel. I'll probably do a skim coat and sand it to the metal and hopefully fill in the low spots. I can work the high spots down if needed. I did this on my Model A hotrod. I probably put a half gallon of filler on the car and ended up with maybe a 1/2 pint on it. But it was sure straight.
DeleteAs far as bodywork goes, I need to revisit some of the weld repairs to clean them up and fix some noticeable pinholes (yay!) Then it's a layer of Metal-to-metal on the weld joints. The roof and the rest of the interior need to be stripped and readied for primer. I'm hoping to be at the end of serious metal replacement on the body shell.
I have the rear deck lid to try and do some serious rust repair. If I can't get it done the way I want it, I'll get a Dynacorn lid or look for an original in good condition. The fenders have a couple of patches. The hood is from a 67 and needs the "FORD" holes in the front filled. Doors are good.
It may be very possible that by the end of the year, I'll be going in the other direction and be done with repairs on the body as a whole.
As in all things, time will tell.
That seems pretty close to being done with bodywork to me. I still have a list as long as my leg, and I swear it just keeps getting bigger. :)
DeleteAbsolutely FANTASTIC work there Dennis! That 'ol girl is looking mighty fine indeed! If you haven't sprayed the PPG products, you are in for a treat. They are top shelf and very user friendly. I pretty much shoot the PPG Deltron line of products exclusively and can't say enough about the quality AND (often more importantly) the customer service when you need it.
ReplyDeleteWell Sven, I don't know if I'd call it "fantastic". It's done about the best way I could muster. Hopefully it will look OK with paint on it.
DeleteI'm still searching for a distributor of PPG paint in Indy. The two I checked out were a bust. One doesn't carry it any more and the other place had no one at the counter. After 10 minutes I said, "forget it" and left. I've used Dupont Chromabase system before and it worked well, but they don't have an epoxy primer to seal the body. I may buy it on line. BTW, what's the coverage on DP? Will a gallon be enough? Thanks.
Not bad Dennis! What a before and after shot!!!
ReplyDeleteHey, I just took a trip into the basement as I thought I had a spare 67/68 OEM decklid for a fastback down there. Seems I do. Not sure if it is much better than yours though. The outer surface seems fairly solid except for some bubbling in the lower left hand corner. Trouble areas are on both corners on the inside surface. I can take some photos if you are interested. Price is right - just the cost of shipping it. It's been down there for 20 years and will be there for another 20. I'd rather see it go to a good home than sit there gathering dust. Thanks!
Great story on how I got these. Used to live in Ft Worth - very close to the Pate swap meet. On the last day of the meet I was heading back to the truck and came across this guy who had a hood and decklid for a 67/68. Hood had an ugly hole cut out of it for some miserable looking scoop. He said for $10 I could have them both so he didn't have to take them back home. Only problem - my truck was 3 miles away in a field. My wife carried the decklid, I carried the hood. My arms are still 4 inches longer since that day. :) :)
rj
RJ, Thanks for the offer on the deck lid. I'm not sure what shipping would be but maybe yours is in better shape than mine. Mine has rust on the inside as well, but a bad place in one of the support ribs and rust on the outside. If you want to shoot some pictures to me, send them to deo1929@gmail.com with the cost to package and ship. It doesn't hurt to look and thanks again for the offer!!
DeleteLooks great! Are you going to seal the metal with something like POR-15 to prevent rust?
ReplyDeleteI've had really good success with Eastwood's "Fast Etch" on the bare metal. It gives the metal a phosphate coating and protects it from flash rust. I've had parts sitting around for 6 months with no flash rust forming. It wipes off easily with acetone. After the wipe down, I plan on using "metal-to-metal" filler on the weld joints to smooth them out. Then I'll apply the seam sealer before primer.
DeleteI'm going to use PPG DP-74 epoxy primer on the entire body. It's red oxide in color and is great at rust prevention. Plus, it will emulate the original color of the interior and underside...not that I'm building a Concours 100 point Mustang, but I want it looking original as possible.
At least that's the plan for the moment.