The week of July 7th started my 12 day vacation...well, supposed to be vacation. It's amazing how many work-related items tend to crop up even when you're "off work." The problem was that people at church knew I wasn't out of town until the following weekend and week. So I guess that means it's fair game to call the pastor up with the line, "I know you're on vacation, but..." I wonder how many other occupations are like this. Physicians maybe, especially surgeons. Add to that a rather convoluted and exhausting vacation including a wedding in Cincinnati, a stop in Frankemuth, Michigan, and then to our family cabin in northwest Michigan with 9 adults (one of them my 90 year old mother-in-law) and 4 children between the age of 18 months and 6 years old. Anyway... I digress.
I ended up with part of a morning the day before vacation departure for continuing my reconstruction of the driver's side fender. The last post, I had cut the headlight support bucket out of the fender and the lower rear outer skin and inner support. The fender and the inner bucket had been coated with Zero Rust and left to dry.
In the mean time, I took the lower rear fender pieces, put them in my blasting cabinet. Here's the "outside" of the inner support piece after glass beading...

...and here's the "inside" surface of it that will be hidden by the outer skin.

This next picture looks like it was shot as a "black and white" but it's just that the cleaned up metal is nothing but shades of grey. (Wasn't there a song with that title, "Shades of Grey" by the Monkees? Dang! I'm dating myself!) It cleaned up pretty good.

With a fresh coat of Zero Rust on both sides, I hung it up to dry.

While this piece was drying, I proceeded to start the fit of the replacement headlight bucket support into the fender. As is the case, this became a time-consuming process, as if I expected anything different. I got the bucket in the general location. Then I started at the front bottom (bottom is to the left in the picture) and lined up the holes and clamped it into position.

This hole in the middle of the picture is one hole for the attachment stud for the fender extension.

This hole in the middle of the picture is where one of the fender extension pin goes into to position it on the fender.
But I wasn't satisfied with the gaps in the two parts. It was much more than I wanted and I couldn't get them to close up with clamps no matter how I positioned them.

The nice part of this process is that I had the right front fender as a guide (though "flipped") to give me some reference points. One thing I discovered is that the plane of the flange that the fender extension mounts to is exactly that--parallel across that plane. Using my straight edge, it was obvious that in removing the bucket support, both flanges of the bucket and fender were "tweaked" from the drilling and the prying, etc. etc. So there was a definite gap (not parallel) across the flanges.
It took some judicious work with hammer and dolly to get the fender flange correct. Then I would do what I needed to for the bucket flange to match up with this fender flange. Easier said than done.

The next step in the fitting process was how to be able to draw the two pieces together so that I had a tight plug weld. A couple of screws and washers in the fender extension mounting holes helped in the areas where I couldn't get a welding clamp to work. It drew the flanges up nicely. And with the help of my pick hammer, I was able to get everything as tight as physically possible.

After getting the bucket-to-fender fit to the best of my ability, I marked the bucket through the spot weld holes in the fender so I would be able to remove the paint and prep for weld.

After the bucket, it was the fender flange that got cleaned and prepped for welding.

I put all the pieces back together and got the fit back to where it was with the clamps and nuts/bolts. A couple of "adjustment" taps with the pick hammer and it's ready to go.

Here is the bucket with a couple of the plug welds in. Of course, the plan is to move around so that there's no heat buildup to prevent warping. A blast compressed air helps also after each weld.

I kept the clamps and nuts/bolts in place throughout the process. I got this front section done but not without issues.

The MIG welder was acting up...again. I tried playing with wire feed, gun tip and nozzle, and shielding gas flow, but ended up with some knarly looking plug welds nonetheless. I took the ground cable apart and cleaned it, checked the feed rollers and just about every other part I could think of. While standing there pondering my situation, I noticed that the wind had changed directions and was now blowing toward the garage. Duh! The wind was disrupting the shielding gas! So with a reposition of the fender, it was better, but the poor welding damage had already been done.
In the process of grinding down said ugly welds and fixing them, I got a little too close to the edge of the flange on the fender and ended up rounding it in a couple of places. AaarrrrggghhHHHH! Now I will have to go back and do some filler work to fix my ^$%@ mistake! Shish! It seems like it's never easy. Not once. I may wait on this repair until I have the extension I'm going to use. It would suck to use this one only to have it be off enough to notice with the one I'm planning on using.

I have three welds left to do on the bottom of the fender-to-bucket bracket along with going back to do some repair of a few plug welds. Then it's moving on to the bottom rear corner of the fender to rebuild the structure and the skin with the pieces from the other fender. Hopefully that will go smoothly, but as in all things restored, I ain't planning on it.
Until the next time...
I ended up with part of a morning the day before vacation departure for continuing my reconstruction of the driver's side fender. The last post, I had cut the headlight support bucket out of the fender and the lower rear outer skin and inner support. The fender and the inner bucket had been coated with Zero Rust and left to dry.
In the mean time, I took the lower rear fender pieces, put them in my blasting cabinet. Here's the "outside" of the inner support piece after glass beading...
...and here's the "inside" surface of it that will be hidden by the outer skin.
This next picture looks like it was shot as a "black and white" but it's just that the cleaned up metal is nothing but shades of grey. (Wasn't there a song with that title, "Shades of Grey" by the Monkees? Dang! I'm dating myself!) It cleaned up pretty good.
With a fresh coat of Zero Rust on both sides, I hung it up to dry.
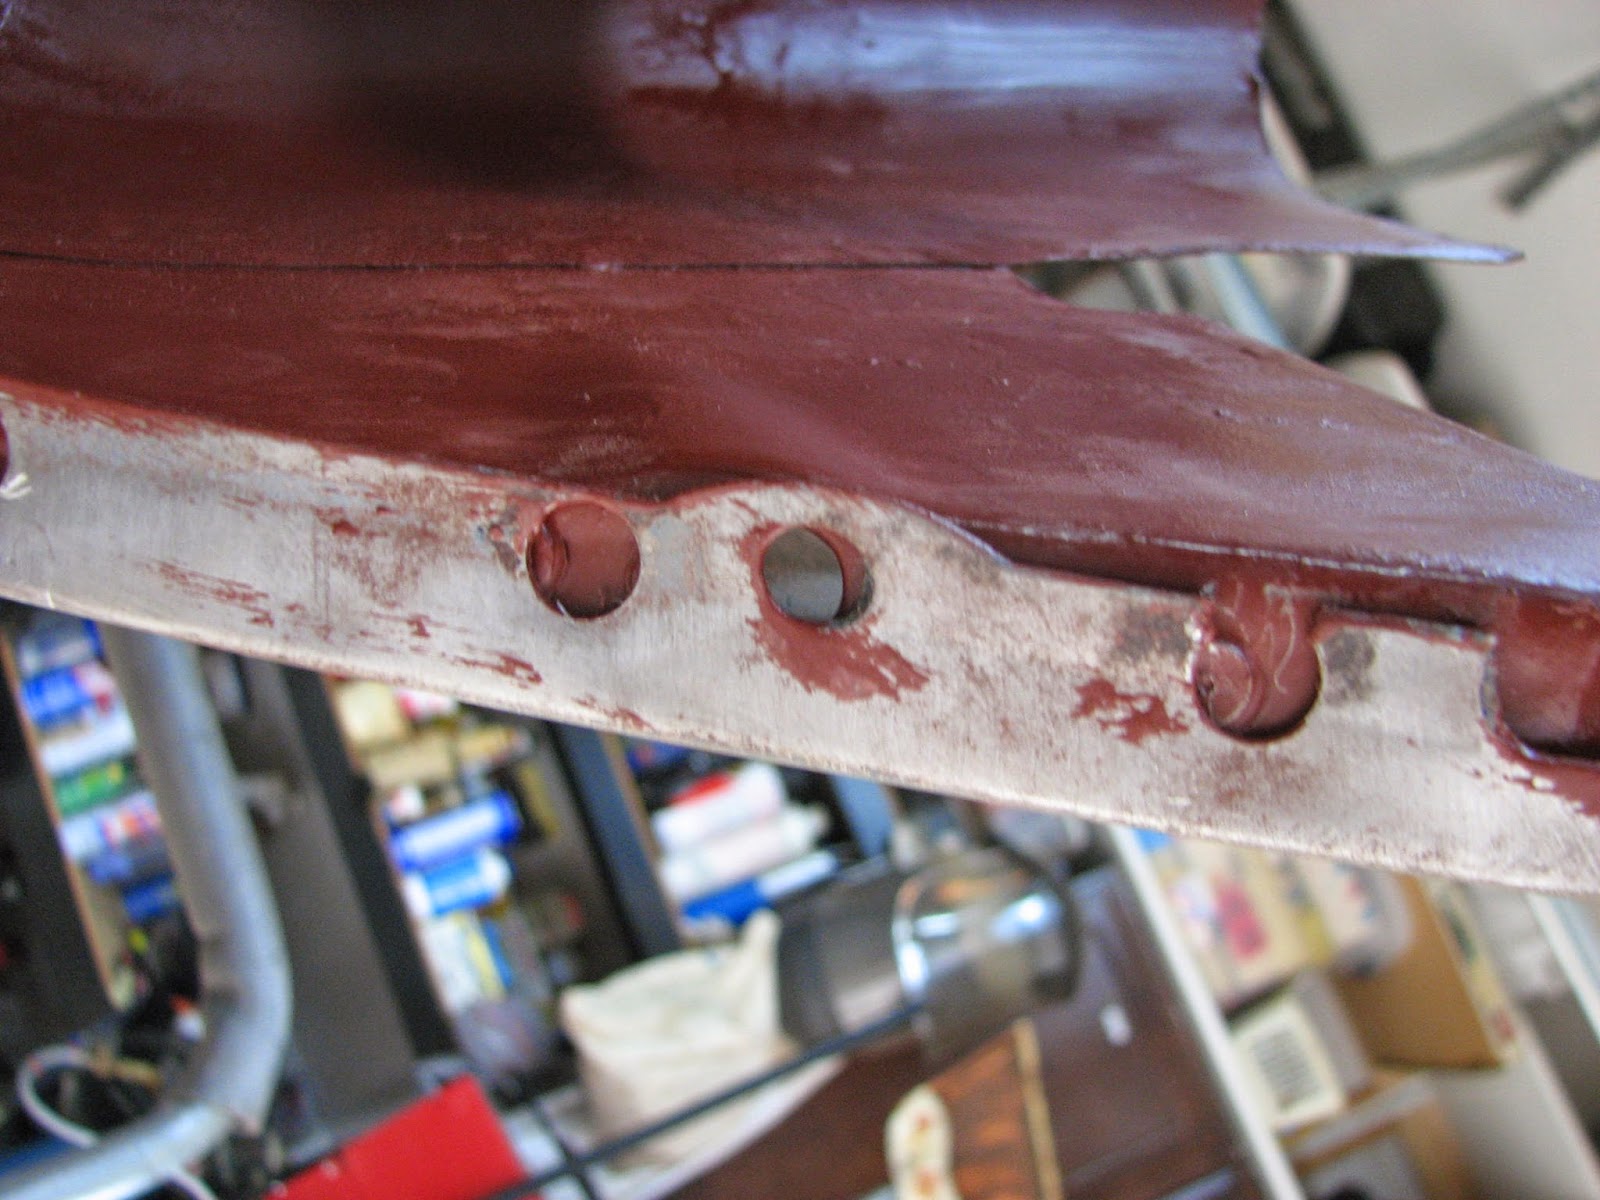
While this piece was drying, I proceeded to start the fit of the replacement headlight bucket support into the fender. As is the case, this became a time-consuming process, as if I expected anything different. I got the bucket in the general location. Then I started at the front bottom (bottom is to the left in the picture) and lined up the holes and clamped it into position.
This hole in the middle of the picture is one hole for the attachment stud for the fender extension.
This hole in the middle of the picture is where one of the fender extension pin goes into to position it on the fender.
But I wasn't satisfied with the gaps in the two parts. It was much more than I wanted and I couldn't get them to close up with clamps no matter how I positioned them.
The nice part of this process is that I had the right front fender as a guide (though "flipped") to give me some reference points. One thing I discovered is that the plane of the flange that the fender extension mounts to is exactly that--parallel across that plane. Using my straight edge, it was obvious that in removing the bucket support, both flanges of the bucket and fender were "tweaked" from the drilling and the prying, etc. etc. So there was a definite gap (not parallel) across the flanges.
 |
| Bottom flange gab |
 |
| Top flange gap |
 |
| From the top, the flange was looking pretty good. |
 |
| No gap at the top |
 |
| No gap at the bottom. |
 | |
| From the inside, it was looking much closer to being parallel across the surface of the flange. |
However, in spite of the PITA it was, the result was acceptable. I put a scrap fender extension in position to see if there would be any horrific gaps. So far, it looks pretty good.
 |
| Nice and pretty gap |
 |
| I was able to get one more screw in to the right to tighten the gap to the right of his screw |
 | |||
| With another screw, I was able to get this flange nice and tight for plug welding. |
After getting the bucket-to-fender fit to the best of my ability, I marked the bucket through the spot weld holes in the fender so I would be able to remove the paint and prep for weld.
After the bucket, it was the fender flange that got cleaned and prepped for welding.
I put all the pieces back together and got the fit back to where it was with the clamps and nuts/bolts. A couple of "adjustment" taps with the pick hammer and it's ready to go.
Here is the bucket with a couple of the plug welds in. Of course, the plan is to move around so that there's no heat buildup to prevent warping. A blast compressed air helps also after each weld.
I kept the clamps and nuts/bolts in place throughout the process. I got this front section done but not without issues.
The MIG welder was acting up...again. I tried playing with wire feed, gun tip and nozzle, and shielding gas flow, but ended up with some knarly looking plug welds nonetheless. I took the ground cable apart and cleaned it, checked the feed rollers and just about every other part I could think of. While standing there pondering my situation, I noticed that the wind had changed directions and was now blowing toward the garage. Duh! The wind was disrupting the shielding gas! So with a reposition of the fender, it was better, but the poor welding damage had already been done.
In the process of grinding down said ugly welds and fixing them, I got a little too close to the edge of the flange on the fender and ended up rounding it in a couple of places. AaarrrrggghhHHHH! Now I will have to go back and do some filler work to fix my ^$%@ mistake! Shish! It seems like it's never easy. Not once. I may wait on this repair until I have the extension I'm going to use. It would suck to use this one only to have it be off enough to notice with the one I'm planning on using.
I have three welds left to do on the bottom of the fender-to-bucket bracket along with going back to do some repair of a few plug welds. Then it's moving on to the bottom rear corner of the fender to rebuild the structure and the skin with the pieces from the other fender. Hopefully that will go smoothly, but as in all things restored, I ain't planning on it.
Until the next time...
Nice attention to detail on that flange! Errr... up until the grinding incident. :-)
ReplyDeleteSometimes I wished that I had 3 parts for each fabrication task with the car. One to practice and then one to finish for each side of the car. I think my car is half mistakes and half acceptable because I always learned on one side and then did it somewhat correctly on the the other.
At any rate, I feel your pain. The other fender will be perfect! :-)
Ditto on the practice parts Alex. I have a number of "would-of, could-of, should-of" places on mine. The advantage moving on is the other fender is good around the headlight area. I may have a small patch on the lower rear, but not as big as this fender. I'll have to wait and see how it goes.
DeleteThat fender is coming along (mostly) well, Dennis. I feel your pain on rounding out the edges. I have had that happen in a couple of places. Good thing they aren't as visible a place as a fender.
ReplyDeleteEnjoy your vacation and hopefully we'll see this fender finished in a couple of weeks.
I like your optimism Grant on me finishing the fender in a "couple of weeks". Maybe it will rub off on me and I'll get more done sooner.
DeleteGlad to see this update Dennis! Work is moving nicely and the oopsies are easy enough to fix. Now, if you'd quit taking "vacations" you'd have time to get more done! Ha!
ReplyDeleteOopsies are a fact of life on any restoration. I just hate using filler to cover them up. At least it won't be a thick layer like you see on the car restoration TV shows.
DeleteYou don't know how close you came to having a visitor from Indianapolis stop by your place. Unfortunately a side trip was overruled by the rest of my family. One of the days...
Ah! That would have been cool! I am working on finding contractors to help with a considerable "addition" to my house that will offer quite an improved workspace that you would really enjoy! Hope to have it completed by late next spring. Then you will just HAVE to come up! Frankenmuth is only an house north on I-75 from me!
DeleteDennis, looks good. When you paint the Zero Rust on do you prep the metal in any way? Prime it or scuff it?
ReplyDeleteMike
hey Mike. I had previously media blasted the fender and the headlight bucket support. So the metal was pretty much paint ready after a wipe down of wax and grease remover. I also used cheap foam brushes to apply Zero Rust. It wasn't a huge area and it's not a readily visible area either. The Zero Rust website has the general application description you can find at http://zero-rust.com/index.php. As long as you clean as much of the surface rust off you should be OK.
Delete