I was going through my "baby book" on my fastback the other night sorting through the hundreds of pictures I've taken of the restoration. I looked at the first couple of pages and saw the bill of sale on the fastback that my family calls "Eleanor." If you're a true Mustang person, or even a muscle car person, you know the reference well.
Anyway, I realized that we brought this lady into our household on April 14, 2005. Tomorrow is our 8th anniversary.
Wow! It's hard to believe I've had her for that long. Some marriages don't last as long as the "relationship" I've had with this vehicle.
That reminds me what my wife said years ago. "You won't leave me for another woman. A car? Yes." So the love of my life has agreed to share me with the "other woman."
So here's to our 8th anniversary Eleanor. May we have many more years together. And like my wife, you'll look better and better as each year goes by.
As of April 1, it has now been 2 years since I started this blog. Yup. I'm an anniversary kind of guy (that my wife loves, by the way). It's more of an engineering thing. I remember pretty much anything with numbers--dates, phone numbers, addresses, airport frequencies, credit card numbers. You get the idea.
With that being said, the progress on the fastback would not be where it is had it not been for the blogosphere. Maybe more specifically, the bloggers HERE. The ones who have a Mustang they are attempting to bring back to life or have done so and are enjoying them on the road.
Then on the other hand, I wonder how long can I keep this up? Both the blog and the car. Some of you fellow Mustang bloggers have been at it for years...several years...with over 100,000 views. That's persistence on both counts. The question is this: can I match that kind of persistence? As I have often said in these posts, "We'll see."
But I can say that I have made more progress on the fastback mainly because of the blog. I know I said it last year on the 1st anniversary of "resurrection", but I'll say it again. The support, encouragement, and the amount of high-quality documentation in words and pictures has helped my own restoration. And as humbling as it's been, others have also said the same about my blogs.
But we're not here for ego trips are we. We're here because we love our Mustangs and we appreciate others who love their Mustangs.
I'm just hoping one day in the future (whenever that is) I'll be at Carlisle and see a Mustang and say, "I know that car from the blog" and finally get to meet some of you face-to-face.
Until then, it's time to get on with the restoration process. And thanks for going along for the ride with me.
This is just a short addition to my last post. I got the idea to try the slapping spoon with the air hammer from this Youtube video. I was trying to replicate the portable planishing hammer. I think it worked out well, tho' my method is a little more time consuming. Enjoy.
It's bee awhile since I've been able to get back on the fastback. I do have to be honest that I have used my very limited spare time to get some flying done, particularly my Instrument Proficiency Check before the end of the month when the club 10% winter discount goes away. But I also had some other obligations such as conducting a close family friend's funeral in Battle Creek, Michigan and an all-day seminar this past Saturday. Another infraction on my time was my daily driver was down for repair. The crankshaft pulley bolt decided to back out and trashed the pulley that is also the harmonic balancer. Thankfully, the crank nose wasn't damaged from the key shearing and the pulley wobbling on the crank. It did break a small 1/8" chunk on the end of the keyway, but it all went back together OK. I bough a used pulley, a new bolt and key, along with the specific tool to allow me to torque it back to 120 FT-Lbs. with a smear of blue Loctite for extra measure. So there have been a number of diversions. In general, this is just a real busy time of the year for me and will not relent until after Easter. So I have to grab time as I see fit.
At the last exciting episode, I was making slow but steady progress on getting the dents and dimples out of the quarter panel. I ordered one tool to help with the process after doing a little web browsing. The first tool was a "slapping spoon". This is used in place of a body hammer. It spreads the force of the blows across a wider area to help smooth out the panel....
Then after seeing a youtube video of bodywork on an original 50's T-Bird front fender, I ordered a second tool. This is a pneumatic body hammer. It goes in the air chisel and works sort of like half of an English wheel/hammer....
So with both of these in hand, I fired up the 'ol torpedo heater and shampooed the living room carpet while the garage came up to temperature.
If you recall, this is where I left off....
There are still quite a few of those little dents and dimples and creases and....well, it's just a lot of imperfections. So it was time to try the great experiment. But for this blog, I decided it would be better to show and explain it in video than to try and put it into words. So below are two Youtube videos for your to watch. The first is using the pneumatic hammer with the slapping spoon. The second is using the spoon alone with a dolly.
You may notice that the color of the low spots has changed as I used a high-build primer to spray the rear quarter. Then I sanded it and used the new paint areas to identify the spots still needed some work. After an hour of work, this is the result, a noticeable improvement from the picture above.
The dark spots were made by the shrinking disc. It's the heat affected zone and also where the metal got polished by the disc. I then put another couple of coats of high-build primer on the quarter to see how it looks and to be ready when I get back on it the next session. I'll do another sanding job and then continue the process working my way down on the quarter panel. There are still a couple of areas needing attention, but there is progress, especially when I started with this...
...and now it looks like this.....
I do have my doubts that I'll get the bottom section of the quarter panel reworked to my satisfaction, especially since there is a mild body reveal line and the metal at that point is very lumpy, not to mention my access with the air hammer will be limited. As in all things, time will tell.
The decision making process each of us goes through is usually weighted to our individual expectations, needs and desires. That went into the search and eventual purchase of my "other woman," the fastback. Then we spend countless hours in the planning and direction each of us want our beloved Mustangs to go.
Originally, I didn't know this was a 1-of-1 Mustang. "The Plan" was first to do an "Eleanor" tribute car. But that was a 1967. Then the direction was to do a "Bullitt" tribute since our 1929 Ford hot rod was green...1990 Silver anniversary Mustang green. I bought a black console for a manual transmission car and started in that direction, minus the S code 390. Then I ordered the Marti Report that was new at the time and did the option breakdown. Figuring the car was somewhat rare because of the color, I never expected it to be a 1-of-1 car. Bugger. And I wasn't a fan of the "Tahoe Turquoise". It was a girly color and explained in my mind why it sat on a dealers lot for 10 months, not to mention Ford introduced this new for 1969 Mustang called the "Mach 1". But after having this baby for closing on 7 years, the color has grown on me. It won't be bone-stock when I'm done, but it could be put back without too much work. Of course, that direction could still change. (I still like that Emerald pearl 1990 Mustang color).
So where am I going with this? I previously posted that I now have my wings back. It's been fun...sort of. 2 of the airports I would have access to a rental plane are both 45 minutes one-way from my house. They have a 3 hour minimum if you take the plane for a day. So that eliminates long cross country trips. So after much deliberation, coupled with some frustration on the part of one of the airplane operations, I have joined a flying club. Yup. I now own a piece of 4 different aircraft. And the minimum is 1 hour per day. So now those trips to Omaha and Lexington are within reach.
My application (and check for the share) were vetted and I got keys this past Saturday. Today, I met with the club safety officer who is also a flight instructor and works maintenance at FedEx on the aircraft at Indianapolis International Airport where their hub is located.
I've flown a lot of airplanes in my day, but this one is sweet! It's a Cessna 172 S model that has been upgraded to include such nicities as a full color moving-map GPS that is also coupled to a new multi-axis computer controlled autopilot. I still have to get used to how all the tech gadgets work, but I should be up to speed in a couple of more hours. This is one of the airplanes at the airport 15 minutes from my house....
And this is the cockpit with all the toys...
But it gets better. The other airplane they keep there is a new model Cessna 182T. This has ALL the stuff including a full "glass cockpit". The advantage is the GPS in the other airplanes, including the 172 are all the same, and the 'guts' of the glass cockpit GPS is the same. So the transition between aircraft is easy. So here's the 182....
...And here's a look at the glass cockpit...
I'm looking forward to my first cross-country trip with my wife and taking my kids and grandkids for a ride. That will be fun. But do not fret. The Mustang is still in the picture and the next post will hopefully demonstrate 2 new body tools I've picked up to make quicker and better work on that knarled up rear quarter panel.
Saturday has been a busy day. But it seems like that's been the norm lately. My wife is at a retreat this weekend and so I'm a single guy with no real home commitments. However, that didn't mean I could ditch my other obligations including the open house for our church's early childhood center. Then it was decision time for the rest of the afternoon. The weather Saturday was really nice here...light breeze. Sunny. Mild for this time of the year. And not a cloud in the sky. It was calling me to bore holes in it. And the airplane was available. What to do? Fly or Mustang? Fly....or Mustang? The Mustang won. I went home and worked on the fastback. One has to keep priorities in line, right? There will be another day to fly. Plus my wife wants to go with me on my next $100 hamburger run.
From my last installment, it was apparent that this part of the body was going to provide a large challenge in getting it straight. I do have a section of rust repair left to do, but determined that it would be best to get the panel in shape first then do the rust repair.
To do the metal bumping required a full arsenal of body tools, especially hammers and dollies. Here is most of my collection...
I also picked up a dead-blow hammer that is a handy tool to have as well. The first step for the body work was to get out my long sanding board and find out where the high and the low spots were. Here's the quarter panel as it was left before with the etching primer applied...
After a few minutes of sanding with 80 grit on a long sanding block, the high and low spots were quite evident, particularly the larger areas and the creases that seemed to cover most of the panel. It does not look pretty...
To get an idea of where the creases were, I used my paint pen and let it
follow the valleys of the creases. The "dimpled" dents became apparent from the sanding. There were quite a number of them
that will make this an interesting exercise in body work.
To aid in the locating of the dents for the dolly and hammer placement, I cleaned up the inside of the quarter to make that task easier. High spots were shiny and the low spots darker. Holy Mackerel! what am I thinking!?!?!? I must be a glutton for punishment to do this work.
There are two larger round dents right over the top of the wheel well...
I started with these two dents. The reason for starting here were twofold. The first is they are the easier dents to remove as they are symmetrical. The second is that they were the farthest away and would allow me to work toward the more challenging part of the quarter panel.
I was using a couple of techniques that you may or may not be familiar with using body hammers and dollies. First off, the dolly is used on one side of the dent with the hammer applied to the opposite side. The metal for all purposes is sandwiched between the hammer and dolly. How it's sandwiched is the key to metal bumping.
The first is the "dolly off" method. This is when the dolly is pushed against the low side of the dent that you want to bring into alignment with the surface while at the same time hammering lightly around the perimeter. What this does is return the metal close to its original state. Hold the hammer up close to the head. The technique to use is light rapid hammer blows, almost more of a tapping, in a circular motion around the dent. Make sure the hammer hits are flush to the metal and not at an angle. Otherwise you'll introduce more small dimples. Don't be in a hurry, or use a lot of force, and check your progress often. In this case, the hammering is done around the outline of the dent where the sanding marks stopped in the primer indicating the low side. I worked in a circular pattern pushing on the dolly while at the same time slowly working toward the center of the dent on the opposite side with the hammer. The result when done judiciously is usually pretty good, at least on the gauge of the panels on the Mustang and gets the body panel back to the original shape.
The second method is the "dolly on" method. This flattens the sheet metal, but also thins it and causes it to stretch sort of like rolling out dough with a rolling pin. This is when a shrinking hammer comes in handy. This is the Snap-On hammer I picked up a while ago. The "knurls" in the head actually gather the metal together shrinking it. Dollies are also available like this.
Whatever method you use, it is a TIME CONSUMING and SLOW process. Did I say you need to be patient? This is what the panel looked like after about 45 minutes.
The other part of the process I mentioned is to use a flat sanding board lightly over the area you're repairing on a frequent basis. Notice that the areas where the primer remained in the low spots are starting to get smaller. Keep working the dent in the hammer off dolly method. Eventually you will get close to the center of the dent.
As the process continues, the area with the primer will get smaller and smaller until there is a very small or hardly visible area.
Eventually, the dent will almost disappear. But even at this stage, a high build primer will fill the remainder of the dent particularly when it gets down to about a 1/4" in diameter. The trick is to not overwork the area and go too far. Otherwise, you will end up using the shrinking hammer with the "dolly on" method. This is what the finished product looks like...
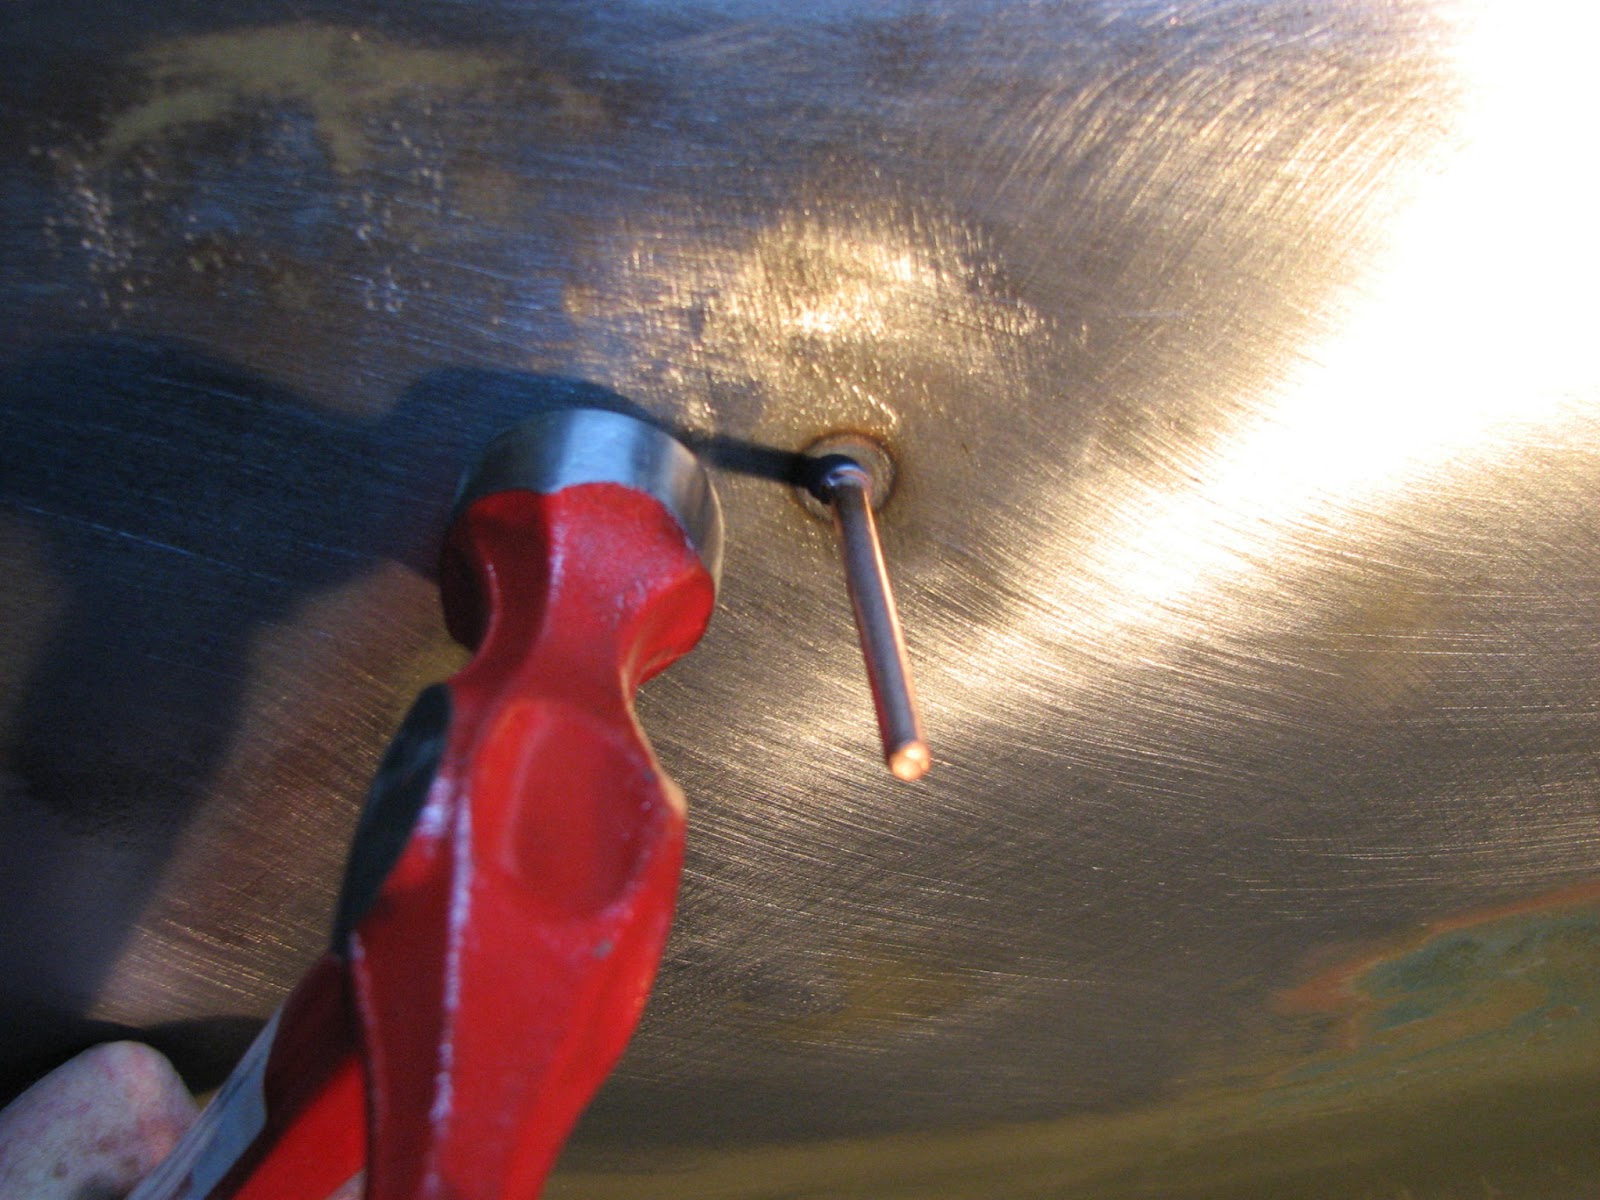
Here's a trick I used since I couldn't get behind the dent furthest toward the front of the quarter panel with a dolly or even a crow bar (yes you heard that right!) So I broke out the stud gun. I was somewhat concerned about using it considering the problems I had previously. But then when I took a look at the end of the gun, the grounding ring was pretty nasty. I took the tip out and used a fine tooth file and dressed it up. Volia! Success. (Lesson learned: be sure your welding ground is clean!)
I cleaned the primer from the dent and then put a stud in the center of it. This is a variation on the dolly off dent removal. The stud takes the place of the dolly behind the dent...
The stud puller is attached but the slide is not used. Instead, pull steadily on the slide hammer while hammering around the stud. When you can determine that the center is even with the rest of the panel, such as using a straight edge next to the stud, you're done. Use a cutoff wheel to remove the stud. Do not...DO NOT try and bend it back and forth. Otherwise you'll end up with a hole where the end of the stud was.
I was out of primer and thought I'd use a can of guide coat since that's what I was using the primer for. Amazing what you can find that you bought before and forgot you bought it when looking for something else.
So I laid down a couple of coats and waited for it to dry...
While I was waiting for the guide coat to dry, I decided to try my newly purchased nylon cone brush on the roof to see how good it would work on cleaning up the "patina" on it. This is the front part of the passenger side roof....
...And this is the after on the rear section. It does a pretty nice job, even if I say so myself...
OK. So the guide coat was dry...
This is after making a pass with my sanding board with 80 grit...
I kept moving the direction of the repair work from over the wheel well toward the rear of the quarter and moving down simultaneously. Think of it as working the panel in a pattern in the opposite direction as if dropping a rock in a pond...in a wave pattern since most damage travels through a panel in a similar matter. You're following the wave pattern but backwards. Here's the panel after working across the top and moving down into the middle of the quarter panel...
The size of the creases and dimples have been dramatically reduced. There is progress, but the metal was starting to bunch up with high spots. That needs to be fixed.
I could used the shrinking hammer but that would take tons of time. So... I've been saving the best for last. It was time to break out the heavy artillery...
Meet the shrinking disc. This is a 9" diameter stainless steel disc with a slightly upward curve at the circumference somewhat like a plate. It acts very similar to using a torch except the heat is only applied to the high spot that you're trying to shrink and doesn't affect a wider area like a torch would...
For a treat, here's a short video of how this works.
After getting a couple of the high spots back in place, I worked some more on the little blemishes--i.e. the little dents and creases. I will tell you this; God bless the person who came up with the auto rotisserie. I can't imagine working in some of the physical positions to do this work without being able to rotate the body for the best leverage. So after almost 4 hours of hammer and dolly work, this is the progress...
This is looking down the quarter panel line. It's looking pretty good. If I keep this up, I may get by without any filler and use just a high-build primer.
I stopped here because I literally ran out of strength in my arms and shoulders after 4 hours. I didn't even attempt to pick up the garage. That can be done later...or I can just leave it until I get to continue this lovely process.
With our current winter weather pattern, my garage space has been rearranged to accommodate my wife's car that we affectionately call "Little Red", a 2010 Ford Fusion SE with 3 pedals on the floor (if you know what I mean). This keeps me from having to clean off snow, frost, freezing rain, and whatever other combination of winter precipitation that decides to fall from one vehicle (mine) instead of two. Living in central Indiana, you never know from day-to-day what the weather will be.
Garaging a daily driver however has its drawbacks from a Mustang perspective. And that is ease of setting up shop to work on it. The fastback is pushed to one side, support tools such as a workmate, work light, and other miscellaneous items are stored underneath it. The metal working tools, hand, electric, and air powered, are put away in their respective tool boxes stacked next tot he work bench along with the welder. Yesterday afternoon, Little Red was relegated to the outside and I set up shop to start tackling the next project on the body--the right rear quarter panel.
In a way, I had already started on it with the repair of the rusted trunk corner and top of the rear quarter in my recent previous posts in December. I knew I had a small area of rust in the lower section of the quarter to fix. I also had some major damage to it as well to repair. I decided to tackle the metal bumping and shaping first. Part of the reasoning for doing the dent repairs was that I didn't want to invest my time in fixing the rust only to find that I couldn't get the quarter panel back into shape and end up replacing it anyway. The progress here and following will determine that decision.
I didn't have a really good "before" picture as I've been somewhat working on this panel off and on over the time I've had the fastback. According to the previous owner, the guy before him stored the Mustang outside next to his barn. Why not inside? Who knows. The story goes that a couple of cows got loose and in the scuffle ran into the rear quarter panel. Funny though...I didn't find any Guernsey or Hefer cow marks on it. :-) This is the best picture of how the panel looked upon arrival at my house.
The first order of business was to strip the paint and surface rust off of the rear quarter panel. I did snag one of the 6" nylon cone brushes for my large grinder on Amazon, thanks to Sven's link here. I got it on Thursday and was anxious to see how it would work.
This is what I started with as far as paint and surface rust on the lower half of the quarter panel. I had already from before used a wood buck to push out as much of the larger dent as possible.
The nylon cone brush did a great job of ruffing up the surface but wasn't aggressive enough to take the paint off with any speed. In all fairness however, the nylon brush will be helpful on the inside of the body to prepare it for rust inhibitor and primer. It's really designed to rough up pick up truck beds before bed liner application. So I got out one of the stripping pads I bought from Eastwood a while back and used my 4-1/2" grinder to strip the panel.
The Stripping disc I got from Eastwood
After about 20 minuted of work, I had the rear half of the quarter panel stripped to bare metal.
The top rear section cleaned up
The bottom rear section cleaned up
From the reflection of the metal surface, there are obvious waves, creases, and dents that will need to be massaged out of the panel. I used my wooden buck that I made from a 2"x4" back when I was working on the driver's side floor to help form the radius to the transmission tunnel. I started at the top of the dent and walked the buck downward while hitting the end with my hammer. It worked well but still left some of the hard to reach and more sharply and deeply dented places behind. I used my collection of body dollies and hammers to work out the bigger stuff. Where I couldn't get behind the panel easily, I used my stud weld gun to pull the dents out.
This worked "OK" but for some reason, the studs did not all cooperate. About 1 out of 4 broke loose from the body while either putting the slide hammer on the stud or after just 1 or 2 hits. I'm not sure if it's a stud, gun tip, or power problem with the gun. But I was definitely not getting the penetration needed. The internal gun breaker was also tripping if I held the trigger longer than 4 seconds. The other problem was with a couple of the studs pulling the panel out but then breaking off leaving a nice 1/16" pin hole to repair later. That should be no problem with the practice I've had, right? (LOL!). After the stud welding faux pas (i.e. blunder) I reverted back to the hammers and dollies. I did make progress, but it's slow going getting it back into shape.
Upper right quadrant of the panel after stud welding and some hammer and dolly work.
A shot of the entire rear half of the quarter panel after the first round of work
Time was starting to run out, especially with a large stock pot of Kentucky "Burgoo" on the stove simmering away to be consumed during the Superbowl. If you've never heard of Burgoo, you can read more about it here. If you're interested in making it, there's a recipe on Food.com here that you can use. I have my own recipe that emulates more of the Owensboro / western Kentucky style. But I digress....
I wanted to protect the bare metal and also get a read on how much of the dent and straightening process was going. I could feel and see only so much especially with the bare metal and all the stripper and cone brush marks. I shut down the torpedo heater and let it cool down. I got out some etching primer and laid down a dust coat followed by 2 full coats. I took these pictures before the primer had totally dried. I didn't want to start the torpedo heater up with all the paint fume as that could really spoil a person's day with a flash fire. After paint application some of the dimples from the stud welding are still visible, but the depth of the dents has been reduced quite a bit on this upper right quadrant of the panel.
The bottom left half of the quarter however is where it really looks ugly. This is going to take a heap of time and patience to get the contours close enough since I don't want to have more than .030 thickness of body filler in any one place if even that much.
I have a couple of methods I'm going to use to work the metal particularly in the lower part. One I've tried with good success. The other I've dabbled in but will see how well it works. Like I said before, the worse that could happen is that I cut this panel out and replace it with a repo part. But I'm going to do my best to keep as much of the original sheet metal on the body as possible.
Until the next installment, it's off to get some burgoo and watch some football.