Sunday, September 23, 2012

Passenger Side Toe Board / Firewall Repair - part 2

Since my last entry, I placed an order with Eastwood for a new replacement air saw.   I've had good luck with them particularly when it comes to any issues with the equipment they sell.   Again, my window of time was limited this afternoon, but I wanted to get the toe board/firewall patch bucked up for a good fit to the firewall before trying to trim it to fit.  The first task was to measure the offset of the contour in the new part versus the firewall.  The vertical line on the left with the arrow pointing to the left was the marking for the material I needed to remove to get the contours close to matching up.


After removing the end piece, the contours were close to being dead-on...


Now I had to deal with the newly created offset in the ribs in the toe board versus the replacement part.  This was relatively easy to sort out.  The offset was virtually one rib width as marked below...


 I needed to add this amount to the right side of the rib in the replacement part to move the rib back in alignment with the existing floor.  The vertical line on the left in the photo below was the first cut line...


Now with the cut made, I needed to fabricate the filler piece.


With my measurement of the width I needed, I drew the cut line in the excess end of the replacement part I didn't use for the patch...


After I cut out the part, I used my 2" air sander to smooth up the edges to get a nice fit.   Then I used my nice welding clamps to get the fit initially in place. 
 

 I did have to do some "massaging" of the filler part with the other two pieces to get a good even surface.   Then came the job of doing some initial spot welds...


I removed the clamps and then rechecked the alignment of the joints. But before getting to far ahead, I checked the fit of the replacement part with the firewall.  It looked good from the inside....


...and pretty good from the outside.  By the time I do the final trim to fit, it should be fairly close, especially after some hammer and dolly work...


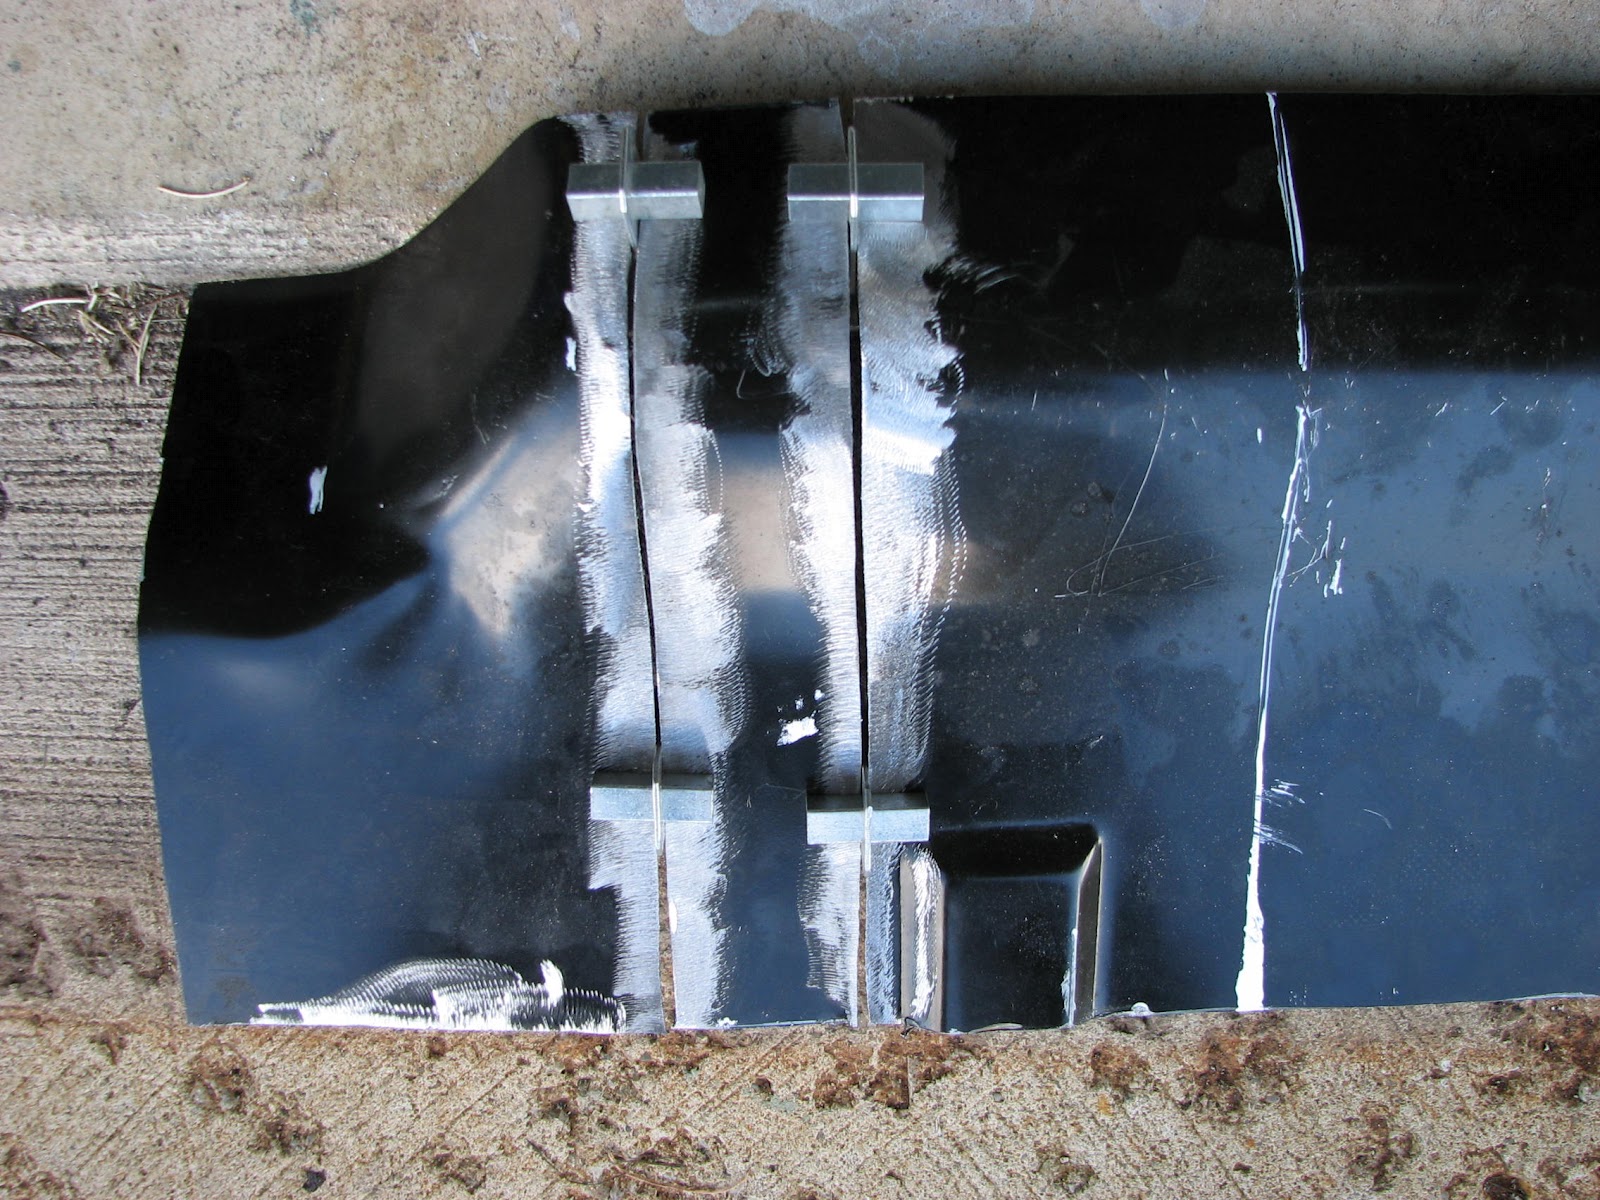
The spot welding continued until I was confident that the joints were plum and flat with the mating parts using the body hammer and dolly every half-dozen welds.  A quick hit with the 2" air sander and this is the result...


I had to stop here since I had some meat (AKA smoked beef brisket) that needed my attention as well.  The metalwork could wait.  The brisket couldn't.   I'll get back on this and get the joint metal finished later this week, or by the weekend at the latest.  Then I can get the final trim and hopefull start the install process and finally, FINALLY get the metal on the floors done.  Until then, a man's gotta eat, right? :-)

Sunday, September 16, 2012

Passenger Side Toeboard/ Firewall repair

Fall is almost here.  With our drought that plagued us for most of the summer, August brought us more seasonal temperatures and...rain...lots of rain.   My lawn tractor has been idle from Memorial Day weekend until the first week in August.   It took about two weeks for the grass to rebound.  Since then, the grass has decided to grow profusely.   I'm mowing every 4-5 days.  Apparently the Scotts fertilizer I put on days before the rain stopped decided to kick in.   So I'm really back to what I normally do during Indiana summers.  I'm just out of the habit.   But it also is cutting into garage time, especially since all the fall lawn work and prep for winter is beginning.

Yesterday was a full day.   I needed to finish up  work for Sunday (sermon, power point for Bible study, and updating the church Facebook and website, etc),  cutting the acreage, stopping by Lowes for grass seed, seed mesh, deck wash, and other various and sundry item, and get some major bare spots reseeded before the rain arrives on Monday.

So Sunday afternoon afforded me some time to start on the toe board/firewall repair on the passenger side of the car.   I suppose I have only myself to blame, but I wish that I had spent more time cleaning up the surface rust on the toe board and firewall before starting any floor repairs.  But, it is what it is.

 Even with the advantage of the rotisserie, it was, shall I say, not a pleasant experience, especially since half-way through the process my air saw decided to implode.  (Note to myself:  don't buy one from Harbor Freight again)

I cleaned up the area with my 4" grinder using a 24 grit lap sanding pad, just to be sure I was catching all the badness.  Then I marked the area to be removed with my metal triangle and paint pen.  The "wheel of death," air chisle, 2" air sander, and the air saw (until it died) were the tools of the trace to remove the old sheet metal.  


This is a view from inside the engine bay looking at the intersection of the firewall, toe board, and rear fender apron.

This is a view from the passenger side outer fender well at the intersection of the toe board, torque box, and rear fender apron.  Really not pretty.

I marked out where the rusty area was that needed to be removed, plus an extra margin of safety.  Then came the process of removing the offending area.


The cutting took some time since I was trying to troubleshoot the air saw.  That sucker really worked well, as long as it worked.  But I finally gave up after I found out that two of the screws that held the head in where the blade is inserted decided to strip out.   Again, it pays to buy quality tools.

I got the outer piece removed....


And then  the inner piece removed....


I used my air chisel  to remove the sheet metal around the spot welds since I couldn't identify where they were on the inside.  I didn't want to spot weld drill through the two layers of the torque box to get to the toe board.   So the chisel worked well.


 I put the pieces together to get an idea of where to measure the new panel for the initial cut.   I love jigsaw puzzles!


This is the replacement panel I got from Kentucky Mustang.  It was similar to all the other sources, like NDP, Mustang's Plus, etc.   So I pulled the trigger on the part that offered the least total cost.  Kentucky Mustang charges $9.95 for shipping on all part.  So when you're looking for parts, give them a look.  They've been great on the phone and in person when they were at the Indy Mustang Club show.

You may notice that I started the cut on the paint line, but this is where the air saw died.  Out comes the "wheel of death".


 After the painfully slow process of cutting the piece out I needed, this is what I had...

I cut the piece out I needed and got rid of the "mystery flange" that is there to stamp the part.
 It all looks good...until the fit up.  The ribs are different size (larger) than factory.


And if that wasn't enough to make life interesting, the stamping in the lower right side of the firewall was off....WAY OFF!

The gap at the stamping was a good 1/2-3/4 inch off.
 It's more noticeable from the fender well side.   Great.  I love fixing other people's screw ups.  But that's how aftermarket parts work.  I've have never...NEVER...(did I say never?) had one part that fit correctly...China, Canada, Dynacorn, and even Ford stamping.


I'll have to rework the step in the toe board to firewall transition.  I look at these situations to hone my metal working skills.


This isn't too bad, but it will play into the reforming of the lower right-hand corner.
I called it quits, especially since I was listening to the Colts-Vikings game and the Colts were within 1:50 of winning the game...or going into overtime.  Besides,  I was up since 6 AM and tired from yesterday's yard exercise.  It will also give me some time to think through how I want to handle the metal forming of this part.   That's why I leave extra metal.  I've learned from previous experience (check out the post on the driver's side floor) that I need to leave plenty of extra metal, just in case.

This coming weekend, my wife has to work on Saturday afternoon.  I plan on getting this blinkity-blank part formed to fit.  I may even be able to start the install.   However, I will wait to see how the week plays out.  "The best played plans of mice and men" don't always work.

Sunday, September 9, 2012

Driver's side floor repair--part 5

The window of opportunity opened for my Saturday afternoon for me to get back on the floors...again.   It was back to the same-'ol, same 'ol thing of trying to finish up the metalwork from a welding standpoint.

So from my past posts on the floor, you know the drill.  Back light the floor, mark the pinholes, weld up the pinholes, grind the welds down.   Repeat.  Eventually I got them all taken care of, or at least those that were visible.  It's not going to be a structure issue, but an appearance issue.   I remember one foreman on one of the final assembly areas when I worked at Trane Company.  He had a sign hanging behind his desk that read, "There comes a time in every project when you shoot the engineer and get on with production."   That's where I am.  I've done about all I can within reason.  I'm calling the floors done.  Yes, you heard that correctly..... Floors!


I got the work on the firewall and toeboard on the driver's side about as good as I can without becoming so anal it turns into a competition for the Ridler Award.


There were a couple of pinholes in the outer toe board area.  This seam was a tough one to get to on the outside, but it's going to be covered eventually with the factory undercoating.  The driver's side was done!

The next step was to work on the passenger side floor and clean up the seam.  This side of the floor was my first major work on the car and I did the 1/2" overlap as recommended by Vail's Classic Cars in Greenfield, Indiana.  They do a number of Mustangs along with some Mopars.   This was before I discovered Dave Scribling in Crawfordsville who was a big proponent of the butt weld joint.  Hindsight being 20/20, I would have done the butt weld on the passenger side.  But I decided I didn't want to redo everything.  So I hammer and dollied the lap of the trans tunnel to the floor pan.  Then came the tedious job of all those spot welds spaced an inch apart.  Then going back and putting one in between those, and on and on and on....


In between passes was the grinding down of the previous spot welds, especially when the space between them was the diameter of the weld.   I also used that piece of sheet metal with the funny bend in it that you see sitting on the frame rail in the picture above to pull the floor into shape.  I tacked it to the low spots and then used my slide hammer to get the contour of the floor back as close to factory as I could.  This was another fallacy of using the overlap method versus the butt weld method.


After a half dozen passes of spot welding and fixing pin holes, I called it done for metalworking.


The floors are ready for the repaired joints to get a skim coat of Everlast "Metal-to-Metal" body filler.   I'm going to hold off however until I get that passenger side toe board repair done.  Then I'll do the whole floor and firewall at one time.   I must say, I've spent more time than I ever dreamed of working on a part of the car that will not be visible, especially after everything is installed back in the car, like the drive shaft, exhaust system, etc.   So, it's time to shoot the engineer and get on with production.

Wednesday, September 5, 2012

A Different Kind of Labor Day Weekend

I had known for a few weeks that my Labor Day weekend would be "car-less" as far as work on the fastback would go.  My wife committed us to watch our 2 and 4 year old granddaughters so that their mom and dad could get away before #3 arrives in December/January.

This is also a big weekend around here since the US Nationals take place at raceway park.   John Force has a huge open house the first opening day of the nats at his shop in Brownsburg, Indiana.  There's a car show, a tour of his racing shop, and John and all the drivers of John Force Racing are available to sign autographs.

My day was a little full, but I swung by on the way home to see what cars had shown up.  It was a real potpourri of wheels from a 1918 Marmon to a 2013 Boss 302 and everything in between.


A couple of the cars really hit home with me, especially the two 1966 Ford Fairlane hardtops.


This white one was like mine, the very first car I owned except it had a 427 V8 instead of a 289 like mine and it had a black  interior instead of red.   Still, it was a nice clean car.


This was a really nice 390 GTA with buckets and a console, power steering and disc brakes.   I passed over all the bowtie stuff.  (After all, I'm to the point you see one 67 to 69 Camaro, you've seen them all.)


This was a very nice '67 fastback that was done in a mild restorod fashion.  It had and aluminum radiator and side exit exhaust, just to name a few items.   The owner wasn't around, but I would guess that SBF was not a stock 302.

One vehicle turned my head and not because of what it was, but because of what color it was...


The color is called "Frosted Glass".   Well, if this isn't a redux of "Tahoe Turquoise" I don't know what is.  It is almost spot on for the color of my fastback.   I'll bet that when I'm done, people will think I painted it a 2013 Escape color.   It only took 45 years for the color to become popular again....that is, if it ever was.

So that was the John Force show.   With the remains of Hurricane Isaac closing in and threatening the remainder of the weekend, my wife and I decided to take the kids to th Indianapolis Children's Museum.  There was a special "Hot Wheels" exhibit that was pretty cool.  They had the actual cars that were designed and built from Hot Wheels models.   But the star of the show was "Bumblebee" from the Transformers movies.  They had a rather unique demonstration for everyone there...


The rest of the weekend was filled with movies and lots of play time.   By the time my daughter and son-in-law picked up the kids on Monday afternoon, I was ready for a nap.

For right now, I'm trying to shake off a cold courtesy of our bizarre weather pattern and fatigue.  I'm hoping that this weekend will afford me with some time to get more work done on the floors and then move on to other deserving areas.    Until next time.....

Wednesday, August 22, 2012

Help Wanted...

Anyone you know looking for a job working in an auto restoration shop?  I got word that Dave Scribling is looking for help.  He is the owner of formerly DVS Restoration Services, now called Dave Scribling Restorations.   He made headlines with his now famous '68 Fastback, "Mustang in Black" or MIB.   Here's the link from the article in "Modified Mustangs and Ford" magazine...

http://www.mustangandfords.com/featuredvehicles/1964_1973_mustang/mufp_0603_1968_ford_mustang_fastback/viewall.html

Dave spent years using this as his "mule" car to develop a kit to put a 2003 Mustang Cobra 4.6L V8, along with front and rear suspension into a classic Mustang.   I saw this car 3 years ago when he brought it to Indy Raceway Park during the Indy Mustang Club show.   It's even more stunning in real life!


If you know anyone who would be interested in working for his growing business, have them send an email with their resume to  dave@davestriblingrestorations.com.   His shop is located in Crawfordsville, Indiana, about 45 minutes northwest of Indianapolis near I-74.

Please pass the word.  It could be someone's opportunity to get into the restoration business.  And in this economy, it could be a boost to someone needing a job.   Thanks.

Sunday, August 19, 2012

Driver's Side Floor - Part 4

As most everyone knows, it's been a really, really hot, HOT summer here in the midwest.  I haven't spent much time working on the fastback since the heat has been so bad.  I decided that I needed to get some sort of AC for the garage in an act of desperation.  I've been checking Craigslist for a used AC to keep my bones cooler.  Finally, after 7 weeks, I found one and was able to close the deal before I got beat out on the buy.  So now, I have this nice AC window unit that will let me hang meat in my insulated garage after an hour....


However, after my purchase, the temperature hasn't broken 84F degrees since.  Go figure.

One interesting facet of getting the AC was the guy I got if from had a '69 Chevelle in his garage that he owned since he was 15.  The restoration was complete and he no longer spent time in his garage working on the car for hours.  It was a sweet car for a Bowtie...454 with Donavan heads, roller cam,  a 5 speed Tremec and a 9" Ford rear with 3.91 gears.   It was mildly tubbed and has a great paint job in a deep blue with ghost flames.  He, like I, have determined, that drag racing gets expensive really fast.  It's great to meet another car guy who appreciates each others cars.

So, I now have the capacity to cool the 3 bays of garage with 12,000 BTU'S of cold air.  But there's still the problem of ventilating the garage of MIG welding fumes.   Well, I didn't have to worry about it since it was 79F degrees this afternoon.  That made it  a good day to get some work done.  ( I won't bore you with the details from Saturday that amounted to finding a place to put a new (used) freezer in the garage and the cleaning/reorganizing carnage that took place instead of working on the fastback.)

I'll skip the details of working on the drivers side floor getting the metalwork done--the welding and grinding...followed by more welding and grinding..  It was a matter of getting the joints between the floor pan the toe boards to the point where I felt comfortable putting a skim coat of "Metal-to-Metal" body filler on the joints to make them look acceptable to me since I am the customer I have to please on this whole restoration thing.

After 4 hours of chasing pinholes in the welds, I'm getting close to calling the bottom side of the driver's side floor "done".   Sort of.

I guess I'm too picky.  I see a little pit, or I see another pinhole, and need to dress it up.  I finally had to close up shop since I used up all my consumables...basically the 2" disc I use on my 90 degree air grinder.  But progress is progress....

This is the rear half of the driver's side floor....

This is the the floor at the transmission crossmember....

This is a view of the front firewall toe board....

This is the driver's side lower toe board/firewall repair....

Another shot of the driver's side floor to transmission tunnel joint.

This is the driver's side joint of the new front floor pan to the existing rear floor pan.
I figure I'm about 90% done with this side of the floor.  I have some work to do on the toe board that's outside the engine compartment along with the inside to fill....you guessed it... the remaining pinholes in the welds.   Once I get that done, I'll begin the process of using the "Metal-to-Metal" body filler to make all the little pits and dips level.

I never imagined in my wildest imagination that I would be doing bodywork on the underside of a floor!  How sad is that!  But, as I've said before, I'm building this for me and if I'm not happy, then what's the point?

I'm hoping to finish up some of the picky-uny stuff on the floor and firewall this week.  Then I'll smear some filler on it and see how the results look.  I'm hopeful it will look good.

Then there's still the passenger side to do.  Oh well...It's all part of the process, right?

Monday, August 13, 2012

What's it worth?

My cousin, Betty, has decided to part with her 1967 Mustang coupe.  What cemented her decision is the death of her brother last week since he was the one who did all the mechanical work on the car.  I hate to see her get rid of it and I'm sort of tempted to buy it, but then I'd have two projects again.  That the reason I sold my Kawasaki 750 LTD because I was working on it to make it nice and the Mustang sat orphaned in the garage for a year.   She lives in the Louisville, Kentucky area. 

The '67 is an "OK" car, but in need of work to make it a nice car.  It has a clean and clear title.  I'm in a quandary  about the car and what happened to it in the past since it's a 67 with 68 rear quarters on it.  It's a 289 2V that is stock, sans dual exhaust, headers, and a retrofit Duraspark II ignition system.   It has power steering and I believe power drum brakes--or the pedal has the power brake chrome circle on it.  The wheels and tires are in nice shape.  She had the Mustang's Unlimited "Grab-a-Trac" suspension put on and ran it in SCCA events on-and-off.   Here are some pictures of it as it sits.  I was limited to the camera on my phone and so the quality isn't the best, especially with my fat finger over part of the lens.


I am not sure of the miles on it and forgot to look since I took these pictures right after going to Betty's house after the funeral and needed to hit the road to get back home.

Some of the bad:  The front floors for sure will need to be replaced.  There is visible rust there.  The paint is so-so and is showing some popping off at the rear quarters and edge of the vinyl roof.  I noticed the driver's side front apron has signs of a collision as there are wrinkles in it.  The radiator cross member and support look OK though.  It looks like the right passenger seat either has a seat cover on it or is upholstered in a different fabric.  The back seat looked OK.

I drove this right after the front suspension work a few years ago and it's a nice driving Mustang.  It's no powerhouse, but everything works that I know of.  I'll get in contact with my cousin and find out mileage, VIN, and see if she can take some more pictures, especially the underside. 

So fellow Mustanger's, what would you think something like this would be worth?   Any suggestions would be appreciated...and any reasonable offers considered.